background image

WPA1200 Product Reference Guide 


36 


2.  Tap the automatic shut off time arrow to select from a list of time periods. The available time periods are 1, 2, 

3, 4, and 5 minutes. 
 

This function can also be activated when the WPA1200 is plugged into the power adapter or placed in its docking 
station by tapping the 

On external power 

check box and then tapping the arrow to select from a list of time 

periods. The available time periods are 1, 2, 5,10, 15 and 30 minutes


Adjusting Backlight Setting


The power consumption of the LCD backlight is high.  You can turn off the backlight function if it is not necessary.


If a backlight is required, set the “automatically turn off the backlight” function.


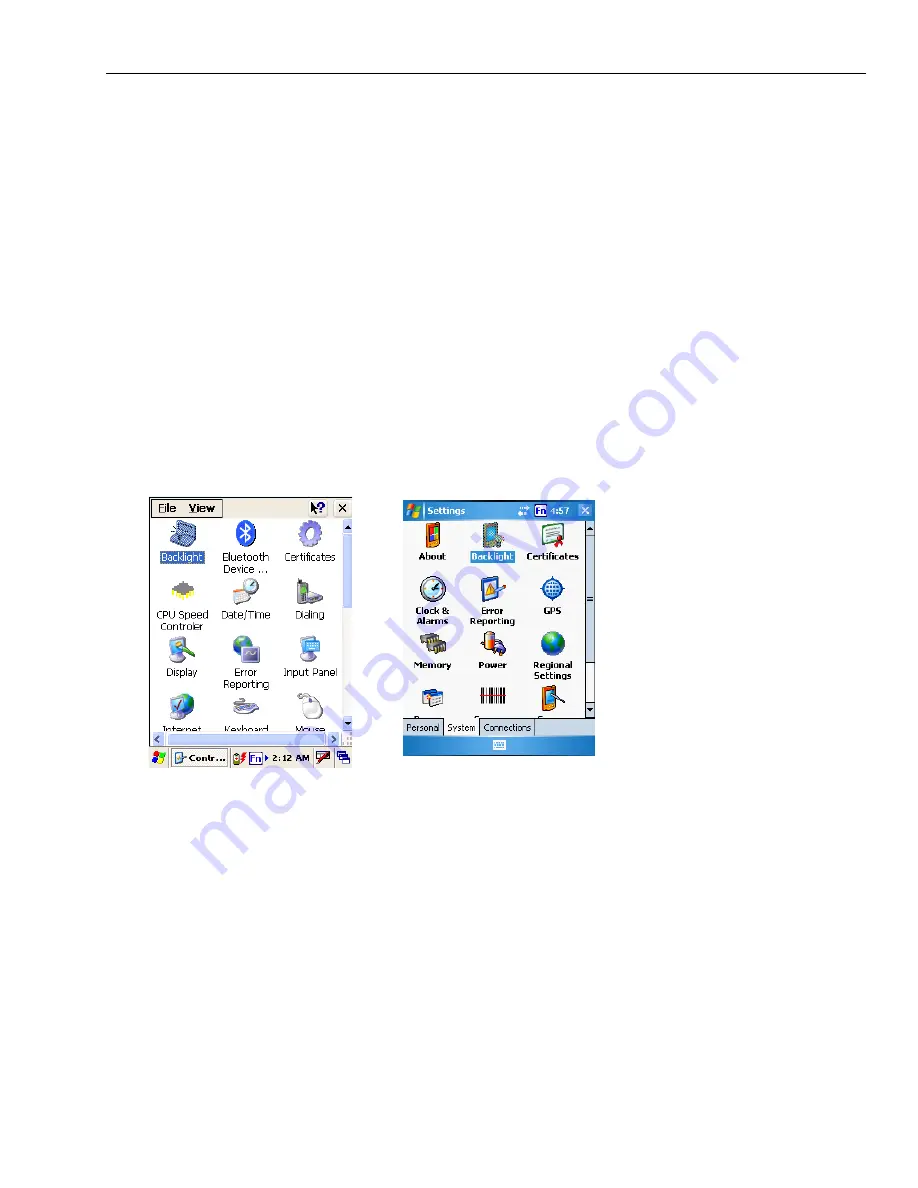
To change backlight settings:


1. 

CE .Net 5:

 Tap 

Start


→ 

Settings


→ 

Control Panel

Windows Mobile 5: 

Tap 

Start


→ 

Settings


→ 

System


2. Tap 

Backlight


3.  Do any of the following:


• 

In the Battery Power tab, tap the 

Dim LCD Backlight if device is not used for:

 check box 

and select the amount of time before the unit turns off the backlight while running in battery 
power mode from the drop-down list. 
 

• 

In the External Power tab, tap the 

Dim LCD Backlight if device is not used


for: 

check box 

and select the amount of time before the unit turns off the backlight while running in battery 
power mode from the drop-down list. 


CE .Net 5 

Windows Mobile 5

Summary of Contents for WPA1200

Page 1: ...WPA1200 Product Reference Guide Wasp Barcode Technologies 2007...

Page 2: ...3A AC DC adapter and recharge the unit for 16 hours in order to fully charge its backup battery The backup battery will charge from external power or the main battery if the main battery still has en...

Page 3: ...3 Using the SD MMC Memory Card 13 Using the Laser Scanner 14 Chapter 3 Getting Connected 16 Establishing Device PC Connection 16 Connecting the Device to Your Computer 19 Synchronization with your Com...

Page 4: ...ile 5 0 Windows CE 5 0 operating system Intel PXA270 processor with speed of up to 520 MHz System memory 64 MB SDRAM 128 MB Flash ROM Display 3 5 inch QVGA LCD touch sensitive screen 320 x 240 resolut...

Page 5: ...sal Plug Battery Pack Stylus USB Charging Cables Elastic Stylus String CD ROM Quick Start Guide Package Contents After opening the box ensure the following accessories for the WPA1200 are present If a...

Page 6: ...ly when the unit is on this key must be pressed and held down for about two seconds in order to turn the device off 4 Microphone Enables you to record voice audio 5 Universal Connector Connects your d...

Page 7: ...er Attachment location for holding hand strap carrying strap and stylus 15 Memory Card Slot Accommodates Secure Digital memory cards 16 Barcode Scanner Window Used to scan barcodes This is the window...

Page 8: ...s in your area A backup battery cell is embedded into your device to prevent data loss in instances when the removable battery pack is removed or completely discharged This backup battery cell will on...

Page 9: ...tacts in the compartment and the battery is placed on top of the plastic tab as shown in the following illustration 4 Slide the battery pack into the battery bay while simultaneously pulling the secur...

Page 10: ...tored in RAM memory When the main battery is removed the backup battery retains RAM data in memory for 2 hours please charge the battery to avoid the data loss in RAM memory Note Data you entered may...

Page 11: ...ctor button on the USB charging cable and connect it to the WPA1200 1 2 Plug the USB connector into the USB port on the PC and connect the AC adapter into the USB connector 2 3 Connect the AC adapter...

Page 12: ...tart Settings and then click the Control Panel tab 2 Tap the Stylus icon on a CE Net 5 device or the Screen icon on a Windows Mobile 5 device 3 The Stylus Properties window appears on the CE Net 5 dev...

Page 13: ...nce Guide 10 4 Tap the cross hair firmly and accurately The cross hair moves to the next location 5 Continue tapping the cross hairs until the screen has been calibrated CE Net 5 CE Net 5 Windows Mobi...

Page 14: ...green function button is pressed the green icon options on the keypad become available When the Function button is pressed an icon appears in the operating system The following table describes the key...

Page 15: ...Key __ Enables Disables Secondary Key Functions Tab Windows Key Opens Start Menu Alphanumeric 7 p q r s Decreases Screen Brightness Alphanumeric 8 t u v Down Navigation Key Alphanumeric 9 w x y z Inc...

Page 16: ...a menu lightly tap the tip of the stylus on that choice 3 To write data into a field on a form use the stylus to print the letters or numbers Use very light pressure Using the SD MMC Memory Card Your...

Page 17: ...has been released 4 Remove the card from the slot Using the Laser Scanner The WPA1200 has an integrated laser scanner that reads all major bar code labels Note Scanning software must be enabled in or...

Page 18: ...CE Net 5 To test the barcode scanner tap the Test tab a Tap Tools b Tap Enable Scan c To perform auto scan Tap Tools Auto Scan Start Auto Scan d Choose Interval 3 secs e Tap Start f Laser scans every...

Page 19: ...application in Vista is called Windows Mobile Device Center You can skip the Install Microsoft ActiveSync section below but you must complete the setup steps The Vista setup process is similar to tha...

Page 20: ...WPA1200 Product Reference Guide 17 5 Accept the license agreement terms and click Next You are prompted for user information 6 Type the user name and organization and click Next...

Page 21: ...or the destination folder 7 Select a drive to install the program and click Next The installation wizard has gathered the information it needs to install ActiveSync and prompts you to begin the instal...

Page 22: ...the other end of the USB charging cable into a USB port on your computer 3 Turn the device on ActiveSync starts automatically and configures the USB port to work with the WPA1200 The New Partnership s...

Page 23: ...llowing ways On your computer double click My Computer Mobile Devices folder Connect the USB cable between the computer and WPA1200 Execute Rellpog from the WPA1200 Windows directory Connection Option...

Page 24: ...d rate or cable type connection 7 Tap OK Infrared Connection The infrared port allows you to synchronize information with an infrared enabled computer Align the infrared port of your device with the i...

Page 25: ...ed and within close range b Initiate connection by tapping Start Settings Control Panel PC Connection c Select Enable direct connections to the desktop computer using this check box d Tap the Change C...

Page 26: ...point Bluetooth wireless technology allows you to communicate with the computer whenever it is within range Follow these instructions to set up a Bluetooth connection on a CE Net 5 device 1 Tap Start...

Page 27: ...in in the box provided 5 On the PC screen you are prompted to enter the Bluetooth PIN Code 6 Enter the same pin as you entered in step 4 On the WPA1200 select a device from the list and select Active...

Page 28: ...ich COM port was selected look in your BT dongle or integrated BT settings 8 On the WPA1200 tap Start Programs ActiveSync Menu Connect via Bluetooth Follow these instructions to set up a Bluetooth con...

Page 29: ...entered in step 4 6 On the WPA1200 tap Partnership Settings Check Serial Port Finish 7 On your PC click ActiveSync Connection Setting Select COM Port OK When you installed your Bluetooth dongle or se...

Page 30: ...an be added either when the network is detected or by manually entering settings information Before doing these steps determine if authentication information is needed For CE Net 5 Devices 1 If the WI...

Page 31: ...wing network connection options All available Only access points Only computer to computer 6 When finished tap OK For more information on how to configure the wireless network settings tap Start Help...

Page 32: ...ne location will not affect the information on the other one If you want to automatically update information on both your device and computer synchronize the information instead You can copy two types...

Page 33: ...your device right click the file and click Copy Place the cursor in the desired folder for your device right click then click Paste To copy the file to your computer right click the file and click Cop...

Page 34: ...er port to any aware active focused text editor such as MS Pocket Word Scanner Setting When it is necessary for the user to change the default barcode symbology for a different application the Scanner...

Page 35: ...ts Function Code Double label decoding data length double labels separator Code 93 Yes Yes data length Deta Code Yes Yes Yes EAN128 Yes Yes Transmit Code ID Field separator EAN13 Yes Yes Yes EAN8 Yes...

Page 36: ...art Settings Control Panel Windows Mobile 5 Device To access Settings tap Start Settings The Control Panel screen appears From here you can adjust such user configurable items as the backlight auto po...

Page 37: ...he icon to bring the Power Properties screen On CE Net 5 Devices Tap Start Settings Control Panel Power On Windows Mobile 5 Devices Tap Start Settings System Power Note Press Fn key and 8 button 2 The...

Page 38: ...it was at the time of the automatic shutdown To change the automatic power settings on a CE Net 5 device 1 In the Power screen tap the Schemes tab 2 Tap the Switch state to User Idle Switch state to...

Page 39: ...the backlight function if it is not necessary If a backlight is required set the automatically turn off the backlight function To change backlight settings 1 CE Net 5 Tap Start Settings Control Panel...

Page 40: ...d 4 CE Net 5 To set the Intensity brightness tap and drag the slider to choose a dimmer backlight when operating on battery power Windows Mobile 5 To set the Intensity brightness in the Brightness tab...

Page 41: ...orm a reset if the device freezes i e device no longer responds to the buttons or tapping on the screen A soft reset or Warm Boot allows your device to get a fresh start similar to rebooting a compute...

Page 42: ...asing all records and entries deleting all programs you have added and restoring the device to default factory settings Never perform a hard reset unless a soft reset does not correct your problem Whe...

Page 43: ...settings All registry settings and all files including any hidden files are returned to their original factory defaults Method 2 1 Press and hold the TAB key 2 While holding the TAB key insert the ti...

Page 44: ...th Modem Bluetooth ActiveSync Audio MIC Speaker Headset Connector Receiver Main 3 7V 1950mAH Li ion battery pack Power Source Backup One rechargeable Ni MH backup battery Weight Under 300g with batter...

Reviews: