WINCH MANUAL
WINCHING TECHNIQUES A-Z
8
WINCHING TECHNIQUES A-Z
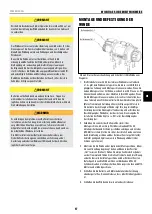
a. Take time to asses your situation and plan your pull.
b. Put on gloves to protect your hands.
c. Disengage the clutch where possible to allow free-spooling and also
save battery power.
d. (If supplied) Attach the hand saver hook to the clevis hook.
e. Pull out the wire rope to your desired anchor point safely.
f. Secure the clevis hook to the anchor point: Sling, chain or snatch block.
Do not attach the hook back onto the wire rope.
g. Engage the clutch.
h. Connect the remote control lead to the winch.
i. Start your engine to ensure power is being replenished to the vehicle
battery.
j. Power in the wire rope guiding the wire under tension to draw up the
slack in the wire. Once the wire is under tension stand well clear. Never
stand or step over the wire rope under tension.
k. Double check your anchors and make sure all connections are secure.
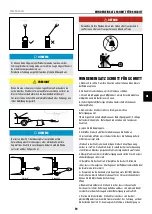
l. Inspect the wire rope. Make sure there are at least 5 wraps of wire rope
around the winch drum.(usually marked with red)
m. Drape a blanket or sail (Sold separately) over the wire rope
approximately 5 to 6 feet from the hook. Open the hood/bonnet for
added protection.
n. Clear the area. Make sure all people, spectators are well back and that
no one is directly in front or behind the vehicle or anchor point.
o. Begin winching. Be sure that the wire rope is winding evenly and tightly
around the drum. If needed, the vehicle that is being winched can be
slowly driven to add assistance to the winching process. Avoid shock
loading; keep the wire rope under tension.
p. The vehicle to be winched should be placed in neutral and the
emergency brake released. Only release the brake pedal when under full
tension. Avoid shock loading to the winch. This can damage the winch,
rope and vehicle.
q. The winch is meant for intermittent use. Under full load with a single
line rig do not power in for more than 8 minutes without letting the motor
cool down for a few minutes and then resume the winching operation.
r. The winching operation is complete once the vehicle is on stable ground
and or can drive under its own power.
s. Secure the vehicle. Be sure to set the brakes and place the vehicle in
park.
t. Release the tension on the wire rope. The winch is NOT designed
as securing device and should NEVER hold a load or secure whilst in
transport, winch cable MUST be released when equipment or vehicle is
secure. Not doing so will possibly damage the brake and winch and void
any warranty.
u. Disconnect the wire rope from the anchor and NEVER leave connected.
v. Rewind the wire rope. Make sure that any wire already on the drum has
spooled tightly and neatly. If not, draw out the wire and re-spool from the
point where the rope is tight.
w. Keep your hands clear of the winch drum and fairlead as the wire rope is
being drawn in.
x. Secure the hook and hook strap.
y. Disconnect the remote control lead and store in a clean, dry place.
z. Clean and inspect connections and mounting hardware for next
winching operation.
Winch Working Demonstration
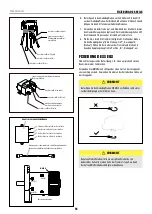
1. Disengage the clutch by turning the clutch to the “CLUTCH OUT”
position.
2. Grab the cable assembly and pull the cable to the desired length,
then attach to item being pulled.
3. Reengage the clutch by turn the clutch assembly to the “CLUTCH IN”
position, rarely if ever the clutch is difficult to engage, you should
slightly turn the drum by hand, and then turn the clutch.
4. Insert the switch assembly connector onto the control box
5. Test-run winch in two directions, each direction for one or two
seconds.
6. While standing aside of the tow path, hold and operate the switch
assembly supplied by your choice. To reverse directions. Wait until
the motor stops before reversing directions.
7. When the pulling is complete, remove the switch assembly. From
the female connector of the directional valve and replace the female
connectors cover.
MAINTENANCE
1. Periodically check the tightness of mounting bolts and electrical
connections. Remove all dirt or corrosion and always keep clean.
2. Do not attempt to disassemble the gear box. Repairs should be
done by the manufacturer or an authorized repair center.
3. The gear box has been lubricated using a high temperature lithium
grease and is sealed at the factory. No internal lubrication is
required.
REpLACING THE WIRE ROpE
If the wire rope has become worn or is beginning to show signs of fraying,
it must be replaced before being used again.
1. Turn the clutch to the “CLUTCH OUT” position.
2. Extend cable to its full length. Note how the existing cable is
connected to the drum.
3. Remove old cable assembly and attach new one as the old cable
connected to the drum. Insert the end of the new rope and secure
the screw M8x10.
4. Ensure that the new cable wraps in the same rotation direction as
the old one. The cable should exit the drum from the bottom, under
the drum. (Underwind).
5. Turn the clutch to the “CLUTCH IN” position.
6. Winch cable onto drum, first five wraps being careful not to allow
kinking, then winch cable must be wound onto the drum under a load
of at least 10% rated line pull.
WARNING
Only replace the wire rope with the identical replacement part
recommended by the manufacturer. Steel or synthetic ropes are NOT
covered by any warranty offer and are sole responsibility of the owner
or user to maintain and replace if necessary.


