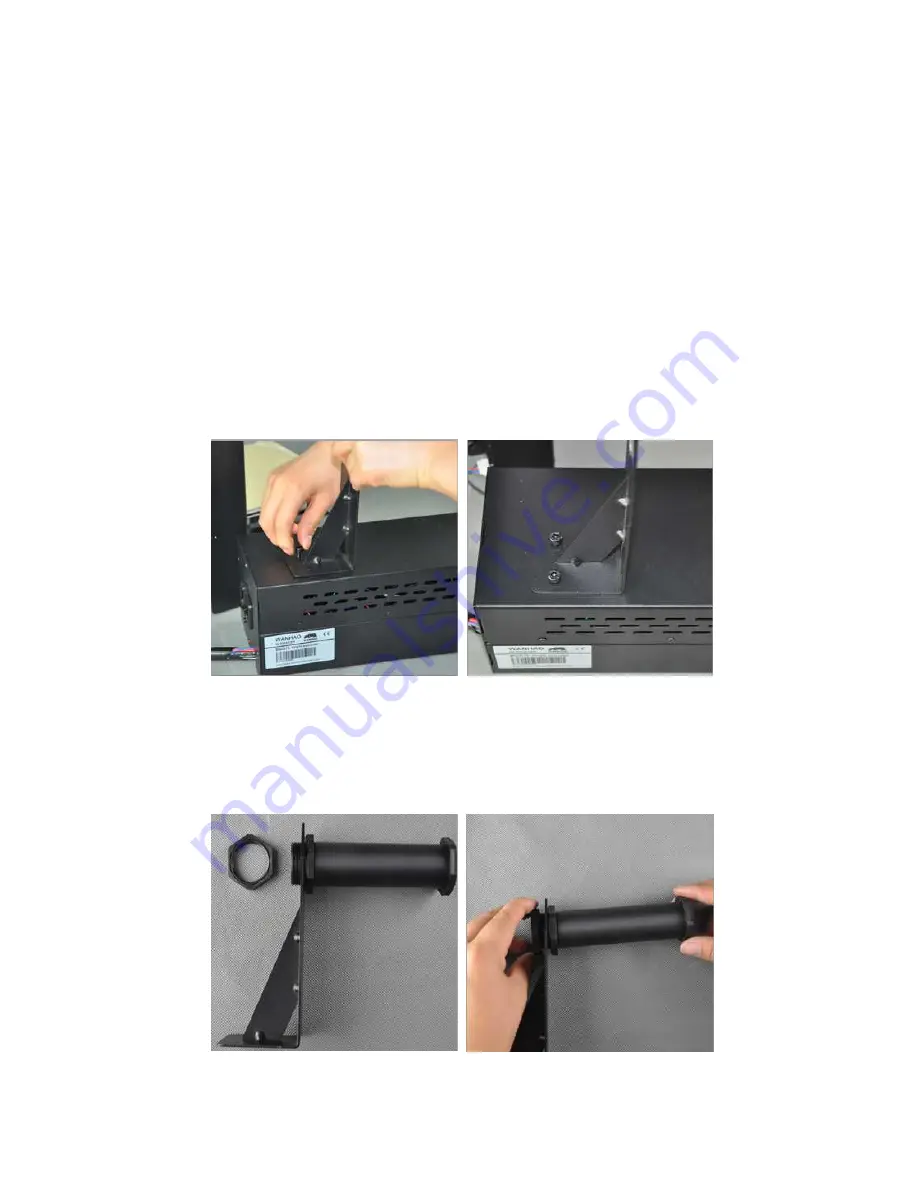
background image

Find the 

Spool Holder Stand

 and the 

Control Box

. Place the 

s

tand

 into 

position  on  top  of  the  Control  Box  by  aligning  the  two  screw  slots  so 
that they are at the rear of the 

s

tand

. Insert 2 screws and secure the 

s

tand

 to the Control Box.

Hardware Setup

 #

2

Find

 the 

Filament Spool Holder 

and unscrew 1 of the end nuts on the 

side with 2 end nuts. Place the 

h

older 

through the 

hole in the 

s

tand and 

secure the previously removed end nut back into place.


Summary of Contents for Duplicator i3

Page 1: ...WANHAO Duplicator i3 User Manual V1 2 Wanhao USA 2015 www wanhaousa com...

Page 2: ...components by hand After a print make sure your printer is off and that your nozzle is no longer hot before removing a model from the printer CAUTION When opening the Duplicator i3 for service ensure...

Page 3: ...he Box Duplicator i3 3D Printer Model Removal Tool Hex Screws Key Kit Filament Spool Holder Power Supply Cable 10M 30FT PLA Filament Pack USB Cable SD Card Kit Platform Tape Sheets Control Box Spool H...

Page 4: ...ter box on a dry clean and stable work surface table or floor Unboxing Hardware Setup 1 NOTE Never lift your printer by any electronics cables We also recommend that you keep your printer box for futu...

Page 5: ...nd place the control box next to the printer base Remove the second layer foam insert revealing the square tower frame the extruder assembly 8 Remove the tower frame and stand it up vertically on the...

Page 6: ...ies box and use them to screw the tower frame to the printer base Start by screwing in one screw from the outside of the frame towards the inside of the frame 11 Lastly turn your printer on it s side...

Page 7: ...ou need to make sure that your X Axis the 2 parallel rods running left to right is perfectly level Once your tower is locked in placed you will need to make sure that your X Axis the 2 parallel rods r...

Page 8: ...o screw slots so that they are at the rear of the stand Insert 2 screws and secure the stand to the Control Box Hardware Setup 2 Find the Filament Spool Holder and unscrew 1 of the end nuts on the sid...

Page 9: ...ert each connector into their corresponding sockets before using your printer The longest cable is for X Axis Hardware Setup 3 The other 2 cables near the sides of your printer are for the Z Axis step...

Page 10: ...e Hardware Setup 4 Find your Power Cable in the cardboard accessories box and plug it into the power supply socket on your Control Box the socket is located next to the power switch Note Your printer...

Page 11: ...ur printer Once you have prepared your printer for operation press the power switch on the back of your control box The power switch is located next to the power cable socket If you are not able to tu...

Page 12: ...resolution strength and accuracy or your prints The image below will show you the correct and incorrect height at which your nozzle should be in relation to the build platform Nozzle Too High Insuffic...

Page 13: ...ing right above the left front of your build surface The image to the right shows where your extruder assembly should rest after selecting HOME ALL Before you start leveling the build plate make sure...

Page 14: ...allow a more accurate leveling for smaller prints that would normally not extend far out into the corner of your build plate Once you have turned your printer OFF there will no longer be power to you...

Page 15: ...brass nozzle tip and the build surface should be roughly the thickness of 1 sheet of copy paper To be accurate slide a sheet of copy paper back and forth between the two components and keep adjusting...

Reviews: