27
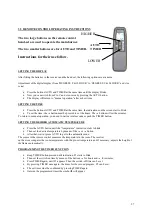
3.3 REMOTE CONTROL OPERATING INSTRUCTIONS
HIGHER
The two large buttons on the remote control
hand-set are used to operate the main burner.
AUTO
The two smaller buttons are for AUTO and TIMER. TIMER
Instructions for their use follow.
LOWER
SETTING THE DISPLAY
After fitting the batteries in the receiver and the hand set, the following options are available:
Adjustment of the digital display (from ‘DEGREES F & 12 HOUR’ to ‘DEGREES C & 24 HOUR’ and vice
versa)
•
Press the buttons AUTO and TIMER at the same time until the display blinks.
•
Now you can switch from F to C and vice-versa by pressing the AUTO button.
•
The display will return to “manual operation” after a short time.
SETTING THE TIME
•
Press the buttons AUTO and TIMER at the same time, the indications on the screen start to blink.
•
To set the time, the
button must be pressed to set the hours. The
button will set the minutes.
To return to manual operation, you need to wait several seconds or push the TIMER button.
SETTING THE DESIRED AUTOMATIC TEMPERATURE
•
Press the AUTO button until the “temperature” indication starts to blink.
•
Then set the desired temperature by means of the
or
button.
•
After that, wait or press AUTO to get to the automatic mode.
The sensor in the remote control measures the temperature in the room. The receiver
on the stove compares the room temperature with the pre-set temperature and if necessary, adjusts the height of
the flames automatically.
PROGRAMMING THE TIMER FUNCTION
•
Keep TIMER button pressed until indication P1 starts to blink.
•
Then set the switch-on time by means of the buttons
for hours and
for minutes.
•
Press TIMER again, until P1 appears. Then the switch-off time can be set.
•
By pressing TIMER once again, the times for the second program, P2 can be set.
•
The set times must be confirmed by pressing TIMER again.
•
Outside the programmed times the symbol will appear.
Summary of Contents for BORDEAUX
Page 6: ...6 Fig 4a Fig 4b Fig 4c...
Page 15: ...15 BRANDERSET BUITENMANTEL SCHUIFPLAAT GLASRAAM SIERLIJST VERBRANDINGSKAMER...
Page 16: ...16...
Page 17: ...17 INSTALLATION AND OPERATION INSTRUCTIONS FOR BORDEAUX GAS INSET STOVE...
Page 25: ...25 FIG 4b FIG 4C LOG LAYOUT FOR NATURAL GAS FIG 4A FIG 4B FIG 4A...
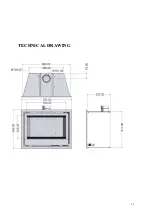
Page 32: ...32 TECHNICAL DRAWING 14...


