Revision 2.05
EXPERTS IN WATER CHEMISTRY SINCE 1903
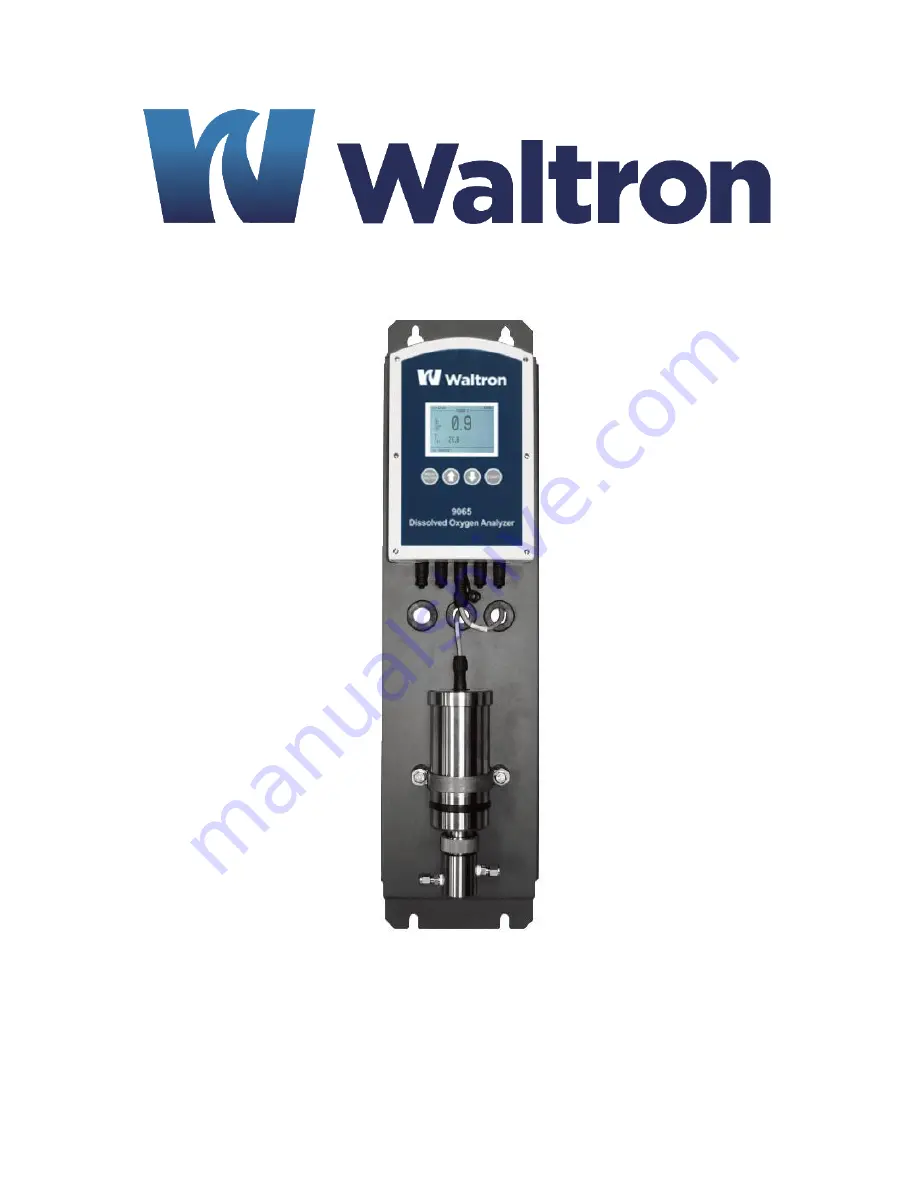
9065 Luminescent Dissolved Oxygen Analyzer
User Manual
Page 1: ...Revision 2 05 EXPERTS IN WATER CHEMISTRY SINCE 1903 9065 Luminescent Dissolved Oxygen Analyzer User Manual...
Page 2: ...4 5546 www waltron net Please be ready to provide the following information Date analyzer was purchased Analyzer model and serial number Recent maintenance history Calibration slope values and detaile...
Page 3: ...containers packages and chemicals Only qualified personnel should be involved in the installation operation and servicing of the analyzer Follow safety precautions when operating analyzer in condition...
Page 4: ...chnical Service Department Customer name address and department Name and telephone number of the individual responsible for returning items for repair Brief problem description Ship to Waltron service...
Page 5: ...moving and shipping needs Check all items received against those on the packing list Chemicals are usually shipped in a separate package and will be itemized accordingly Verify that the number of pack...
Page 6: ...2 1 Analyzer Overview 12 2 2 Sensor 13 2 3 Coatingholder 13 2 4 O2 Measurement Principle 13 3 Installation 15 3 1 Content of the Delivery 15 3 2 Pre Installation 15 3 3 Mounting the 9065 16 3 4 Assem...
Page 7: ...on of the Temperature Sensor 33 6 2 Calibrating the O2 Sensor 33 6 2 1 Calibration Frequency 33 6 2 2 One point Calibration 33 6 2 3 Calibration with Two Gases 36 6 2 4 Check Calibration 38 6 2 5 Cali...
Page 8: ...6 Figure 3 2 Dimensions of the 9065 sensor mounting bracket 16 Figure 3 3 Fitting the sensor into the flowcell 17 Figure 3 4 Sensor orientation relative to flow direction 17 Figure 3 5 Sample Connecti...
Page 9: ...ble 3 3 Connector 1 Power supply 24V DC 19 Table 3 4 Connector 2 RS 232 communication 20 Table 3 5 Connector 3 and 4 Sensor 1 and 2 Sensor communication 20 Table 3 6 Connector 5 I O Cable 20 Table 4 1...
Page 10: ...ed value ppm 0 001 ppm 2 of the measured value mg l 0 001 mg l 2 of the measured value Temperature C 0 1 C F 0 2 F Max Pressure barg 10 00 barg psi 145 0 psi kg cm2 10 20 kg cm2 kPa 1 000 kPa Measurem...
Page 11: ...er can be used in a variety of online analysis applications throughout many different industries The 9065 must be connected to a sample line The connections to the flowcell are 6mm Swagelok fittings T...
Page 12: ...ECAUTIONARY MEASURES AND SAFETY INSTRUCTIONS WARNING To avoid a short circuit never insert metal objects into the connector The use of chlorite based or fluorine based cleaning products is not permitt...
Page 13: ...lved Oxygen Analyzer 2 INTRODUCTION 2 1 ANALYZER OVERVIEW The 9065 has two main sections 1 Transmitter 2 Sensor Housing Figure 2 1 Analyzer overview Transmitter Display User Interface Transmitter Conn...
Page 14: ...of the measured partial oxygen pressure and the temperature The oxygen sensor optically measures the liquid s O2 content based on the luminescence measurement principle where an oxygen sensitive layer...
Page 15: ...oxygen 1 and in the presence of oxygen 2 The oxygen content is calculated using the time difference between the exposure to the blue light and the molecules lighting up phase shift and the product te...
Page 16: ...et Always state the serial number the order number or the invoice number as given by Waltron of the 9065 in all correspondence NOTE Before using the instrument you must make sure the instrument is com...
Page 17: ...alyzer 3 3 MOUNTING THE 9065 The 9065 can be mounted on a wall or a flat surface using the dimensions shown in the figure below Figure 3 1 Dimensions of the 9065 mounting plate for wall mounting Figur...
Page 18: ...plate The figure below shows how the sensor properly fits into the flowcell It is important that the coating is always the first to be in contact with the flowing product The sensor can be located a...
Page 19: ...inlet and outlet sample connections to the flowcell are Swagelok fittings It is highly recommended to us stainless steel tubing for the sample lines to prevent outside oxygen from entering the sample...
Page 20: ...ector No Cable Connection 1 Power supply 2 RS communication 3 Sensor communication 1 4 Sensor communication 2 5 I O communication Profibus Depending on model 3 6 2 POWER CABLE Table 3 2 Connector 1 Po...
Page 21: ...Txd Grey 6 NTC An inp Pink 7 NTC common Blue 8 Shielding 3 6 5 I O CABLE Table 3 6 Connector 5 I O Cable Pin No I O Type Comment Wire color 1 Ground Ground White 2 24V DC Supply Brown 3 24V control A...
Page 22: ...n example of the I O connections 3 7 PREPARATION AND START UP Power can be supplied to the analyzer afternall the cables have been connected The 9065 will initialize automatically once the power is tu...
Page 23: ...tton is pressed for 3 seconds whilst the measurement screen is displayed then the main menu screen will be displayed Up Arrow For a quick overview the up arrow button can be used to scroll to the SHOR...
Page 24: ...ors are connected and one or both do not give a measurement value then a dotted line will be displayed on the screen and the status message will change The current time and the operating mode remote l...
Page 25: ...ibration mode is activated During calibration mode it is not possible to take a measurement 4 4 USER LEVEL The default settings can be changed to the preferred user settings before the 9065 is used fo...
Page 26: ...e Configuration menu 1 In the main measurement menu press the Enter button for three seconds The main menu will be displayed 2 Use the cursor keys to select Configuration and press the Enter button to...
Page 27: ...Configuration menu 4 5 5 LANGUAGE The arrow buttons can be used to select Dutch German or English as the language Press the Enter button to confirm the selected language The Configuration menu will th...
Page 28: ...be compensated with the measured pressure For example Patm during calibration 1013 mBar O2 measured 1 033 Bar 20 cm H2O 1 0 O2 Patm 0 981 4 5 8 2 Liquid Application When the sensor will be used in liq...
Page 29: ...e setting concerned 4 Press the Enter button to return to the Analog outputs menu 5 Use the cursor keys to select the Return sign and press the Enter button to return to the Configuration menu NOTE Th...
Page 30: ...1 is also zero in the case of an O2 alarm These outputs can be reset by selecting ACK RESET ALARM in the Shortcut menu and will then remain high if the alarm signal continues O2 Extra Alarm for Senso...
Page 31: ...Summary x The output becomes zero immediately the relay cuts out due to the alarm function The state of the relay remains unchanged Sensor Alarm A1 A2 A3 A4 1 Temp min max X 1 O2 O2 alarm X X 1 O2 O2...
Page 32: ...ull the oldest measurements are deleted and the most recent measurements are saved see Section 5 4 5 3 LOCAL AND REMOTE OPERATION Before the 9065 is used for the first time all of the desired paramete...
Page 33: ...e sensor are displayed A distinction is made between measurement hours and standby hours Extremes The extreme values for the oxygen content and the temperature are saved in this menu Calibration The l...
Page 34: ...se counter will be reset and the warning symbol will no longer be displayed The following two principle methods are described to calibrate the oxygen sensor 1 One point calibration This method is reco...
Page 35: ...ate O2 calibration the sensor must be at the same temperature as the gas To achieve this allow the sensor and calibration gas to acclimatize for 4 hours in the same room Procedure 1 Put analyzer into...
Page 36: ...alibrated Note that a single stream analyzer will only display Sensor 1 as an option 11 Select O2 Auto and press enter 12 Select O2 Low and press enter 13 Press Enter again and calibration is now in p...
Page 37: ...ect the back arrow to return to the previous menu Repeat until arriving at the main measurement screen The calibration process is complete 22 Disconnect the calibration gas from the calibration beaker...
Page 38: ...the a s unit NOTE For an accurate O2 calibration the sensor must be at the same temperature as the gas To achieve this allow the sensor and calibration gas to acclimatize for 4 hours in the same room...
Page 39: ...rocess is complete 32 Disconnect the calibration gas from the calibration beaker and remove the calibration beaker from the sensor 33 Replace the flowcell on the sensor again taking caution to prevent...
Page 40: ...Enter button to confirm the selection 5 In this screen the analog outputs can be calibrated to the correct mA value A milliammeter or a multimeter must be connected to the appropriate output to measu...
Page 41: ...with a detergent to clean the sensor or the outside of the control box Warning Never use tools to clean the sensor coating Touching the coating may cause serious damage to the instrument Regular CIP o...
Page 42: ...ge the high level O2 high high O2 value set O2 high high alarm Check the process Change the high high level Sensor x Temp high alarm Temp value set Temp high value Check the process Change the Temp hi...
Page 43: ...G HOLDER If the coating is faulty or damaged then a new coating holder must be placed on the sensor The instructions for replacing the coating are given below 1 Remove the sensor from the mounting pla...
Page 44: ...side of the coating holder s screw thread This is to stop the coating holder from shaking loose Make sure no glue gets on the pink side 6 Screw the coating holder back on to the sensor return the sens...
Page 45: ...M 9 2 STORAGE The instrument must be stored in a dry location and be protected against mechanical and or chemical damage If the 9065 is not going to be used for a long time the instrument must be thor...
Page 46: ...for 24V DC power supply 3p male K5000 015 Power cable wide range 110 240 VAC 5 m K5000 005 Power cable wide range 110 240 VAC 15 m K5000 016 Power cable wide range 110 240 VAV 40 m K5000 017 Power cab...
Page 47: ...lyzer LDO sensor K5000 001 Calibration set K5000 028 Flowcell K5000 002 CD rom with PC software for reading data to PC Incl RS 232 cable On request Swagelok connector P1000 106 25 mm Orbisphere adapte...
Page 48: ...9065 can be set to various oxygen units where the instrument then makes the following conversions 100 20 95 saturation air 2 O With Tm Temperature in C patm Atmospheric air pressure during the oxygen...
Page 49: ...DIX B SOFTWARE STRUCTURE Key Start screen Main menu Shortcut Key Automatic after 3 sec Sensor 2 Key Sensor 1 Sensor 1 2 Measurement screen key Key O2 trend graph Sensor 1 Measurement values Sensor 1 D...
Page 50: ...alibration sensor 1 B Calibration sensor 2 B A Operator level B Supervisor level C Service engineer level Main menu Configuration A Info A Units B Sensor settings B Analogue outputs B Alarm settings B...
Page 51: ...B Calibrations A History 1 Sensor1 A History 2 Sensor1 A History 3 Sensor1 A History 1 Sensor2 A History 2 Sensor2 A History3 Sensor2 A Display temperature graph s2 A Display O2 graph s2 A Display tem...