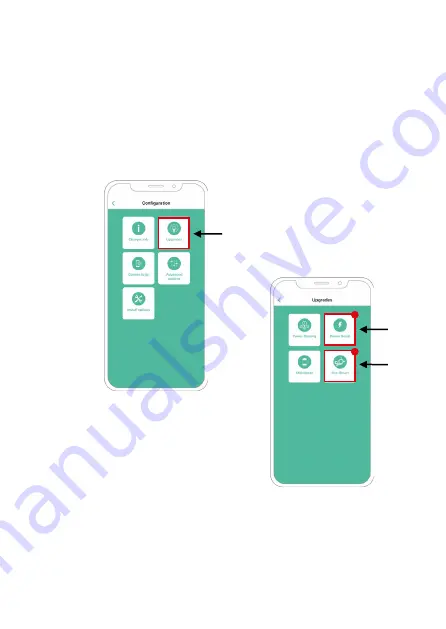
Wallbox Eco-Smart Installation Manual Download Page 30

30

2

1

Configuration

6.

  On the Configuration 

screen, select "

Upgrades

".

7.

  On the Upgrades screen, 

select "

Eco-Smart

". 


Note:

 It is recommended 

that you activate Power 
Boost before enabling 
Eco-Smart. Once you have 
activated Power Boost,  
tap the Eco-Smart icon  
to access its settings.

ECO-SMART

Summary of Contents for Eco-Smart

Page 1: ...Power Boost and Eco Smart Installation Guide North America ENERGY MANAGEMENT SOLUTIONS Version 1 0...

Page 2: ...2 Index Purpose and Scope of the Document 4 Getting Started 5 Power Meter Installation 7 Configuration 24 Power Boost 24 Eco Smart 28 EN...

Page 3: ...3 Index Objectif et port e du document 35 D marrage 36 Installation du compteur de puissance 38 Configuration 55 Power Boost 55 Eco Smart 59 FR...

Page 4: ...purpose and scope of the document is to outline the instructions for the installation of the Eco Smart and Power Boost Energy Management Solutions Purpose and Scope of the Document POWER METER INSTALL...

Page 5: ...applicable local regulations D Update the Wallbox charger with the latest software version before installing the smart meter Refer to the instructions for updating the charger on the Wallbox Academy...

Page 6: ...r to the Pulsar Plus North America Installation Guide for a complete list of tools required for installation POWER METER INSTALLATION T20 Screwdriver or Bit B Measuring Tape Multimeter C D Small flat...

Page 7: ...connector cable output When using this opening for the communications cabling first remove the screw plug Use a wrench to hold the interior lock nut while unscrewing the plug using a flathead screwdri...

Page 8: ...he System This meter is only supported on installations with the following requirements 3 wire installation 2 hot wires neutral Phase to phase voltage 208 240 V Phase to neutral voltage 120 V Follow t...

Page 9: ...d E Energy Meter F Communication G Breaker D Eletrical Panel Positioning and General Overview Follow the scheme below for positioning the CT clamps and the communication cable to charger Communication...

Page 10: ...mmunication line between the meter and the charger For this purpose use STP Class 5E 1600 feet 500 meter Max Length 1 Ensure that the power is off before proceeding with the connection Use circuit bre...

Page 11: ...ide the panel enclosure box 3 Add a protection for the meter in the electric box 4 Wire the terminals N 1 and 2 from the meter to the neutral and two hot lines from your electrical panel min 0 2 mm2 A...

Page 12: ...ct the CT clamps to the incoming hot lines as shown Important Follow the internal arrow indicating the current direction when installing the clamps Arrow to follow Position Installation POWER METER IN...

Page 13: ...6 17 6 Wire the CT clamps to the meter using the following connection points 13 Red wire CT1 14 Black wire CT1 15 Red wire CT2 16 Black wire CT2 18 1 2 3 4 5 6 K L K L K L K L Installation POWER METER...

Page 14: ...able For the communication between charger and meter only three wires are needed The connection between terminals 7 8 is a loop for activating the end of line resistor of the communication 7 8 9 10 11...

Page 15: ...erly in accordance with the installation manual and local regulations 9 Proceed with the Software configuration At this point when the meter is powered up the screen will show a Quick Setup Menu Insta...

Page 16: ...roll down to 2P and press Enter 9 3 Continue to the Ct rAt Menu 9 4 Press OK 9 5 Set the Ct rAt value up to 50 so that it matches with the 250 A clamps supplied 9 6 The meter has been successfully con...

Page 17: ...17 1 Press the ENTER button placed on the meter For Eco Smart installation the following configuration must also be completed 1 2 3 4 5 6 Installation Disclaimer POWER METER INSTALLATION...

Page 18: ...18 2 Press the Enter button until you reach the Settings menu 1 2 3 4 5 6 Installation POWER METER INSTALLATION...

Page 19: ...19 3 Using the down arrow button scroll to Ct rAt Measure 1 2 3 4 5 6 Installation POWER METER INSTALLATION...

Page 20: ...20 4 Press Enter 5 Scroll down to b 1 2 3 4 5 6 Installation POWER METER INSTALLATION...

Page 21: ...21 6 Press Enter 7 Press Enter a second time to save yor settings 1 2 3 4 5 6 BACK SAVE 8 Scroll down to End 9 Scroll up to Back Installation POWER METER INSTALLATION...

Page 22: ...e current selector 1 Set the RS485 switch into position T RS48 RS485 5 T T NT NT 1 2 3 4 5 6 7 8 9 0 Installation 2 Set the rotary switch between 1 and 7 depending on the maximum current available on...

Page 23: ...reaker installed for the EV charger To ensure a safe installation we recommend working with a licensed installer or electrician A professional electrician can perform the necessary load calculations t...

Page 24: ...bile device and connect to your charger During each of the following steps be sure to remain within range of your Bluetooth signal typically no more than 30 feet 3 If you have not done so previously f...

Page 25: ...the charger on which you want to enable Power Boost 5 The app will synchronize with your charger Once complete click the icon in the top right corner of the app screen to go to Settings Configuration...

Page 26: ...26 Configuration 6 On the Configuration screen select Upgrades 7 On the Upgrades screen select Power Boost POWER BOOST...

Page 27: ...is accepted for correct performance In case of doubt contact Wallbox Customer Service Disclaimer Be sure to follow all local regulations when setting up Power Boost and do not enable a higher power r...

Page 28: ...le Bluetooth on your mobile device and connect to your charger During each of the following steps be sure to remain within range of your Bluetooth signal typically no more than 30 feet 3 If you have n...

Page 29: ...t the charger on which you want to enable Eco Smart 5 The app will synchronize with your charger Once complete click the icon in the top right corner of the app screen to go to Settings Configuration...

Page 30: ...ion screen select Upgrades 7 On the Upgrades screen select Eco Smart Note It is recommended that you activate Power Boost before enabling Eco Smart Once you have activated Power Boost tap the Eco Smar...

Page 31: ...31 Configuration 8 Tap Let s start to start using Eco Smart 9 Enable the Eco Smart feature by switching the button to the ON position ECO SMART...

Page 32: ...32 Configuration 10 Select your preferred Eco Smart mode Full Green or Eco Mode 11 Click Save Eco Smart is now active with your selected mode ECO SMART...

Page 33: ...ng Eco Smart 1 If necessary unlock your charger 2 Connect the charging cable to your EV The LED halo will turn to light blue and the message CONNECTED WAITING FOR GREEN ENERGY will display in the myWa...

Page 34: ...e is insufficient surplus green energy available for at least 30 consecutive seconds charging will pause Once mode conditions are met again and there is sufficient available green energy charging will...

Page 35: ...if et la port e de ce document est de pr senter les instructions pour l installation des Energy Management Solutions Eco Smart et Power Boost Objectif et port e du document INSTALLATION DU COMPTEUR DE...

Page 36: ...ons locales en vigueur D Mettez jour le chargeur Wallbox avec la derni re version du logiciel avant d installer le compteur intelligent Consultez les instructions de mise jour du chargeur sur la page...

Page 37: ...e d installation de Pulsar Plus Am rique du Nord pour une liste compl te des outils requis pour l installation INSTALLATION DU COMPTEUR DE PUISSANCE Tournevis T20 ou m che B M tre ruban Multim tre C D...

Page 38: ...ez d abord l obturateur vis lorsque vous utilisez cette ouverture pour le c blage de communication Utilisez une cl pour maintenir l crou de blocage int rieur tout en d vissant l obturateur l aide d un...

Page 39: ...Ce compteur n est pris en charge que sur les installations aux exigences suivantes Installation 3 c bles 2 fils chauds neutre Tension phase phase 208 240 V Tension phase neutre 120 V Suivez le diagra...

Page 40: ...ommunication G Disjoncteur D Panneau lectrique Positionnementetpr sentationg n rale Suivez le sch ma ci dessous pour positionner les pinces amp rem triques et le c ble de communication au chargeur C b...

Page 41: ...e communication entre le compteur et le chargeur cet effet utilisez un STP Classe 5E d une longueur max de 1600 pi 500 m 1 Assurez vous que le courant soit coup avant de proc der la connexion Utilisez...

Page 42: ...panneau bo te 3 Ajoutez une protection pour le compteur dans le bo tier lectrique 4 C blez les bornes N 1 et 2 partir du compteur au neutre et deux lignes chaudes depuis votre panneau lectrique min 0...

Page 43: ...p rem triques aux lignes chaudes entrantes comme illustr Important Suivez la fl che interne indiquant le sens du courant lors de l installation des pinces Fl che suivre Position Installation INSTALLAT...

Page 44: ...pinces amp rem triques au compteur l aide des points de connexion suivants 13 C ble rouge CT1 14 C ble noir CT1 15 C ble rouge CT2 16 C ble noir CT2 18 1 2 3 4 5 6 K L K L K L K L Installation INSTALL...

Page 45: ...uls 3 c bles sont n cessaires pour la communication entre le chargeur et le compteur La connexion entre les bornes 7 8 est une boucle pour activer la r sistance de fin de ligne de la communication 7 8...

Page 46: ...ent au manuel d installation et aux r glementations locales 9 Proc dez la configuration du logiciel ce point lorsque le compteur est sous tension l cran affichera un Menu de configuration rapide Insta...

Page 47: ...e bas 2P et appuyez sur Entr e 9 3 Continuez vers le Menu Ct rAt 9 4 Appuyez sur OK 9 5 D finissez la valeur Ct rAt jusqu 50 afin qu elle corresponde aux pinces 250 A fournies 9 6 Le compteur a t conf...

Page 48: ...sur le bouton Entr e plac sur le compteur Pour l installation de Eco Smart la configuration suivante doit aussi tre compl t e 1 2 3 4 5 6 Installation Limite de responsabilit INSTALLATION DU COMPTEUR...

Page 49: ...49 2 Appuyez sur le bouton Entr e jusqu atteindre le menu Param tres 1 2 3 4 5 6 Installation INSTALLATION DU COMPTEUR DE PUISSANCE...

Page 50: ...50 3 l aide du bouton fl che vers le bas faites d filer jusqu Ct rAt Measure 1 2 3 4 5 6 Installation INSTALLATION DU COMPTEUR DE PUISSANCE...

Page 51: ...51 4 Appuyez sur Entr e 5 Faites d filer vers le bas jusqu b 1 2 3 4 5 6 Installation INSTALLATION DU COMPTEUR DE PUISSANCE...

Page 52: ...ez sur Entr e une deuxi me fois pour enregistrer vos param tres 1 2 3 4 5 6 PR C DENT SAUVEGARDER 8 Faites d filer vers le bas jusqu Fin 9 Faites d filer vers le haut jusqu Retour Installation INSTALL...

Page 53: ...du s lecteur de courant 1 Mettez l interrupteur RS485 en position T RS48 RS485 5 T T NT NT 1 2 3 4 5 6 7 8 9 0 Installation 2 Mettez le bouton rotatif entre 1 et 7 selon le courant maximal disponible...

Page 54: ...tall s pour le chargeur de VE Pour assurer une installation s curis e nous vous recommandons de travailler avec un installateur ou un lectricien qualifi Un lectricien professionnel peut effectuer les...

Page 55: ...connectez le votre chargeur Durant chacune des tapes suivantes veillez rester dans la port e de votre signal Bluetooth g n ralement pas plus de 9 m 30 pieds 3 Si ce n est pas d j fait suivez les inst...

Page 56: ...uel vous souhaitez activer Power Boost 5 L application se synchronisera avec votre chargeur Une fois termin cliquez sur l ic ne dans le coin sup rieur droit de l cran de l application pour acc der aux...

Page 57: ...57 Configuration 6 Sur l cran de Configuration s lectionnez Mises niveau 7 Sur l cran des Mises niveau s lectionnez Power Boost POWER BOOST...

Page 58: ...ance correcte En cas de doute contactez le service client le de Wallbox Limite de responsabilit Veillez respecter toutes les r glementations locales lors de la configuration de Power Boost et n active...

Page 59: ...sur votre appareil mobile et connectez le votre chargeur Durant chacune des tapes suivantes veillez rester dans la port e de votre signal Bluetooth g n ralement pas plus de 9 m 30 pieds 3 Si ce n est...

Page 60: ...equel vous souhaitez activer Eco Smart 5 L application se synchronisera avec votre chargeur Une fois termin cliquez sur l ic ne dans le coin sup rieur droit de l cran de l application pour acc der aux...

Page 61: ...ctionnez Mises niveau 7 Sur l cran des Mises jour s lectionnez Eco Smart Remarque il est recommand d activer Power Boost avant d activer Eco Smart Une fois la fonction Power Boost activ e appuyez sur...

Page 62: ...62 Configuration 8 Appuyez sur Commencer pour commencer utiliser Eco Smart 9 Activez la fonction Eco Smart en mettant le bouton sur la position ON ECO SMART...

Page 63: ...63 Configuration 10 S lectionnez votre mode Eco Smart pr f r Full Green ou Mode Eco 11 Cliquez sur Enregistrer Eco Smart est pr sent actif avec votre mode s lectionn ECO SMART...

Page 64: ...e d verrouillez votre chargeur 2 Connectez le c ble de recharge votre VE Le halo du voyant DEL passe au bleu clair et le message CONNECT EN ATTENTE DE L NERGIE VERTE CONNECTED WAITING FOR GREEN ENERGY...

Page 65: ...isant pendant au moins 30 secondes cons cutives la charge se mettra en pause Une fois que les conditions du mode seront nouveau respect es et qu il y aura suffisamment d nergie verte la charge reprend...

Page 66: ...support wallbox com...

Reviews: