Wallbox Copper Type 1 Case C Installation Manual Download Page 8

COPPER 

- installation guide

en

8

DRILL & MOUNT

DRILLING TEMPLATE PROCEDURE

• 

Use the drilling template as a guide to mark the location on the wall for the mounting screws. Pay special attention 
when levelling the template. The use of a spirit level is highly recommended.

• 

Drill the marked mounting holes with the diameter specified for the selected installation hardware and check the posi-
tioning of the holes.  For installation on concrete, brick and wood walls, use the included installation hardware.

COPPER MOUNTING

Step 1:  Use the selector on the cover to choose the maximum operating current of the supply connection.

BACKSIDE MOUNTING

IMPORTANT: In case your wallbox is using a backside-wall cable connection,  please follow steps 0 and Step 00. If not using 
such cable connection, please go to step1.
Step 0: In the backside of the wallbox charger you will find an insertion with a thinner wall; use a cutter, razor or a sharp tool 
and carefully make an incision into the cable opening. Please meticulously remove all sharp edges. Take a Rutaseal bushing 
and install it. 
Step 00:  Very carefully, firmly insert your cable supply through the bushing. Bush hole sealing is prepared for a range that 
can vary from 11 to 17mm which falls within the standard for cables that can carry up to 22kW.

Make sure the power supply is turned off during all mounting steps

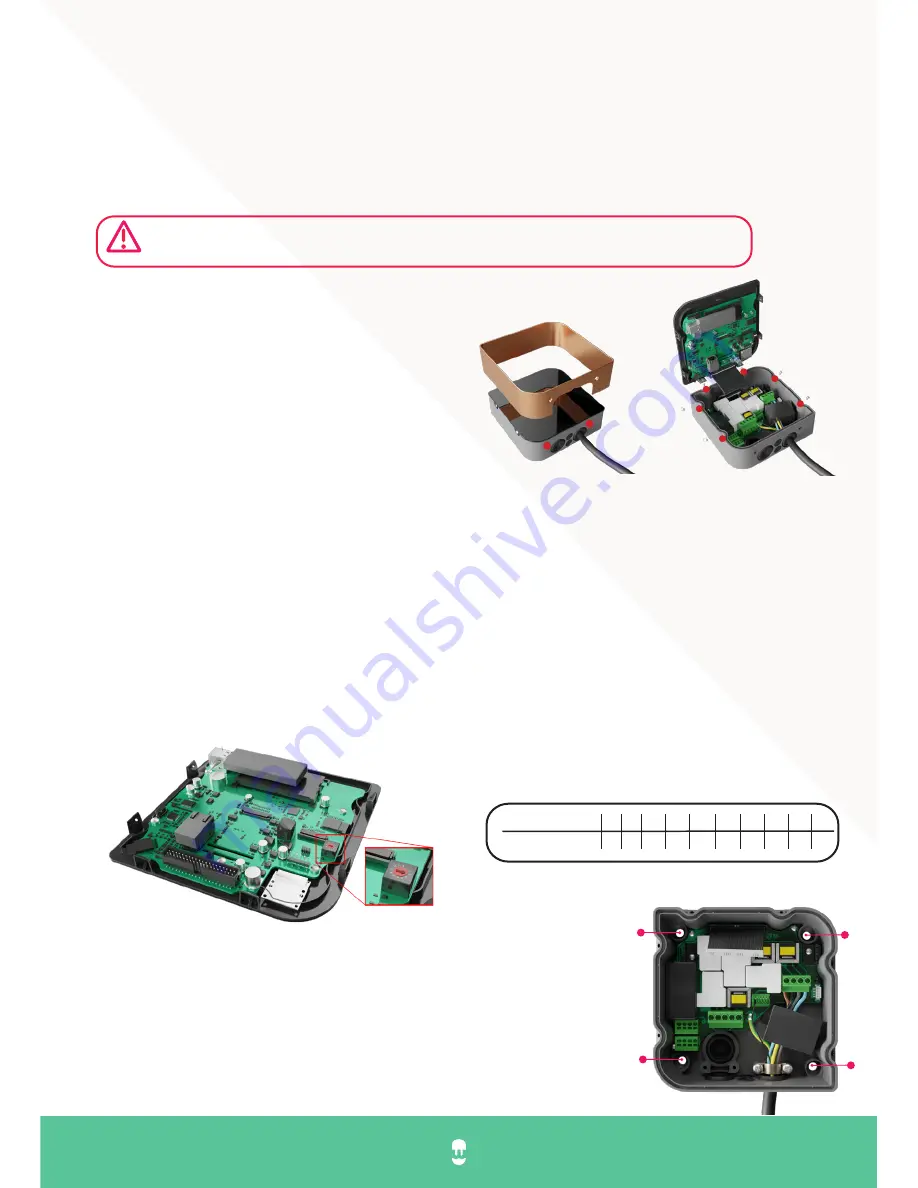
OPENING THE DEVICE

1. Unscrew the two screws on the bottom side of the frame 
and remove it
2. Remove the 6 screws of the front cover
3 Open carefully the cover
4 Disconnect the cover communication cable.  

POSITION            
CURRENT (A)           

0
0

1

6

2

10

3

13

4

16

5

20

6

25

7

32

8

0

9

0

Step 2: Proceed to fix your charger to the wall. Insert the screws in the positions marked, 
starting with the top one, and continuing clockwise. 
Verify that your Wallbox is firmly attached and insert the plugs to complete this process.


Summary of Contents for Copper Type 1 Case C

Page 1: ...COPPER installation guide en 1 COPPER installation guide en WBCP C IG 001 EN plug drive COPPER INSTALLATION GUIDE...

Page 2: ...relieve the user of responsibility to follow all norms and standards or local regulations that may apply The Wallbox charger device has been designed developed and manufactured to satisfy requirements...

Page 3: ...before using them Never use a damaged charging cable vehicle inlet or infrastructure socket outlet for charging Never use contacts that are dirty or wet Only connect the charging cable to vehicle inl...

Page 4: ...rging station is designed to operate with a supply voltage of 230 V 50 Hz 1P or 400V 50Hz 3P PRODUCT DESCRIPTION GENERAL Model Name Copper Type 1 Case C Copper Type 2 Case C Mode Mode 3 Mode 3 Overall...

Page 5: ...us 10mm tool Cutter or razor for the wall cable PRODUCT DESCRIPTION Wallbox Copper Holder Installation Guide Drilling templates The Wallbox charger components delivered must comply the following list...

Page 6: ...g your Wallbox ensure that the power supply is turned off and the system has not energy Sufficient air circulation must be ensured at the mounting site so that the charging station is cooled during op...

Page 7: ...er the following precautions The required mounting area for the Wallbox charging station is at least 250 x 150 mm H x W When mounting the Wallbox the cable should easily reach the charging port For a...

Page 8: ...he wallbox charger you will find an insertion with a thinner wall use a cutter razor or a sharp tool and carefully make an incision into the cable opening Please meticulously remove all sharp edges Ta...

Page 9: ...n international standard please always check the power supply connection Three Phase Configuration From left to right L1 L2 L3 Current carring conductors N Neutral line Protective Earth The presented...

Page 10: ...our wallbox and the vehicle If the car detects a problem during the charging process it will be interrupted At this point a message will pop up in your status menu The internal stats of the Wallbox ar...

Reviews: