background image

English

   - 20 -

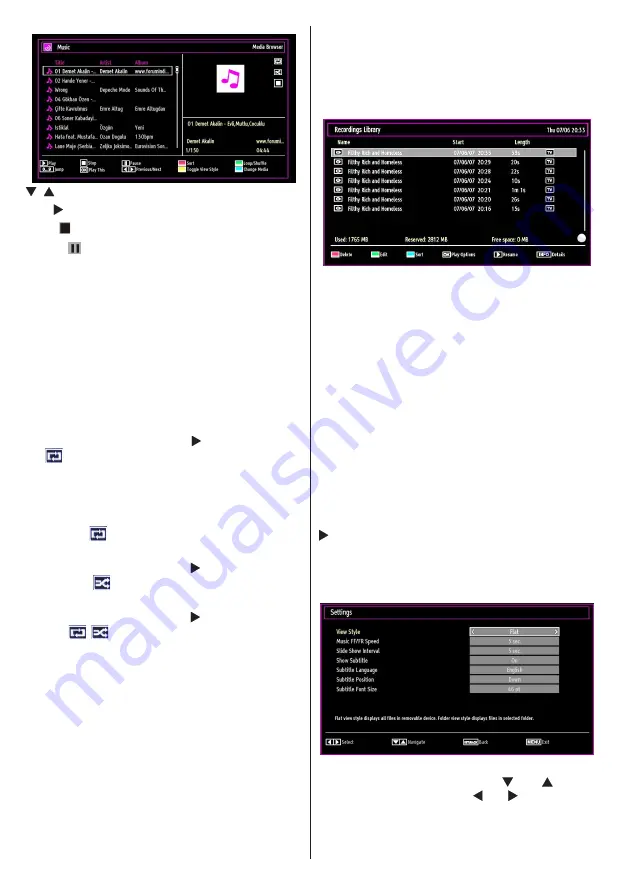
/   : Navigate menu

Play   button): 

Starts the playback.

Stop (  button)

 : Stops playback.

Pause (  button)

 : Pauses the selected playback.

RED  

button: Sorts files by Title,Artist or Album.

Note:

 If the Viewing Style is set to Folder in Media 

Browser Settings, Music folder will be displayed as 

sorted  and  there  is  no  need  to  sort  files  again  by 

pressing RED button.

Loop/Shuffle (GREEN button)

: Press once to disable 

Loop. Press again to disable both Loop and Shuffle. 

Press once more to enable only Shuffle. Press again 

to enable all. You can follow the disabled functions 

with the change of the icons.
Note:
If you start the playback with the   button and activate 
the 

 symbol, the TV will play the next music/video 

file. The playback will proceed accordingly and when 

the end of the list is reached, it will be played again 

from the beginning (loop function).
If you start the playback with the OK button and 
activate the 

 symbol, the same music or video file 

will be played in a loop (repeat function).
If you start the playback with   or OK button and 
activate the 

 symbol, music or video file will be 

played in a shuffle.

If you start the playback with   or OK button and 
activate 

 symbols, music or video file playback 

will continue randomly and the random playback will 

continue.

0..9 (Numeric buttons):

 The TV will jump to the 

file starting with the letter you input via the numeric 

buttons on your remote control.

Play This (OK button)

 : Plays the selected file.

Previous/Next (Left/Right buttons)

 : Jumps to 

previous or next file to play.

Yellow 

Button: Change viewing style

BLUE:

 Changes media options.

Recordings Library

IMPORTANT: To view recordings library, you should 

first connect a USB disk to your TV while the TV is 

switched off. You should then switch on the TV to 

enable recording feature. Otherwise, recording feature 

will not be available.

To view the list of recordings, select “

Recordings 

Library

” and press the 

OK

 button. Recordings Library 

will then be displayed with available recordings.

All the recordings are kept in a list in the recordings 

library. 

RED button (Delete)

:Erases the selected recording.

GREEN button (Edit)

: Makes changes on the 

selected recording.

BLUE button (Sort)

: Changes the order of the 

recordings.  You  can  select  from  a  wide  range  of 

sorting options.

OK button

: Activates play options menu:

•  Play  from  start:  Plays  the  recording  from  the 

beginning.

• Resume: Recommences the recordings.
• Play from offset: Specifies a playing point.

Note: Viewing main menu and menu items will not ve 

available during the playback.

 (Resume): Recommences the recordings.

INFO (Details)

: Displays the short extended 

programmes in detail.

Media Browser Settings

You  can  set  your  Media  Browser  preferences  by 

using the Settings dialog. Press “ ” or “ ” button 

to highlight an item and use “ ” or “ ” button to set.

View Style: 

Sets default browsing mode.

Music FF/FR Speed

: Sets forwarding/advancing 

speed.

Summary of Contents for WP32NBLED

Page 1: ...COLOUR TELEVISION WITH REMOTE CONTROL OPERATING INSTRUCTIONS WP32NBLED BE WALKER WISE logon to www walker ie APPROVED...

Page 2: ...Renaming a Channel 17 Locking a Channel 17 Managing Stations Favourites 17 Button Functions 17 Managing Stations Sorting Channel List 18 On Screen Information 18 Media Playback Using Media Browser 18...

Page 3: ...ual will guide you for the proper operation of your TV Before operating the TV please read this manual thoroughly Please do keep this manual in a safe place for future references This device is intend...

Page 4: ...the manufacturer or have the same specifications as the original one Unauthorized substitutions may result in fire electrical shock or other hazards Servicing Please refer all servicing to qualified...

Page 5: ...uld be set up in a way that an unobstructed access to mains socket is guaranteed so that in case of emergency the mains plug can be pulled immediately To exclude the danger of fire the power cord shou...

Page 6: ...FAV PRESETS SUBTITLE RETURN SOURCE SLEEP SCREEN LANG Remote Control LCD TV Batteries 2 X AAA Instruction Book 1 X Video Audio Connection Cable Note You should check the accessories after purchasing M...

Page 7: ...rowser mode 19 Rapid advance in Media Browser mode 20 Info Reveal in TXT mode 21 No function 22 Picture mode selecion Changes picture mode in Media Browser video mode 23 AV Source 24 Red button 25 Gre...

Page 8: ...t the aerial cable through the device to the television with an appropriate antenna cable as shown in the illustration in the following pages 4 SCART input or output for external devices Connect the S...

Page 9: ...ection you must use the supplied AV connection cable for enabling connection First plug singular jack of the cable to the TV s Side AV socket Afterwards insert your video cable s not supplied connecto...

Page 10: ...quickly plug and unplug the drive This may cause physical damage to the USB player and especially the USB device itself Do not pull out USB module while playing or recording a file Programme Recordin...

Page 11: ...occur First partition of the usb disk is used for PVR ready features It also must be formatted as primary partition to be used for PVR ready features Some stream packets may not be recorded because o...

Page 12: ...from remote control handset when it is not to be used for a long period Otherwise it can be damaged due to any leakage of batteries Remote range is approximately 7m 23ft Switching On Off To Switch th...

Page 13: ...be described in accordance with the menu system of your TV Volume Setting Press V button to increase the volume Press V button to decrease the volume A volume level scale slider will be displayed on...

Page 14: ...Guide Search menu You can search programmes using the Guide Search screen There are searching options located within the Guide Search Screen You can Search By Genre or Name Match If you select GENRE o...

Page 15: ...ured buttons cursor buttons and OK button The operation method may differ depending on the contents of the digital teletext Follow the instructions displayed on digital teletext screen When the button...

Page 16: ...d than press OK Press OK button to quit channel list and watch TV Installation Press MENU button on the remote control and select Installation by using or button Press OK button and the following menu...

Page 17: ...new channels that are not on the list will be stored Analogue Fine Tune Select Analogue Fine Tune from the Installation menu by using or and OK buttons Analogue fine tune screen will be displayed Anal...

Page 18: ...e current character i e b character becomes a by and c by Pressing the numeric buttons 0 9 replaces the highlighted character with the characters printed above the button one by one as the button is p...

Page 19: ...ion is set to France you can use 4725 as the default code Media Playback Using Media Browser If the USB stick is not recognized after power off on or First Time Installation first plug the USB device...

Page 20: ...age files will be filtered and listed on this screen Jump Numeric buttons Jump to selected file using the numeric buttons OK Views the selected picture in full screen Slideshow button Starts the slide...

Page 21: ...e letter you input via the numeric buttons on your remote control Play This OK button Plays the selected file Previous Next Left Right buttons Jumps to previous or next file to play Yellow Button Chan...

Page 22: ...ss STOP button to quit timeshifting mode Similtaneous timeshifting recording s duration depends on your connected USB disk s file size and defined Max Timeshift in the Recordings Configuration menu Se...

Page 23: ...will be available You can use button to slow forward Pressing button consecutively will change slow forwarding speed Changing Image Size Picture Formats You can change the aspect ratio image size of t...

Page 24: ...equirements you can set the related mode option Picture mode can be set to one of these options Cinema Game Dynamic and Natural Contrast Sets the lightness and darkness values of the screen Brightness...

Page 25: ...e Settings For adjusting PC picture items do the following Press or button to select Picture icon Picture menu appears on the screen Contrast Brightness Colour Colour Temp and Picture Zoom settings in...

Page 26: ...gures parental settings Timers Sets timers for selected programmes Date Time Sets date and time Sources Enables or disables selected source options Other Settings Displays other setting options of the...

Page 27: ...s menu will function as described below Language Settings In the configuration menu highlight the Language Settings item by pressing or buttons Press OK and Language Settings submenu will be displayed...

Page 28: ...is used for setting the TV to turn off after a certain time Highlight Sleep Timer by using or button Use or button to set The timer can be programmed between Off and 2 00 hours 120 minutes in steps of...

Page 29: ...er a pin number If you have not changed the pin number the factory default is 0000 After you enter the pin a pop up menu appears on the screen to ensure that the hard disk should be formatted select Y...

Page 30: ...presentation describing what is happening on the screen during the natural pauses in the audio and sometimes during dialogue if deemed necessary You can use this feature only if the broadcaster suppo...

Page 31: ...power cable and connection to the mains socket outlet Poor Picture Have you selected the correct TV system Is your TV set or house aerial located too close to a non earthed audio equipment or neon li...

Page 32: ...B 16 1400x1050 75Hz 85Hz 17 1400x900 65Hz 75Hz 18 1600x1200 60 Hz 19 1680x1050 60 Hz 20 1920x1080 60 HzA 21 1920x1080 60 HzB 22 1920x1200 60HzA 23 1920x1200 60Hz Appendix B AV and HDMI Signal Compatib...

Page 33: ...Upgrade Options menu In Upgrade Options menu select Scan for upgrade and press OK button If a new upgrade is found it starts to download the upgrade A progress bar indicates the remaining download pro...

Page 34: ...EAC3 AC3 mp4 MPEG4 Xvid 1 00 Xvid 1 01 Xvid 1 02 Xvid 1 03 Xvid 1 10 beta1 2 H 264 PCM MP3 avi MPEG2 MPEG4 PCM MP3 MAX 1920x1080 30P 20Mbit sec Xvid 1 00 Xvid 1 01 Xvid 1 02 Xvid 1 03 Xvid 1 10 beta1...

Page 35: ...des Video MP ML PAL 4 3 16 9 Audio MPEG Layer I II 32 44 148kHz Specifications TV BROADCASTING PAL SECAM B G D K K I I L L RECEIVING CHANNELS VHF BAND I III UHF BAND U HYPERBAND NUMBER OF PRESET CHANN...

Page 36: ...green or green and yellow The wire which is coloured blue or black must be connected to the terminal which is marked with the letter N or coloured Black The wire which is coloured brown or red must b...

Page 37: ...50234714...

Reviews: