background image

Maintenance Instructions 

CLEANING

59

Front of Tractor

Proper Orientation of Air Cleaner Cover

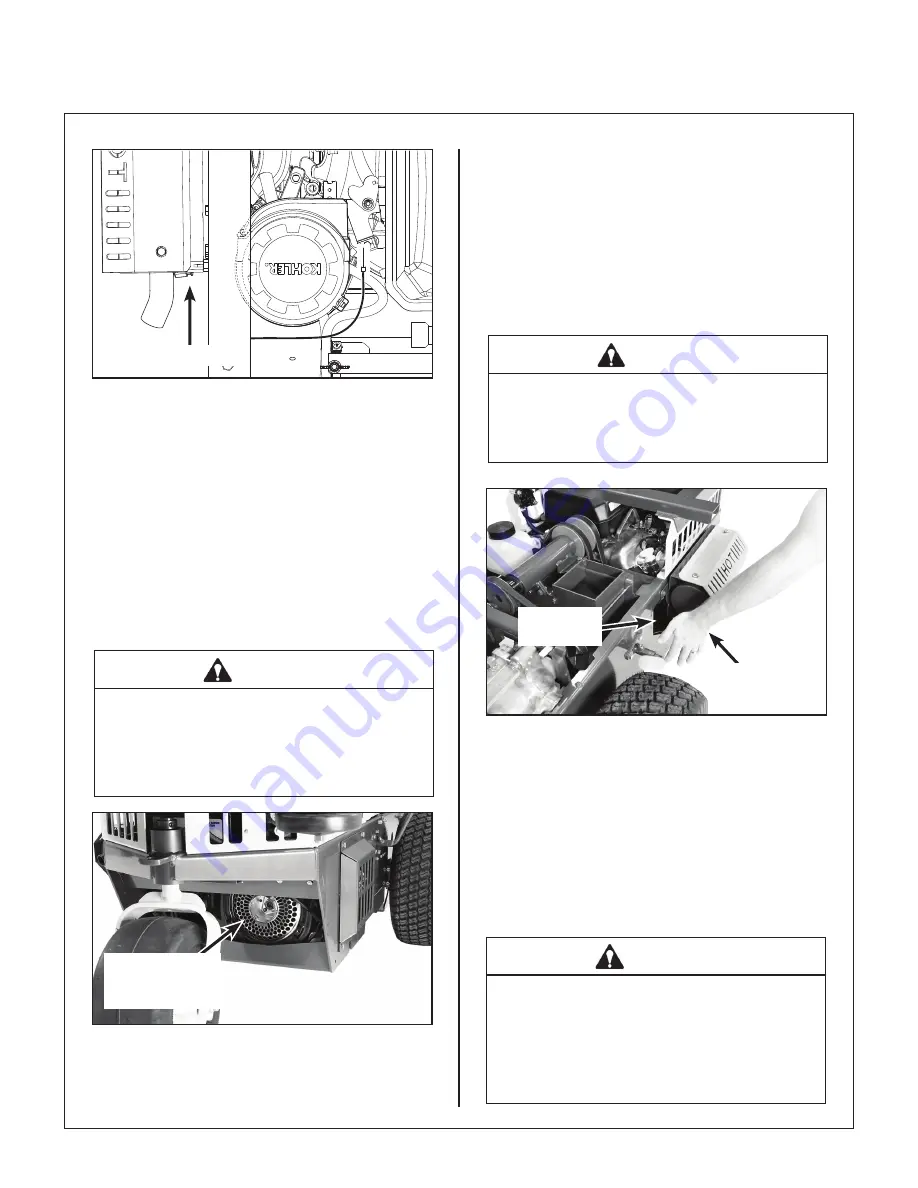
Engine Cooling System

Cooling Air Intake Screen

To prevent engine overheating and possible engine 

damage, clean grass clippings, chaff, and dirt from 

the rotating engine cooling air intake screen 

after


every 8 hours of operation.

    In  certain  mowing 

conditions (dry grass, leaves, tree “cotton”, etc.), it 

may be nec essary to check and clean the screen 

several times each day to prevent engine overheat

­

ing. 

  CAUTION

Operating the engine with a blocked air 

intake screen, dirty or plugged cooling 

fins, and/or cooling shrouds removed will 

cause engine damage from overheating.

Rotating Engine  

Cooling Air


Intake Screen

Keep Rotating Engine Cooling 

Air Intake Screen Clean

Cylinder Head Cooling Fins

It is essential for performance and longevity of the 

air-cooled engine to keep the cylinder head cooling 

fins  clean  and  free  of  obstruction.   After 

every 8 

hours

 of operation, check the performance of the 

cooling  system  by  starting  the  engine,  holding  a 

hand adjacent to the cylinder head cooling air duct, 

and feeling the cooling airflow.  If there is little or no 

airflow, clean the cooling fins as follows:

  DANGER

Make sure to keep hands clear of exhaust 

pipe,  muffler,  and  moving  parts  when 

checking airflow.

Check for


Airflow

Cooling Air 

Duct

Check Cooling System Airflow

1.  Inspect accessible cooling fins and clean with 

compressed air or backpack blower as needed.  

If the buildup is excessive, refer to step 2.

2.  If  the  debris  cannot  be  removed  with  com

­

pressed air, it will be necessary to remove the 

engine from the chassis and remove the engine 

shroud for thorough cleaning.  See your autho

­

rized Kohler dealer for this service.

  CAUTION

DO NOT use a pressure washer to clean 

the cooling system on an air-cooled en-

gine, mud may form under the cooling 

shroud on the cylinder head and cooling 

fan.

Summary of Contents for S14i

Page 1: ...nual Safety Assembly Operating and Maintenance Instructions Please Read and Save These Instructions For Safety Read All Safety and Operation Instructions Prior to Operating Machine Beginning S N 15425...

Page 2: ...perator or others If any thing in this manual is confusing or hard to understand please contact your local authorized dealer or call our service department at 970 221 5614 for clarification before ope...

Page 3: ...llation_____________________ 21 PTO Shaft Guard Installation____________ 21 Tilt Up Roller Wheel Installation__________ 21 Mower Deck Installation on Tractor________ 21 Deck Installation______________...

Page 4: ..._ 64 Charging the Battery___________________ 64 Tire Pressure__________________________ 64 Wheel Nut Torque______________________ 64 Sharpen Mower Blades_________________ 64 Drive Belts_______________...

Page 5: ...OUND DRIVE refers to the dual transaxles which drive the main wheels LEFT HAND LH refers to the left hand side of the tractor when the operator is seated facing forward in the tractor seat POWER TAKE...

Page 6: ...mportant to find a local authorized ser vicing agent of the component manufacturer Any unauthorized work done on these components during the warranty period may void the warranty If you have any diffi...

Page 7: ...m Air Cleaner Engine Mounted Kohler Quad CleanTM Air Cleaner Kohler Filter P N 17 083 21 S Precleaner Filter P N 17 083 15 S ELECTRICAL SYSTEM Battery 12 Volt 300 CCA Interstate SP 35 Charging System...

Page 8: ...6 6 Ground Travel Speed Forward MPH km h Reverse MPH km h 0 6 5 0 10 5 Infinitely Variable 0 5 0 8 Infinitely Variable BLADE DRIVE PTO Shaft Sliding Spline Shaft with Two 2 High Speed U Joints Blade D...

Page 9: ...eight lb kg Tractor Only 596 270 Tractor with 42 Collection Deck DC42 1 787 357 GHS SYSTEM Blower 12 75 in Diameter Three Blade Paddle Wheel Blower Brake Band Brake Works in Combination with PTO Clutc...

Page 10: ...Walker P N 5234 7 SEAT Contour Molded with Nylon Backed Vinyl Cover and Integral Foam Cushion FRAME BODY CONSTRUCTION Frame All Welded Unitized Steel Chassis Body 14 Gauge Steel Deck 11 Gauge Steel GH...

Page 11: ...g Clip Deck Caster Wheel Tilt Up Deck Handle 30 Amp Circuit Breaker Not Visible Engine Low Oil Warning Horn Not Visible Footrests Counterweight Spring and Protective Cover Deck Support Arm Catcher Lif...

Page 12: ...sible Left Hand Drive Wheel Catcher Door Catcher Door Gas Spring Not Visible Catcher Lift Dump Handle Rotating Engine Screen Tailpipe Catcher Door Handle Catcher Air Exhaust Tailwheel Fork and Wheel F...

Page 13: ...Tank Cap Fuel Tank PTO Clutch Lever Neutral Safety Switch RH Transmission Control Rod LH Transmission Control Rod Steering Lever Spring Dampeners Jackshaft Transaxle Oil Expansion Reservoir Fuel Filt...

Page 14: ...y Walker Manufacturing must take full responsibility for safety The Walker Rider Lawnmower has been designed with many safety features to protect the operator from personal harm or injury However it i...

Page 15: ...eat with any one or more of these controls in the operating position 1 Forward Speed Con trol FSC out of NEUTRAL PARK 2 PTO Clutch ENGAGED or 3 Parking Brake DIS ENGAGED 10 Handle gasoline with care G...

Page 16: ...ignition interlock switch normally prevents starting of the machine if these controls are in the OPERATING position 7 Do not operate machine if the operator pres ence safety switch system is not worki...

Page 17: ...r is being closed Also keep fingers and hands clear of the door frame The door may slam shut with considerable force 20 In case of a clogged or plugged mower deck or GHS catching system a Disengage th...

Page 18: ...ines and fuel injectors contact your Walker dealer or autho rized Kohler service dealer 8 Altering the equipment or engine in any manner which adversely affects its operation perfor mance durability o...

Page 19: ...Screen Part Number 5869 Location Top of Fuel Tank Part Number 8600 12 1 Warning carbon monoxide CO poisoning hazard CO emitted by a running engine can be deadly Do not operate indoors or in other encl...

Page 20: ...deflector in place and in the lowest position 2 Warning rotating mower blades are a cutting dismemberment hazard to hands and feet Keep all body parts away from rotating mow er blades Do not step on e...

Page 21: ...ition key 4 Warning do not engage PTO clutch with PTO shaft disconnected 5 PTO Clutch Lever Move lever forward to engage PTO clutch back to disengage Location RH Fender Part Number 8600 45 1 Throttle...

Page 22: ...ck battery charger to start the engine Never jump start the engine using another source Electricity fluctua tions can damage the ECU Electronic Control Unit Always disconnect negative battery cable le...

Page 23: ...use water or any other liquid during initial activation 2 Remove the filler caps and carefully fill each cell until the electrolyte is just above the plates 3 After the battery is filled with electro...

Page 24: ...ck Caster Wheels Installation 1 Remove the bolt nut and axle spacer tube from each deck caster wheel fork 2 Fit the axle spacer tube through the wheel hub and fit the assembly into the wheel fork 3 In...

Page 25: ...stallation Tilt Up Roller Wheel Installation Mount the two 2 tilt up roller wheels on the brack ets on the rear skirt of the deck housing using the P N F543 axle bolt 3 8 in plain washer 3 8 in wave s...

Page 26: ...ough the hole on the end of each support arm to lock the deck in place refer to Deck Counterweight Spring Installa tion photo Two 2 hitch pins are included in the Owner s Packet of materials 6 Raise m...

Page 27: ...bove ground during the leveling process WARNING The machine must be shut off during this procedure 2 Check the side to side level Rotate each blade sideways and measure the distance from blade tip to...

Page 28: ...use fresh automotive grade unleaded gaso line DO NOT use gasoline containing greater than 10 ethanol DO NOT use additives such as car buretor cleaners deicers or moisture removing agents DO NOT use ga...

Page 29: ...tructions for blower cleaning information DANGER Never operate cutter blades with deck in raised position because it is hazardous The tilt up deck can be secured in the raised posi tion by unlocking t...

Page 30: ...lever red knob is located on the left side of the seat and is used to control engine speed Moving the lever forward toward the FAST position increases engine speed moving it back ward toward the IDLE...

Page 31: ...on of the steering levers The steering levers operate only with a backward pulling move ment of the lever which causes the drive wheel for that lever to first slow down stop and then reverse with a fu...

Page 32: ...f the Steering Levers RIGHT WHEEL STEERING LEVER Full Forward Ground Speed Position Reverse Drive Wheel Motion Position Neutral Park Position LEFT WHEEL STEERING LEVER Forward Position No Control Chan...

Page 33: ...ransax les By lifting the arms up and locking them into place with the shoulder on the arm in the chassis notch the transaxles are released to permit free wheeling By releasing the arms and recessing...

Page 34: ...ing Horn Engine Low Oil Warning Horn Hourmeter The hourmeter which is located on the right front of the body displays operating time accumulated while the PTO blade drive clutch is engaged The hourmet...

Page 35: ...y gas 1 Before attempting to start the engine make sure the operator is in the seat the Forward Speed Control is in NEUTRAL PARK position the parking brake is ENGAGED and the blade clutch is DISENGAGE...

Page 36: ...e to stop if the parking brake is in the DISENGAGED position and or the FSC is out of the NEUTRAL PARK position tractor stationary or moving for ward and the operator is not in the seat The function o...

Page 37: ...ine and ground speed slow until learning the control response WARNING When moving forward DO NOT suddenly put the tractor in reverse by rapidly pulling on the steering levers especially when go ing do...

Page 38: ...blade timing has not been dis turbed the blades should be at 90 degrees to each other Refer to REPLACING RE PAIRING the Blade Overload Shear Bolts in Mainte nance Instructions if blades are out of ti...

Page 39: ...brake NOTE The emergency stop procedure is exactly the same procedure used to normally stop and park the machine ADJUSTING CUTTING HEIGHT WARNING The engine must be stopped before ad justing cutting...

Page 40: ...ition RECOMMENDATIONS FOR MOWING DANGER Do not mow around overhanging tree branches or bushes at the same height as the operator s torso and head where inad vertent contact may cause injury Avoid Low...

Page 41: ...the FSC for trimming operations Make sure the mower is leveled properly for a smooth cut Refer to Deck Leveling in Assembly Instructions Use an alternating stripe mowing pattern for best appearance a...

Page 42: ...to reduce the chance of damage to property by thrown objects Discharge Shield Side Discharge Deflector Shield in Lowest Position When operating on a slope reduce speed and use caution to start stop an...

Page 43: ...dy should never be tilted for ward with the deck in the tilt up position This can cause the deck to unhook from the tractor and fall with considerable force potentially causing deck or tractor damage...

Page 44: ...pring Not Visible Actuator Rod Powerfil Drive Motor Grass Pak Vane Switch Full Signal Horn Catcher Door Grass Catcher Catcher Air Exhaust Powerfil Delivery Spout Dump Handle Catcher Delivery Chute Bod...

Page 45: ...o 2 front deck support pins are repositioned 2 to 3 notches higher while leaving the rear pins in their original position DANGER NEVER operate the GHS catcher with the back door open Objects may be th...

Page 46: ...reen juice Clo ver and weeds are especially a problem The mower deck will need to be cleaned frequently when operating in these con ditions Check the deck cutting height setting When working in thick...

Page 47: ...spout when the catcher is almost full The full signal function may be checked by turning the ignition switch ON RUN engaging the blade clutch engine not running opening the catcher back door and trigg...

Page 48: ...ate dumps into a disposal area or dumps into the optional dump bag The dump bag is a reusable nylon fabric bag designed to conveniently move grass clippings from the catcher to a remote disposal area...

Page 49: ...her with the one hand while continuing to hold up on the bag strap with the other hand Refer to photos for posi tioning the bag and dumping Catcher Lift Dump Handle Dumping Catcher into Dump Bag 5 Low...

Page 50: ...e the ram with the clutch ratcheting for an extended time as this will cause extra wear on the clutch mechanism CAUTION The operator should be in the seat and by standers stay clear when the power dum...

Page 51: ...860 0 4 3 1 2 Catcher Door Grass Catcher Lift Channel RH Catcher Door Arm LH Catcher Door Arm Cable Assembly Door Arm Actuator Cable Guide Catcher Door Gas Spring Power Dump Mount Lift Arm Gas Spring...

Page 52: ...Check Blade Brake Action x 66 Check Adjust Blade Clutch x 79 Replace Air Filter Element x 58 Change Transaxle Oil and Filter x 56 Check Adjust Engine Valve Clearance x 66 Replace Fuel Filter x 72 Cle...

Page 53: ...Check performance of the cooling system by starting the engine holding a hand adjacent to the cylinder head and feeling the cooling air flow DANGER Make sure to keep hands clear of exhaust pipe muffl...

Page 54: ...o the sump allow at least five 5 minutes after stopping the engine IMPORTANT NEVER check or add oil with the engine running 2 Before removing the dipstick clean the area around the dipstick opening on...

Page 55: ...expected ambient temperature Oil with the correct viscosity will aid starting in cold weather and assure proper lubrication in hot weather Fill to FULL F mark on the dipstick crankcase capacity is 1...

Page 56: ...18 PTO Belt Tightener Pivot Grease 1 19 Brake Band Pivot Pins Clevis Oil 2 20 Catcher Hinge Point Oil 2 21 Throttle Control Cable Ends Oil 2 22 Engine Dipstick Oil Fill Oil 1 23 Engine Idler Pivot Gre...

Page 57: ...Maintenance Instructions LUBRICATION 53 Chassis and Deck Lubrication Points DC36R Shown 9 9 8 10 11 12 13 25 21 26 12 24 24 14 15 17 22 20 20 21 23 18 19 16 1 6 7 5 3 3 4 1 7 3 4 3...

Page 58: ...arboxes If the lubricant is low add SAE E P Extreme Pressure 80W 90 API GL 5 gear lube until the oil level is up to submerges the horizontal shaft in the gearbox shaft parallel to cover plate NOTE In...

Page 59: ...ansaxle Fluid Level The transaxle oil lubrication is SAE 20W 50 API Service Class SL or higher engine oil Inspect both transaxle cases after every 25 hours of operation for visible leaks The fluid lev...

Page 60: ...p of the transaxles Remove the elbows to access the oil fill opening 5 Fill the transaxles with 20W 50 API Service Class SL or higher oil through the opening where the elbows were Fill up to the openi...

Page 61: ...ddition to the paper filter an oiled foam precleaner sleeve surrounds the filter and provides extra filtering action IMPORTANT Use only Kohler air filter and pre cleaner for replacement Kohler Filter...

Page 62: ...ing 3 Clean the filter by gently tapping on a flat hard surface Radial Sealing Surface Precleaner Paper Filter Element Outlet Tube Air Cleaner Base Air Filter Element Replacement NOTE Use care when cl...

Page 63: ...r cooled engine to keep the cylinder head cooling fins clean and free of obstruction After every 8 hours of operation check the performance of the cooling system by starting the engine holding a hand...

Page 64: ...TILT UP position and insert the deck hook into the tilt up latch on the tractor body Tilt Up Hook Tilt Up Latch Tilt Up Hook and Latch Connected Deck Lock Lever Tilt Up Handle Deck Secured in TILT UP...

Page 65: ...dle Bracket P N 5275 6 as shown This configura tion is set up to allow free movement of the blow er wheel NOTE The saddle bracket is ordered as a ser vice part IMPORTANT With the driveline disconnecte...

Page 66: ...This may be the result of an oil leak If an oil leak is noticed contact your local Walker dealer Cooling Fins Transaxle Housing and Cooling Fins IMPORTANT In case an oil leak develops on the input sh...

Page 67: ...vice Installation and Charging Tips for Electronic Fuel Injection Engines Do not allow the battery cables to touch opposing terminals When connecting battery cables attach the positive cable to positi...

Page 68: ...ire Pressure Inflate tires to pressures shown below Deck Caster Wheel 20 PSI 137 kPa Drive 15 PSI 103 kPa Tailwheel 20 PSI 137 kPa If equipped with optional pneumatic tires Wheel Nut Torque Check the...

Page 69: ...t the blade with wing tips pointing up into the housing For gear driven decks reinstall the blade washer lock washer and nut Tight en the nut to 60 lb ft 81 N m For belt driven decks reinstall the spa...

Page 70: ...ntenance or adjustments will adversely af fect engine operation performance and durability and may VOID the warranty Transmission Control Setting On a yearly interval or when an out of adjustment cond...

Page 71: ...d Without an operator in the seat the engine starts and continues to run with the Forward Speed Control FSC and or PTO engaged or the parking brake disengaged With an operator in the seat the Forward...

Page 72: ...k plug wire IMPORTANT ALWAYS use genuine factory re placement parts Substitute parts CAN result in product malfunction and possible injury to the op erator and or others Drive Belts There are three 3...

Page 73: ...move the belt then slowly release the idler Engine Belt Disengaged Engine Belt Engaged 2 To replace the engine belt a Reverse the removal procedure to replace the engine belt Engine Idler Arm Idler Pu...

Page 74: ...Drive Belt Engaged 2 To replace the PTO belt a Install the PTO drive belt by reversing the removal procedure Replace engine belt NOTE If installing a new PTO belt is difficult the blade brake band adj...

Page 75: ...lease the idler pulley Ground Drive Belt Assembly Disengaged 2 Reverse the procedure to install the ground drive belt Ground Drive Belt Assembly Engaged Raise Idler Pulley to Relax Belt Drive Pulley L...

Page 76: ...a where the fuel line and connections will not be contaminated by dust and dirt 1 Close the fuel shut off valve 2 Expand and slide clamps on either side of the filter away from filter and pull fuel li...

Page 77: ...pen Mower Blades instructions Since sand and abrasive material can wear metal away in this area the blade should be replaced when met al thickness has worn to 1 16 in 1 6 mm or less DANGER When blades...

Page 78: ...n other If they are not equal adjust accordingly The handles may or may not be even at this point NOTE The LH steering lever is non adjust able This procedure will require adjustment of the RH le ver...

Page 79: ...jam nuts Correct FSC Lever NEUTRAL PARK Position Adjust Length of Rod to Position FSC Lever Remove Lower Ball Joint to Adjust FSC Lever Position Adjustment 2 Securely block the tractor up so the driv...

Page 80: ...ard to re verse The transmission is now centered in the neutral window Tighten the jam nut on the ball joint and repeat the same procedure on the other transmission 6 Turn off the engine and then lowe...

Page 81: ...s 5 If the machine is tracking straight throughout the speed range except at maximum speed use the following adjustment procedure a With the engine off place the FSC in full FORWARD On the faster tran...

Page 82: ...justing tighten the jam nut and reconnect the spark plug wire Step 7 Forward Speed Control Friction Adjustment FSC Full Forward Position Pull Steering Levers Back To Check Friction Lock FSC Friction A...

Page 83: ...the clutch engaged adjust the length of the clutch actuator rod to achieve a clutch spring assembly bolt head clearance of 1 4 in to 5 16 in 6 5 mm to 8 mm To adjust the clutch actuator rod length loo...

Page 84: ...band nut to achieve a 1 4 in to 3 8 in 6 5 mm to 9 5 mm gap between the PTO pul ley and clutch idler pulley as shown in the Blade Brake Band Adjustment illustration NOTE As the blade brake band drum...

Page 85: ...hinge joint is properly ad justed the deck lock levers should move in and out of the engaged and disengaged positions freely All four 4 hitch pins used for height adjustment should sit flush on the w...

Page 86: ...the engine running Projectiles CAN be thrown out of the grass delivery spout and CAN cause serious injury to bystand ers or property damage 2 Measure from the exhaust screen top of catch er to the to...

Page 87: ...roduct alterations or failure to follow the instructions contained in the Operator s Manual for operation and maintenance B The customer shall pay any charges for making service calls and or for trans...

Page 88: ...WALKERMFG CO 5925E HARMONYROAD FORTCOLLINS CO80528 970 221 5614 FORM NO 071019 PRINTED IN USA www walker com 2019 WALKER MFG CO...

Reviews: