background image

EN

System settings

MC402

56

12.4

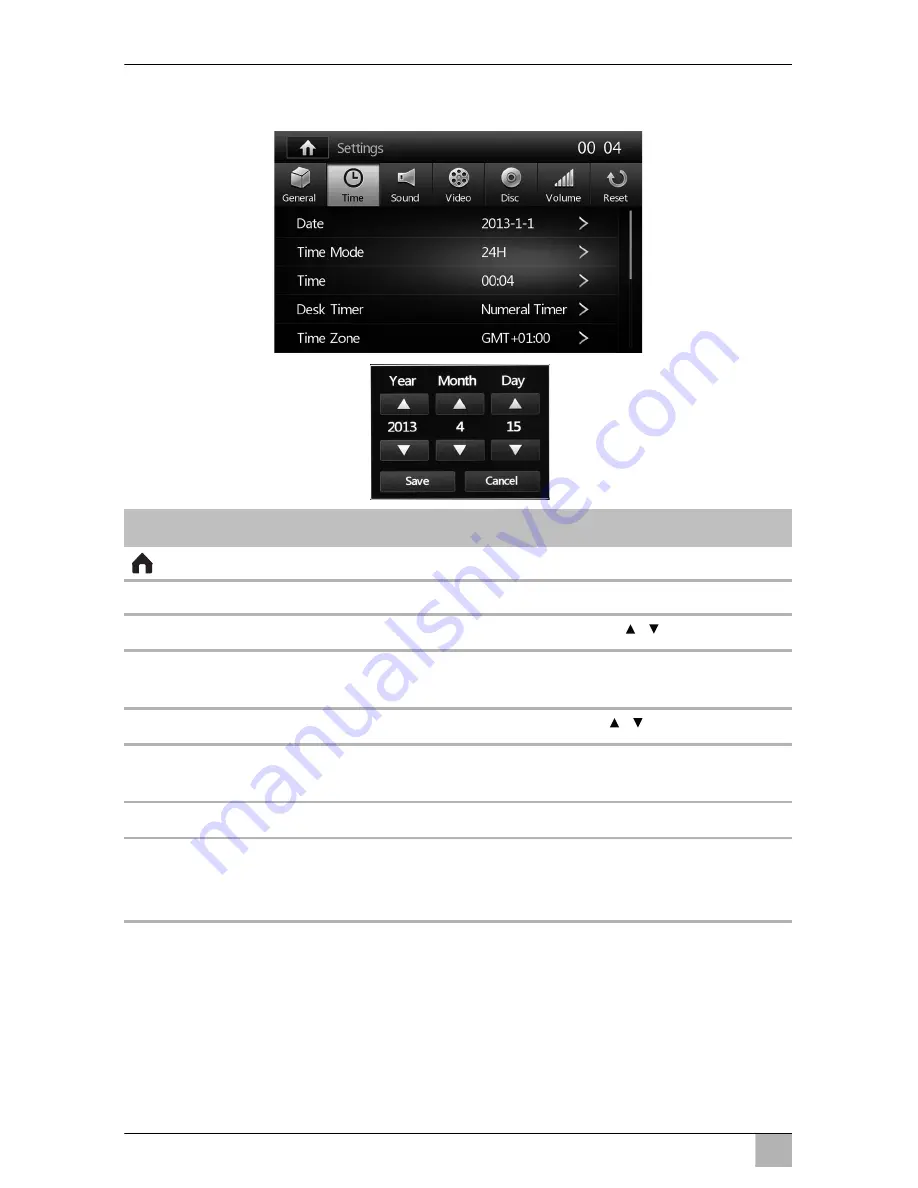
Time settings menu

Description

Description

Displays the 

SOURCE

 menu

00:04

Current time

Date

Set the day, month and year with the 

 button.

Time Mode

Set the format for the time display
12 hour (

12H

) or 24 hours (

24H

) display.

Time

Set the hours and minutes with the 

 button.

Desk Timer

Set the time display to 

Simulate Timer 

(analogue clock) or 

Numeral Timer

 (digital clock).

Time zone

Set the required time zone

Power Off Timer

Set the Power Off display to 

ON

 or 

OFF

.

When 

ON

 is selected, the time will be displayed when the 

device is switched off. 

 / 

 / 

 / 

 / 

Summary of Contents for PerfectView MC402

Page 1: ...PerfectView MC402 EN Moniceiver Installation and Operating Manual...

Page 2: ...gtende p internetadressen www dometic waeco com Inh mta mer information om den omfattande produktpaletten fr n Dometic WAECO Best ll v ra kataloger gratis och utan f rpliktelser under v r Internetadre...

Page 3: ...MC402 3 OD RDM EJECT ZOOM DIM 1 2 3 4 5 1 1 2 3 4 5 6 7 8 10 9 2...

Page 4: ...MC402 4 1 3 2 4 5 3 SLOW RDM EJECT DIM 1 2 3 4 5 6 7 8 9 13 12 14 10 11 15 16 17 18 19 20 21 22 23 24 25 26 27 28 4...

Page 5: ...MC402 5 5 6 7...

Page 6: ...MC402 6 8 1 9...

Page 7: ...MC402 7 1 1 0 1 a...

Page 8: ...MC402 8 A B b...

Page 9: ...MC402 9 c 1 d...

Page 10: ...Remote control 20 7 Installing the moniceiver 22 7 1 Notes on the electrical connections 22 7 2 Installing and connecting the moniceiver 22 8 Operating the moniceiver 26 8 1 Basic functions 26 8 2 Usi...

Page 11: ...12 4 Time settings menu 56 12 5 Sound settings menu 57 12 6 Video settings menu 58 12 7 Disc settings menu 59 12 8 Volume settings menu 61 12 9 Resetting 61 12 10 Use of steering wheel control optiona...

Page 12: ...echanical influences and excess voltage Alterations to the product without express permission from the manu facturer Use for purposes other than those described in the operating manual 2 1 Safety when...

Page 13: ...es only use insulated cable lugs plugs and flat push on receptacles 30 direct supply from positive battery terminal 15 connected positive terminal behind the battery 31 return line from the battery ea...

Page 14: ...ems such as the AIRBAG etc may only be performed by qualified specialists A NOTICE To prevent damage when drilling make sure there is sufficient space on the other side for the drill head to come out...

Page 15: ...nusual smell This reader is certified according to the laser protection class 1 The accessible laser radiation is safe under reasonably foresee able conditions Avoid looking directly into the laser be...

Page 16: ...DIN installation sleeve 3 1 Remote control incl batteries 4 1 Cover frame 5 2 Fastening brackets 1 Display cleaning cloth 1 Stylus 1 Set of connection cables 1 Set of fastening material 1 GPS antenna...

Page 17: ...y switches on when the reverse gear is engaged With the moniceiver you can listen to music in your vehicle watch videos view photos or make calls using the hands free system The moniceiver allows you...

Page 18: ...ages JPEG jpg ID3 tag from version 2 0 Supported sample rate 8 kHz to 48 kHz 44 1 kHz preferred Supported bit rate 32 320 kbps 128 kbps preferred MP3 discs must have the following features ISO 9660 or...

Page 19: ...he audio video source menu 3 ON OFF VOLUME knob Switches the device on and off Controls the volume Switches to mute Controls the brightness 4 BRIGHTNESS button Enables the setting of the brightness of...

Page 20: ...Selects the audio video source Radio Disc SD MMC memory card USB AV IN 1 audio input on the front of the device AV IN 2 audio input on the back of the device Bluetooth 2 EJECT Ejects the disc 3 MENU D...

Page 21: ...VD if available 18 SUBTITLE Displays the subtitles on a DVD 19 REPT A B Repeats from A B of a track 20 REPT Plays again 21 SLO Plays slowly 22 RDM Plays tracks in a random order 23 Set the radio stati...

Page 22: ...and the loudspeaker cables are well insulated in order to avoid short circuits Ensure that the screws for protecting the device during transport fig 9 1 page 6 are removed from the upper side of the...

Page 23: ...CD DVD player will function correctly For the complete wiring diagram see fig b page 8 Label Description TV TV antenna input RADIO ANT Radio antenna input A B ISO plug SWC Connection for steering whe...

Page 24: ...ACC Ignition switching plus terminal 15 GND Earth terminal 31 B 12 V battery KEY A No function assigned KEY B No function assigned KEY GND No function assigned BRAKE Handbrake switch REVERSE Reversin...

Page 25: ...fix the housing securely in the centre console fig 8 page 6 Attach the fastening brackets to the device with the fastening screws pro vided M5 X 6 fig 9 page 6 Connect the device to the electrical sys...

Page 26: ...ice off or Press the POWER button fig 4 16 page 4 to switch the device off NOTE If the moniceiver is connected to the handbrake switch then no video can be played during the journey In the settings th...

Page 27: ...nd of the device to mute The MUTE message appears on the display Briefly press the ON OFF VOLUME knob fig 2 3 page 3 once to switch the sound on again or Press the MUTE button fig 4 27 page 4 again on...

Page 28: ...range of 3 to 5 metres Selecting functions You can select the functions shown directly via the display You have to use the and buttons on the remote control in order to navigate to the desired entry M...

Page 29: ...ote control can no longer be used to operate the device Open the cover on the back of the remote control Replace the button batteries type CR2025 3 V fig d 1 page 9 Close the cover WARNING Keep batter...

Page 30: ...cription Displays the SOURCE menu 1 11 Current track number Displays track list 00 08 Current time Open close menu Prev Next Select track Play Pause Starts interrupts playback EQ Sets equaliser Random...

Page 31: ...13 10 Current time Open close menu Prev Next Select track Play Pause Starts interrupts playback EQ Set equaliser Goto Enters a desired track Menu Opens the DVD main menu A B Repeats from A B of a titl...

Page 32: ...cription Displays the SOURCE menu 1 15 Current track number 00 59 Current time Available music on data carrier Available videos on data carrier Available photos on data carrier NOTE The functions in t...

Page 33: ...s the SOURCE menu 10 10 Title number 01 09 Current time Open close menu EQ Function not available Prev Next Select photo Play Pause Starts interrupts playback Goto Enters the photo desired Origin Disp...

Page 34: ...e remote control The disc is ejected from the disc compartment If the disc is not removed from the device within 10 seconds it is drawn back into the disc compartment again automatically NOTE Make sur...

Page 35: ...a USB flash drive to the device I Open the cover and plug the USB flash drive into the USB port fig 2 7 page 3 The device reads the files on the data carrier and shows them on the dis play Removing a...

Page 36: ...cting the audio video source on page 27 Starting playback Press the button to start playback Pausing playback Press the button during the playback This pauses the playback The PAUSEmessage appears on...

Page 37: ...the display The selected title will be highlighted and played or Press the TITLE button on the remote control to display the play list Select a title or a chapter with the button or press the numbers...

Page 38: ...g playback until the desired repeat function is selected repeat a single track repeat all tracks The track will be replayed The following message will appear in the dis play for CDs VCDs REP 1 REP ALL...

Page 39: ...electing DVD subtitles Press the SUBTITLE button as often as necessary until you have selected the desired subtitles on the DVD Display DVD main menu Press the MENU button to display the main menu Dis...

Page 40: ...nd saturation can be set at levels of 0 16 Press PIC on the display to set brightness contrast and saturation or Press the DIM button on the remote control to adjust the brightness Enlarging photos Pr...

Page 41: ...ent time Scan Searches for and stores the six radio stations with the strongest reception Prev Next Selects frequency Band Changes the frequency band Option Radio settings Memory Stores the radio stat...

Page 42: ...a radio station manually by using the cursor keys or via the num ber pad to set the required frequency Press the button to search for a station manually Hold down the button for 2 seconds to search f...

Page 43: ...to Distance areas further afield or Local for local areas In the local mode local traffic information will be search for LOCAL is shown on the display Traffic information from further afield is searc...

Page 44: ...e radio sta tion is left Set AF to ON or OFF Setting programme type Programme Type PTY denotes the classification of radio stations by type This information always depends on the region the broadcasti...

Page 45: ...ection When you link mobile tele phones to the monceiver you can make calls with the integrated hand free function You can access both lists of numbers dialled as well as the phone book on the linked...

Page 46: ...tion Displays the SOURCE menu Using the telephone function Using the audio player function 00 07 Current time Input screen 0 9 Numeric keypad Deletes numbers Displays phone book Displays call lists St...

Page 47: ...usic menu Symbol Description Displays the SOURCE menu Using the telephone function Using the music function 00 07 Current time Breaks the Bluetooth connection Prev Next Select track Play Pause Starts...

Page 48: ...utomatically and shows the available devices in a list I At the same time your Bluetooth device shows the monoceiver as avail able in the settings for Bluetooth Select the moniceiver in the event list...

Page 49: ...n the display to stop dialling Displaying phone book and call lists I Press the button to display your telephone books A list of entries in the phone book is displayed Press the button to display your...

Page 50: ...I Start the search for available Bluetooth devices NOTE Once the mobile phone and the moniceiver are coupled the device automatically switches to the Bluetooth menu as soon as an incoming call is rec...

Page 51: ...is selected the device will connect automatically as long as a mobile telephone which is not yet coupled is in range NOTE You are able to pause the music being played at any time if you either make o...

Page 52: ...reated manually Setting automatic call acceptance Set the automatic connection to ON or OFF When ON is selected and an incoming call is received on the connected mobile handset this call will be autom...

Page 53: ...e from User Flat Pop Techno Rock Class Jazz Optimal The EQ settings can be user defined in the EQ mode User RESET allows you to reset the user defined settings Set the controls using the buttons You c...

Page 54: ...ers for the subwoofer on a scale of 0 38 and indi vidually set the loudspeaker at levels of 0 7 12 2 Opening settings Press the button on the display in the SOURCE menu see chapter Selecting the audio...

Page 55: ...essed to either ON or OFF Key Colour Sets key colour to Default or User Calibration Calibrate the touch screen as follows Press calibration Press start Touch the display on the symbol in the centre fo...

Page 56: ...the format for the time display 12 hour 12H or 24 hours 24H display Time Set the hours and minutes with the button Desk Timer Set the time display to Simulate Timer analogue clock or Numeral Timer dig...

Page 57: ...fer Filter Set the crossover frequency of the subwoofers to Flat 80 Hz 120 Hz or 160 Hz Loud Set the loud function to ON or OFF When ON is selected the bass and treble frequencies will be increased at...

Page 58: ...mal or Mirror In the mirror image the image from the reversing video cam era will be displayed as if you were looking out of the rear window Brightness Setup Set the display Night Dark Normal or Brigh...

Page 59: ...he preset password is 0000 The numbers can be deleted with the button Confirm the code with the OK button When you enter the code UNLOCK will be displayed in the screen The age rating level can be set...

Page 60: ...DVD has the present language within its range of lan guages the menu will automatically be displayed in this lan guage Aspect Ratio Set the image format to 4 3PS Pan Scan 4 3LB Letter Box or 16 9 4 3...

Page 61: ...the video settings Description Description Displays the SOURCE menu 13 04 Current time Media The volume can be set at levels of 0 12 Radio The radio volume can be set at levels of 0 12 Bluetooth The B...

Page 62: ...the steering wheel control Press the desired function on the display Press the button on the steering wheel control which the function will use The function is now stored under this button for steerin...

Page 63: ...em is unstable e g the on screen display is frozen Reset the system by pressing the RESET but ton The device will not play any disks The disc has not been cor rectly inserted The disc must be inserted...

Page 64: ...the radio The battery cable is not properly connected Connect the battery cable correctly The USB flash drive or memory card cannot be inserted The USB flash drive or memory card have been inserted th...

Page 65: ...dispose of any batteries with general household waste Return defective or used batteries to your retailer or dispose of them at collection points 17 Technical data PerfectView MC402 Item no 910210002...

Page 66: ...kHz Station search sensitivity 20 dB V 28 dB V Distortion factor 1 0 Stereo channel separation 1 kHz 25 dB Input impedance 75 MW Sensitivity S N 20dB 30 dB V Selectivity 9 kHz 50 dB Signal noise ratio...

Page 67: ...The device has E4 certification Distortion factor 0 5 Frequency response 3 dB 20 Hz 20 kHz Audio input level 0 5 Vrms Input impedance 100 Input level max 2 Vrms Input level CVBS 1 0 0 2 V0 Input impe...

Page 68: ...22 414 32 01 Mail info dometic pl RUSSIA Dometic RUS LLC Komsomolskaya square 6 1 107140 Moscow Russia 7 495 780 79 39 7 495 916 56 53 Mail info dometic ru SLOVAKIA Dometic Slovakia s r o Teheln 8 SK...

Reviews: