background image

35

Index

Contents

35

Index

Contents

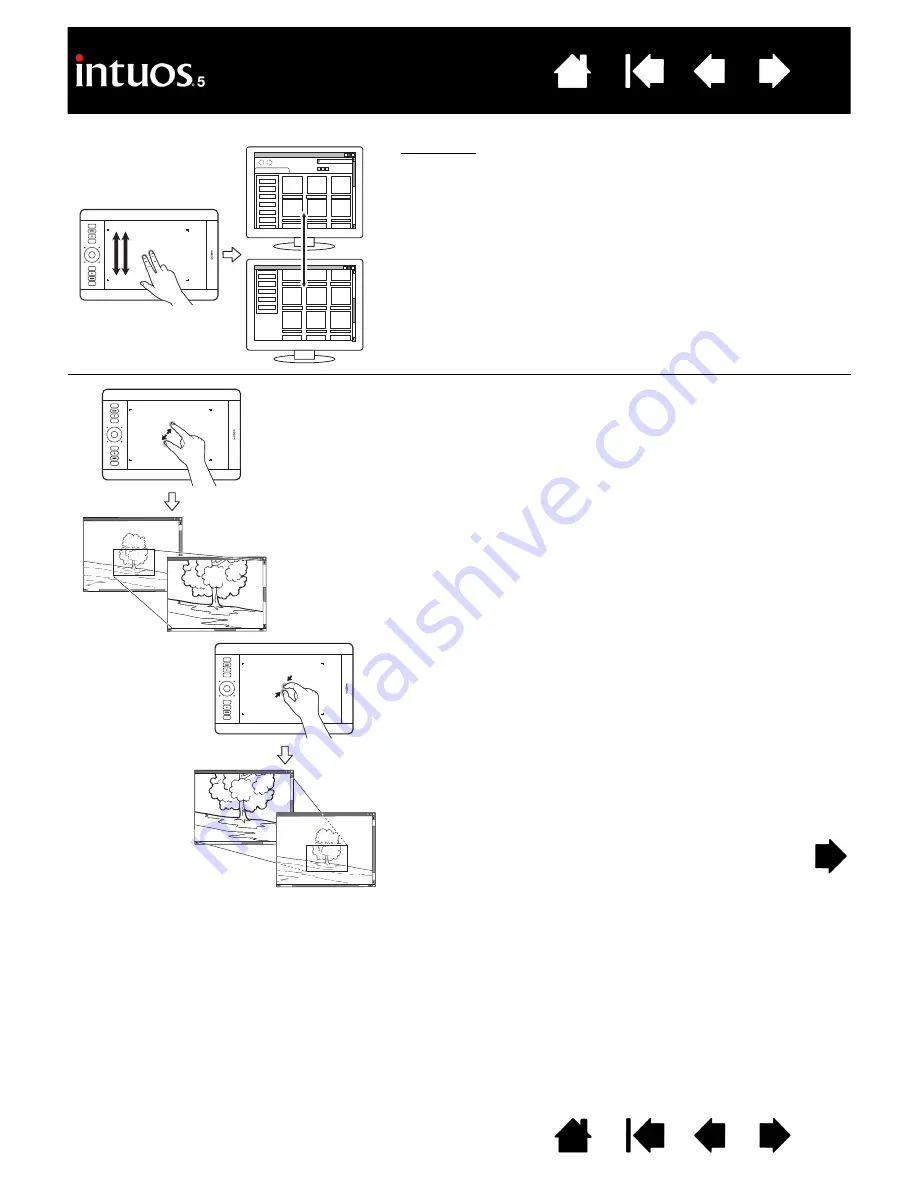
Fast scroll.  Quickly move (or flick) two fingers together, 
lifting your fingers at the end of the motion.

Fast scroll up by flicking your fingers in an upward 
motion.

Fast scroll down by flicking your fingers in a downward 
motion.

Note:  Fast scrolling works only for vertical scrolling.

Z

OOM

First place two fingers on the tablet surface.

Zoom-in by moving (expanding) your fingers away from 
one another.

Zoom-out by moving (pinching) your fingers toward one 
another.

Note:  If zoom functions do not operate correctly within 

Adobe

®

 Photoshop

®

, verify that the Z

OOM


WITH


S

CROLL

 W

HEEL

 function is not selected within the 

Photoshop P

REFERENCES

 options.

Summary of Contents for PTH-450

Page 1: ...ouch PTH 450 PTH 650 PTH 850 Intuos5 PTK 450 PTK 650 Setting up Using a pen Customizing a pen Using the tablet Customizing the tablet Navigating with touch Customizing touch Using the Radial Menu Appl...

Page 2: ...n into the market of the applicable Wacom product Intuos and Wacom are registered trademarks of Wacom Co Ltd Adobe and Photoshop are either registered trademarks or trademarks of Adobe Systems Incorpo...

Page 3: ...your control panel settings 47 Control panel overview 48 Customizing the pen 50 Adjusting tip feel and double click 51 Adjusting eraser feel 52 Advanced tip and eraser pressure settings 52 Customizin...

Page 4: ...103 Technical support options 105 Obtaining driver downloads 106 APPENDIX 107 Caring for Intuos5 107 Replacing the pen nib 108 Uninstalling Intuos5 109 Using the Express View display 110 Managing pre...

Page 5: ...operating system or information about your application software Your best source for this information is the set of manuals and discs that came with your hardware operating system or application In ad...

Page 6: ...at you use on the tablet Identify your tablet model Intuos5 touch tablet Intuos5 tablet Intuos5 pen IDENTIFY YOUR TABLET MODEL Each tablet model within the Intuos5 family has a specific feature set Th...

Page 7: ...s Touch Ring Includes toggle button at center of ring Press to Toggle between Touch Ring modes Wake tablet from sleep mode when operating wirelessly Customizable ExpressKeys Small sized tablets are eq...

Page 8: ...tup Battery compartment Small sized tablets are equipped with a single cover used to access the Wacom wireless module and rechargeable battery Wacom wireless module slot Storage compartment for Wacom...

Page 9: ...level of the active area markers and status LEDs see advanced options Intuos5 medium sized tablet shown See also the bottom view Status LEDs An LED will glow dimly when Intuos5 is connected to an acti...

Page 10: ...ex nib white and black 1 stroke nib white 3 hard felt nibs gray See product information to learn more about which applications currently support the special features of your Intuos5 Grip Pen For infor...

Page 11: ...d relax your muscles Alternate tasks and tools throughout the day Minimize awkward postures and repetitive movements that cause discomfort Change your position if you feel any discomfort due to your w...

Page 12: ...annotate documents Switch applications Swipe four fingers across the tablet surface to open the application switcher Photo retouching Use the pressure sensitive pen to edit images within a photo or im...

Page 13: ...control panel options for correct right handed use Next physically rotate your tablet so the tablet ExpressKeys are positioned to the left See also USB cable installation Left handed operation Open th...

Page 14: ...erred handedness For right handed use connect the USB cable to the tablet as is For left handed use make a loose loop and press the cable into the looping clip located on the USB plug 2 Connect the ot...

Page 15: ...away from the tablet active area to enable touch Pen input Your Intuos5 pen works only on the active area of the tablet Wherever you place the pen on the tablet the screen pointer will jump to the cor...

Page 16: ...witch between applications and perform other desktop functions Save your work View your Wacom tablet settings Some gestures can be customized Learn about the touch experience with Intuos5 The tablet a...

Page 17: ...g system for use with multiple monitors Tips You can customize the tablet to map to a single monitor or to a portion of the monitor area See tablet to screen mapping When your system is configured wit...

Page 18: ...inting clicking double clicking and dragging If you are unfamiliar with using the pen try the exercises on the following pages Note For Intuos5 tablets that support both pen input and touch the pen di...

Page 19: ...most comfortable Place the pen stand within easy reach of your tablet The stand allows for vertical or horizontal placement of the pen Important When not in use place the pen in the pen stand or lay i...

Page 20: ...rface and moving your hand Do this without touching the tablet surface but while still keeping the pen tip within proximity of the tablet To select an icon or folder use your pen to position the scree...

Page 21: ...ress the upper side switch to double click This is easier than tapping twice with the pen tip and is the preferred method of double clicking with a pen Tip Configure Windows to select when hovering th...

Page 22: ...e with the pen tip Upper DOUBLE CLICK Lower RIGHT CLICK Press the lower switch to right click and bring up application specific or icon specific menus Tip To position a document or image in any direct...

Page 23: ...ide when the tool is tilted In other applications you can adjust tilt to define brush characteristics such as width color and opacity To draw write or ink with pressure sensitivity move the pen along...

Page 24: ...rsection 4 Clear your screen and make a simple drawing of your own The more you use your pen the easier drawing writing and navigation will become You can erase intuitively and naturally in graphics a...

Page 25: ...customizing the Touch Ring Active area The section of your tablet that senses touch or pen input ExpressKeys Press the customizable ExpressKeys to perform frequently used functions or keystrokes or t...

Page 26: ...TOGGLE SHIFT modifier key CTRL CMD modifier key ALT OPT modifier key PAN SCROLL Notes Pen only tablets The default settings from top to bottom are SETTINGS RADIAL MENU PRECISION MODE DISPLAY TOGGLE S...

Page 27: ...yboard shortcut Set a key to launch a commonly used file or application If you prefer not to or cannot use the side switches on your Grip Pen then set a key to right or double click Choose from any of...

Page 28: ...n to switch between four customizable modes As you toggle between settings a corresponding status LED illuminates Any disabled settings are skipped in the toggle sequence A diagram of the current Touc...

Page 29: ...your fingers too closely together may be interpreted by the tablet as input from a single finger or the tablet may confuse which finger initiated or performed an action or gesture Your fingers must r...

Page 30: ...ns to navigate and perform typical mouse operations Use gestures to scroll zoom rotate and perform other functions Some gestures may provide a visual cue on your display screen to indicate when the ge...

Page 31: ...ack to an item Lift your finger and tap twice DRAG DRAG LOCK disabled Using a single finger tap on an item to select Then again quickly tap down and track slide your finger across the tablet to drag L...

Page 32: ...we recommend using two fingers instead of your finger and thumb To move the selected item continue moving both fingers across the tablet To highlight a text block continue moving both fingers across t...

Page 33: ...an option in the menu and select it by tapping your finger Note If the tablet orientation is set for left handed use ExpressKeys located to right of tablet touch to the left of the primary finger TAP...

Page 34: ...leave the tablet For windows that scroll vertically and horizontally move your fingers in any direction and the document view will follow If you prefer vertical only scrolling from the Wacom Tablet c...

Page 35: ...ingers in a downward motion Note Fast scrolling works only for vertical scrolling ZOOM First place two fingers on the tablet surface Zoom in by moving expanding your fingers away from one another Zoom...

Page 36: ...l Rotate around finger Place two fingers diagonally on the tablet surface Keep one finger stationary and move the other finger around it For best recognition of this gesture start with your fingers po...

Page 37: ...rward or back in most web browsers TAP AND HOLD to display RADIAL MENU Using three fingers spaced slightly apart tap and hold them on the tablet surface This action will open the Radial Menu on your d...

Page 38: ...application switcher Swipe your fingers again to open the next application in the list Mac OS 10 7 x Using four fingers swipe them left or right to switch between full screen apps SWIPE UP to SHOW DE...

Page 39: ...customized See choosing custom touch functions FIVE FINGER GESTURES SWIPE DOWN to show SETTINGS Using five fingers spaced slightly apart swipe down to activate on your display screen an interactive d...

Page 40: ...hen using touch Select the TOUCH icon in the TOOL list Then select an appropriate tab to customize and change settings using the available options See also navigating with touch Manage your control pa...

Page 41: ...UBLE TAP TIME adjusts how fast you must tap to register a double click To test your setting position the screen cursor over the TEST area and tap twice Sets the scrolling speed of the SCROLL touch ges...

Page 42: ...such as a right click can be performed using different actions or gestures Position the screen cursor over a touch option to see a static image of that function If you do not choose a specific option...

Page 43: ...from the drop down menus Position the screen cursor over a touch option to see a static image of that function If you do not choose a specific option to view then the control panel will display each...

Page 44: ...INGS option which displays an interactive diagram of the current tablet settings on your display screen Deselect to disable touch You can still work with the ExpressKeys and pen Select to ENABLE TOUCH...

Page 45: ...testing your tablet 2 Open the Wacom Tablet control panel and click on the ABOUT button In the dialog box that appears click DIAGNOSE The DIAGNOSTICS dialog box shows dynamic information about the ta...

Page 46: ...e Intuos5 by creating application specific settings Manage your control panel settings Control panel overview Customizing the pen Customizing touch Customizing the tablet functions Tablet to screen ma...

Page 47: ...ol panel The control panel displays only those tabs and options that apply to your current tablet model and configuration See control panel overview Note User specific preferences are supported After...

Page 48: ...and let it rest there The appropriate Tool Tip will pop up in a few moments Your keyboard tab and arrow keys can also be used to navigate the control panel Icons represent your TABLET TOOL and APPLIC...

Page 49: ...n attached tablet or pen display A tablet or pen display cannot be deleted from the control panel list unless it is attached to the computer See also installing multiple tablets and changing the table...

Page 50: ...gital paint These tools are fully supported in the Wacom driver software They will appear in the TOOL list of the Wacom Tablet control panel after you touch the tablet surface with the tip of the tool...

Page 51: ...he double click area Drag slider to OFF if you do not want double click assist Tips Use a soft TIP FEEL for a wider range of pressure values in most pressure sensitive applications In some application...

Page 52: ...f pressure needed to erase Click to further customize the eraser sensitivity With your screen cursor positioned over an empty area of the control panel press down on the tablet with the pen eraser Use...

Page 53: ...within 10 mm 0 4 inch of the tablet surface without touching the tablet and then press the upper or lower side switch Tip To make double clicking easier set the side switch to DOUBLE CLICK Double clic...

Page 54: ...customize your Intuos5 tablet open the Wacom Tablet control panel and select the FUNCTIONS icon in the TOOL list Select a tab to customize and change settings using the available options Drag the sli...

Page 55: ...ons can override and control the ExpressKey functions For details see using applications integrated for tablet control Choose a function to perform when the key is pressed ExpressKey functions can be...

Page 56: ...e in the toggle sequence To zoom images at the current position of the screen cursor in Adobe Photoshop CS3 or later open the Adobe Photoshop general preferences pane Check the ZOOM WITH SCROLL WHEEL...

Page 57: ...MODE enables you to move the screen cursor with a pick up and slide motion similar to using a standard mouse Select a portion of screen area for tablet to screen mapping Select a portion of tablet ar...

Page 58: ...nal Mouse for Intuos5 When USE TABLET ORIENTATION is selected moving the mouse toward the top of the tablet moves the screen cursor up In this mode the entire active area of the tablet is available fo...

Page 59: ...ore than one monitor is connected to your system an option will be available for each detected monitor PORTION In the dialog box that appears choose a method for defining a portion of the display Drag...

Page 60: ...t is mapped This is the default setting PORTION In the dialog box that appears choose a method for defining a portion of the tablet Drag corners of the foreground graphic to select the tablet area tha...

Page 61: ...Be sure at least one button performs this function so you can always navigate and click RIGHT CLICK Simulates a right mouse button click which displays a context menu MIDDLE CLICK Simulates a middle m...

Page 62: ...t be used to select OK You must use your Intuos5 tool to click on the OK button Enter a name for the keystroke definition The name will be displayed with the respective control or in the Radial Menu a...

Page 63: ...you to position a document or image in any direction within the active pane Do this by pressing a pen button set for PAN SCROLL and then dragging with the pen tip across the tablet active area Choose...

Page 64: ...e also customizing the ExpressKeys INK TOGGLE Mac only Toggles the ink in any application function of Ink on and off Ink automatically recognizes and converts your handwriting into text and inserts it...

Page 65: ...in the control panel However only one MOUSE ACCELERATION and SPEED setting can be made for each tool and application that you are customizing The mouse mode settings are independent of system settings...

Page 66: ...teractive diagram of the current ExpressKey Touch Ring pen and touch settings The current functions for each control are shown Click on any section of the diagram to open the appropriate Wacom Tablet...

Page 67: ...ccording to settings found in the Windows 7 and Vista TABLET PC SETTINGS and PEN AND INPUT DEVICES control panels Windows XP Tablet Edition TABLET AND PEN SETTINGS control panel DISABLED Disables the...

Page 68: ...nu for additional options The menu closes after you make a selection To close without making a selection click on the X located at the center of the Radial Menu or on a control slice that has no funct...

Page 69: ...y or pen side switch to DISPLAY TOGGLE you can then press that button to sequentially toggle the current tablet mapping between a base mapping the current setting from the MAPPING tab and other monito...

Page 70: ...ollowing actions will return the toggle sequence to the base mapping Launching a graphics application that supports pressure sensitivity Logging out of or rebooting the system Switching users Fast Use...

Page 71: ...settings are added the ALL icon changes to ALL OTHER and an application icon is displayed for the newly added application s In the above example application specific settings have been added for the...

Page 72: ...s that have not been customized in this manner will use the tool settings for ALL OTHER Tip First customize settings for one application When you feel comfortable with the process you can create more...

Page 73: ...setting Then in the APPLICATION list select the application you want to remove from the list 2 Click on the APPLICATION list button In the dialog box that appears click DELETE to confirm your selectio...

Page 74: ...stomized for the newly added tool Identical tools will use the same settings To remove a selected tool from the TOOL list click on the TOOL list button In the dialog box that appears click DELETE to c...

Page 75: ...erformance in some circumstances If your recognition software does not work well you can change the tablet mode from standard to recognition mode Within the control panel TABLET list double click on t...

Page 76: ...functions When selected you must first press the side switch then touch the pen tip to the tablet surface in order to perform the function Hover click Click tap MOUSE HANDEDNESS options change the but...

Page 77: ...s the following components To install the kit see wireless setup Rechargeable battery Lithium Ion Li Ion Installs within the Intuos5 tablet Warning See the Important Product Information guide for safe...

Page 78: ...y done so turn on your computer and wait until the system has fully loaded Next connect wirelessly Establishing a wireless connection Optimizing the wireless connection A Install the battery Align con...

Page 79: ...module and Wacom wireless receiver are factory paired and work together as a discrete set Intuos5 can operate wirelessly for up to 10 meters 33 feet away from your computer It is not necessary for Int...

Page 80: ...on guide Power off your tablet in locations where when electronic devices are not allowed Because the tablet may cause other electronic devices to malfunction in some locations where when the use of e...

Page 81: ...USB cable between Intuos5 and a primary USB port located directly on your computer or to a powered USB hub The battery charges whenever the cable is connected and the battery is not fully charged For...

Page 82: ...r wireless mode off Amber USB cable connected and tablet battery charging Green USB cable connected and tablet battery fully charged Off USB cable connected tablet is in USB suspend mode or USB connec...

Page 83: ...s Depending on your tablet model wake from power saving mode by touching the tablet pressing an ExpressKey or placing the pen in proximity Sleep mode Tablet enters sleep mode When there is no wireless...

Page 84: ...ule off before leaving the tablet unused for a number of days Once the battery voltage has fallen below a minimum safety level an internal protection circuit within the battery prevents any charging I...

Page 85: ...slide into place 5 Connect the USB cable and charge the battery for optimum performance See charging the battery Important When replacing the battery be careful not to drop it on hard surfaces The ba...

Page 86: ...ver Slide cover away from tablet body to remove 2 Use your thumbnail or other suitable non metallic tool to unseat the module You can also use the wireless module spacer that came with your Wacom wire...

Page 87: ...let To store the receiver in the tablet 1 Use your fingernail or other suitable non metallic tool to open the wireless receiver storage compartment 2 As you open the receiver storage door slide the wi...

Page 88: ...and wireless connection status If the battery charge is low connect the USB cable and charge the battery See charging the battery 5 Switch the wireless module off and then back on 6 Move the tablet c...

Page 89: ...check the product FAQs Frequently Asked Questions 5 If you are having a compatibility conflict between Intuos5 and a new hardware or software product see obtaining driver downloads for information on...

Page 90: ...ubleshooting no power to the tablet a status LED does not light plug the tablet directly into the system USB port located on your computer Temporarily eliminate any external hubs in use until you dete...

Page 91: ...g the tablet controls and tools and testing a pen 5 Check touch Attempt to move the screen cursor by tracking your finger across the tablet surface Then tap to select an item A status LED should brigh...

Page 92: ...will be added back to the TOOL list with its default settings Open the Wacom Tablet control panel and click on the ABOUT button In the dialog box that appears click DIAGNOSE The DIAGNOSTICS dialog box...

Page 93: ...olumn as you test the Touch Ring Be sure to select the tablet unit you are testing from the TABLET INFO column 2 Slide your finger around the entire circumference of the Touch Ring As you touch and mo...

Page 94: ...ES state and PRESSURE value should change PRESSURE should change from approximately 0 with no pressure applied to approximately 100 when full pressure is applied For the optional Airbrush move the fin...

Page 95: ...ctive USB port If connecting to a USB hub device make sure the hub is connected to an active USB port and that the hub is active Try also connecting to another USB port or using another USB cable If u...

Page 96: ...een cursor and click but there will be no other pen functionality For tablet models that combine pen input and touch basic touch movement will continue to be recognized but other actions and gestures...

Page 97: ...K DISTANCE slider to the OFF position in order to turn off double click assist Try turning off the operating system inking features You have to press hard with the pen when clicking drawing or writing...

Page 98: ...positioning when using other input devices Cannot move the cursor where you want to on the screen or the line you are drawing does not line up with the location of the pointer in paint applications Op...

Page 99: ...ize them as being separate Try moving your fingers a little further apart Cannot zoom in or zoom out when working with Adobe Photoshop If zoom functions do not operate correctly within Photoshop verif...

Page 100: ...uch be sure you have not turned off touch See disabling touch Be sure you are using the pen correctly Review using the Grip Pen Switch the wireless module off then back on If the battery charge is low...

Page 101: ...odule check the battery status LED Amber indicates the battery is charging Green indicates the battery is fully charged If the LED remains off the battery may be defective Replace the battery 4 If bot...

Page 102: ...tablet preferences In the TABLET PREFERENCE FILE UTILITY dialog box click BACKUP and follow the prompts Then use the Tablet Preference File Utility to delete the tablet preferences as follows Single u...

Page 103: ...reless connection If connected with the provided USB cable Make sure the USB cable is securely connected to an active USB port on your computer or USB hub Check to be sure that a tablet status LED is...

Page 104: ...at have been backed up for the CURRENT USER or ALL USERS by clicking RESTORE within the utility Note Do not manually remove the WACOM TABLET PREFPANE file from the main LIBRARY PREFERENCEPANES folder...

Page 105: ...nd you think your tablet is not working properly contact the Wacom Customer Care staff for the area where your product was purchased See the tablet Read Me file located on the Intuos5 installation CD...

Page 106: ...ific English China Hong Kong Korea Taiwan Thailand Worldwide Web http www wacom com Software updates Worldwide Web http www wacom eu downloads Software updates Worldwide Web http tablet wacom co jp do...

Page 107: ...o the tablet surface Regular cleaning with a soft damp cloth will help to prolong the life of your tablet surface and tools You can also dampen the cloth using a very mild soap diluted with water Do n...

Page 108: ...the nib removal tool and replacement nibs 2 Clasp the old nib and pull it straight out of the pen Use the nib removal tool pair of tweezers needle nosed pliers or similar instrument The pen nib tip w...

Page 109: ...In the CONTROL PANEL window click on UNINSTALL A PROGRAM In the dialog box that appears choose WACOM TABLET and click UNINSTALL Follow the prompts to remove the tablet driver If prompted enter your ad...

Page 110: ...highlight other keys in the display If an ExpressKey has been disabled it will be shown as disabled or there may be no display for that key The display closes when you remove your finger from the Exp...

Page 111: ...tly open tablet aware applications that you may be running To back up your preferences click BACKUP under MY PREFERENCES To restore preferences that you had previously backed up click RESTORE under MY...

Page 112: ...n using the additional tablet s The eraser function will continue to work correctly using the first tablet that was added to the control panel To remove one of multiple tablets from the driver select...

Page 113: ...round When you close that application or select a new application pane to work in your Wacom Tablet control panel settings are returned to their previous state To review the ExpressKey Touch Ring or p...

Page 114: ...ial Menu or pen button and eraser functions To import expert settings 1 Choose an XML file with settings for use with a particular application Double click on your file selection 2 Carefully read and...

Page 115: ...et may interfere with screen cursor positioning when using other pointing devices See product information to learn more about which applications currently support the Airbrush fingerwheel or Art Pen r...

Page 116: ...functionality within your Internet browser Right button Displays a context menu when pressed Left button This is the primary button used to CLICK and select The mouse buttons can be customized Default...

Page 117: ...elect the function to perform when pressing a button WHEEL options control the fingerwheel function SCROLL Default setting When selecting SCROLL the tab displays custom scroll options Choose a SCROLLI...

Page 118: ...tablet active area and test by clicking each mouse button A tablet status LED should brighten and the SWITCHES state should change for each button you click 3 When the DIAGNOSTICS dialog box is first...

Page 119: ...n the REVIEW tab within applicable applications The Windows 7 or Vista Input Panel enables you to use handwriting or an on screen keyboard to directly enter text with your Wacom pen There are differen...

Page 120: ...ss and hold to right click features are disabled in the Windows 7 PEN AND TOUCH or Windows Vista PEN AND INPUT DEVICES control panel PRODUCT INFORMATION To learn more about Intuos5 visit the Wacom web...

Page 121: ...oll free or visit Wacom s web site at http direct wacom com USA only In Europe call 49 0 180 500 03 75 or send an email to spareparts wacom eu Or visit http shop wacom eu You can also contact your loc...

Page 122: ...h your tablet on all displays or on one display at a time Available only on multiple monitor systems See working with Display Toggle Double click assist A function of the Wacom Tablet control panel th...

Page 123: ...ilar to using a traditional mouse This is known as relative positioning and is the default setting for the optional Mouse See also pen mode Mouse speed A setting that allows you to adjust the speed at...

Page 124: ...h an on screen keyboard The Input Panel dynamically converts your handwriting to text Information you create can then be inserted into other documents spreadsheets or illustrations Tap A motion used w...

Page 125: ...tomizing 46 double click 51 eraser feel 52 advanced 52 ExpressKeys 55 mouse buttons 117 fingerwheel 117 pen 50 Radial Menu 68 tablet 54 ExpressKeys 55 Touch Ring 56 tablet to screen mapping 57 tilt se...

Page 126: ...lacing 108 Options advanced 76 Ordering parts and accessories 121 Orientation configuring for tablet 13 Parts and accessories available 121 ordering 121 Pen clicking with 21 customizing 50 double clic...

Page 127: ...vanced 52 customizing 51 Tool buttons customizing 53 Tools testing 92 working with multiple 74 Touch adjusting touch speed 41 basic actions 30 custom touch functions 43 customizing 40 disabling 44 fiv...

Page 128: ...specific problems troubleshooting 102 Wireless operation 77 battery charging 81 life 84 management 81 replacement 85 components 77 connection problems 100 establishing a connection 79 optimizing the c...

Page 129: ...KOREA CO LTD 1103 Beijing IFC West Tower 1211 12F KGIT Sangam Center No 8 Jianguomenwai Street 1601 Sangam dong Mapo gu Seoul 121 913 Korea Chaoyang District Beijing 100022 Telephone 82 2 557 3894 Chi...

Reviews: