Disassembly/Assembly Procedures
PD Repair
wc_tx000590gb.fm
44
5.10 Gearbox Disassembly
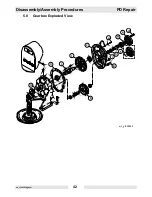
See Graphic: wc_gr003461 and wc_gr003462
This procedure requires an Arbor or similar type press.
Disassembly:
5.10.1
Remove the engine and drain the oil from the gearbox. See section
Replacing the Engine.
5.10.2
Remove the connecting rod. See section Replacing the Connecting
Rod and Bearing.
5.10.3
The gearbox housing may remain mounted to the pump housing for
the rebuilding procedure. If the gearbox housing is being replaced,
remove the screws that secure it to the pump housing and remove it
from the pump housing.
5.10.4
Remove the two longer screws (a) that secure both the lifting bracket
and the gearbox cover to the gearbox housing.
5.10.5
Remove the rest of the screws (b) that secure the gearbox cover (c) to
the gearbox housing and remove the gearbox cover. It may be
necessary to gently pry the gearbox cover to remove it. If prying is
necessary, be careful not to damage the gasket (n) while prying.
5.10.6
Remove the screws (d) and lockwashers that secure the engine
adapter (e) to the gearbox cover and remove the engine adapter.
5.10.7
Pull the pinion gear (f) (with the bearing attached) from the gearbox
cover.
5.10.8
Remove the retaining ring (g) from the pinion gear and press the
bearing from the pinion gear.
5.10.9
Press the seal (h) and the needle bearing (i) from the gearbox cover.
Note: Older machines are fitted with a gearbox cover which utilizes an
O-ring. This older style is no longer available. These models have
been replaced by gearbox covers which use the seal.
5.10.10 Remove the Woodruff key (j) from the gear shaft.
5.10.11 Pull the internal gear (k) and its pinion gear, then the external gear (l)
and its shaft, from the gearbox housing. Note: Work both sets of gears
simultaneously if necessary to remove them. Once removed, press the
bearings and the gears (internal and external) from their shafts.
5.10.12 Remove the seal (m) from the gearbox housing.
Summary of Contents for PDI 2
Page 2: ......
Page 13: ...PD 2 3 Safety Information wc_si000176gb fm 9 ...
Page 25: ...PD 2A 3A Operation wc_tx000592gb fm 21 ...
Page 45: ...PD Repair Disassembly Assembly Procedures wc_tx000590gb fm 41 wc_gr003460 a c f b e d a g g ...
Page 53: ...PD Repair Disassembly Assembly Procedures wc_tx000590gb fm 49 wc_gr003465 wc_gr003464 ...
Page 54: ...Disassembly Assembly Procedures PD Repair wc_tx000590gb fm 50 ...
Page 59: ......


