www.prolight.co.uk
RM 30T
User Manual
5
Operation:
•
Carefully, lift the antennae into the vertical position.
•
Connect the included power supply to a suitable 240V AC~50Hz
mains voltage outlet and plug the DC connector into the DC
Power Input on the rear panel of the receiver (12-18V DC,
500mA minimum).
•
Using the supplied audio cable, connect the MIX OUT on the rear
panel of the receiver for both audio channels to the mixer’s audio
line input. The receiver also features balanced XLR outputs,
one for each channel.
•
Switch on the power to the receiver, checking the display
backlight illuminates.
•
Open the battery compartment on the transmitter (Optional
Beltpack – slide downwards away from the belt clip. Handheld -
unscrew the lower portion). Install the appropriate batteries into
the transmitter, taking care to observe the orientation and
polarity. Only use high quality, alkaline type batteries. Refit the
battery compartment cover carefully.
•
Switch on the transmitter, during switch on the battery light on the
transmitter illuminate. If the light does illuminate or glows dimly,
the battery will require replacement.
•
Adjust the volume on the front panel of the receiver for each
of the channels.
NOTE:
The RM30T system is shipped with two handheld transmitters. The receiver
in this system features a dual channel receiver allowing both handheld
microphones to be used simultaneously, an additional belt pack kit maybe
purchased if required to be used in place of the handheld transmitters. Each
receiver channel in this system may only be used with one transmitter at any
one time. If the user attempts to power on, and use two transmitters with
one receiver the system will malfunction and not operate correctly as one
transmitter will cut out the RF Radio signal to the second transmitter.
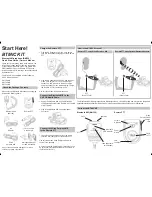
Handheld transmitter
identification:
1. Grille
2. Display
3. Battery cover
4. Power indicator
on base
5. Power switch
on base
1
2
3
4
5
Troubleshooting:
Problem
Possible cause
Solution
Receiver – no sound
Power button is in the OFF position. DC power adapter
is not plugged in
Turn on the power button plug in the power adapter
Receiver – no LED
Microphone - no sound
but LED indicators are lit
Mic transmitter is out of range. Mic is switched off. Mic
volume it turned down. Batteries in mic are not installed
properly. Receiver is not connected to an amp or mixer.
Ensure that the mic is within range. Turn on the mic switch.
Turn up the mic volume on the receiver. Reinstall or use new
batteries. Connect an output cable to an amp or mixer
Distorted sound or feedback
The 4 mics may be too close together. Batteries are running
out of charge. Mic volume may be too high. Possible
interference from another source.
Increase the distance between mics. Replace the batteries.
Reduce the volume. Move the system away from other
electric sources.
Operating instructions