


INTRODUCTION
Thank you for purchasing the
VTech
®
Kidizoom Plus
TM
!
Take and edit pictures, make videos and play fun games on this sleek, easy to use and
durable digital camera!
Kidizoom Plus
TM
has real 2.0 mega pixel resolution so your
pictures will be clearer and better than ever!
Kidizoom Plus
TM
can also be connected to
a TV so you can view your photos and movies or play games on a TV screen.
Kidizoom
Plus
TM
has 256MB of in-built memory and supports both normal SD and SDHC cards
(memory cards not included) with a memory size of 32MB to 16GB, so even more photos
and movies can be saved! There is also a USB port and cable that allows you to connect
the
Kidizoom Plus
TM
to your home PC for viewing and editing photos or movies, or
emailing them to family and friends.
PRODUCT FEATURES
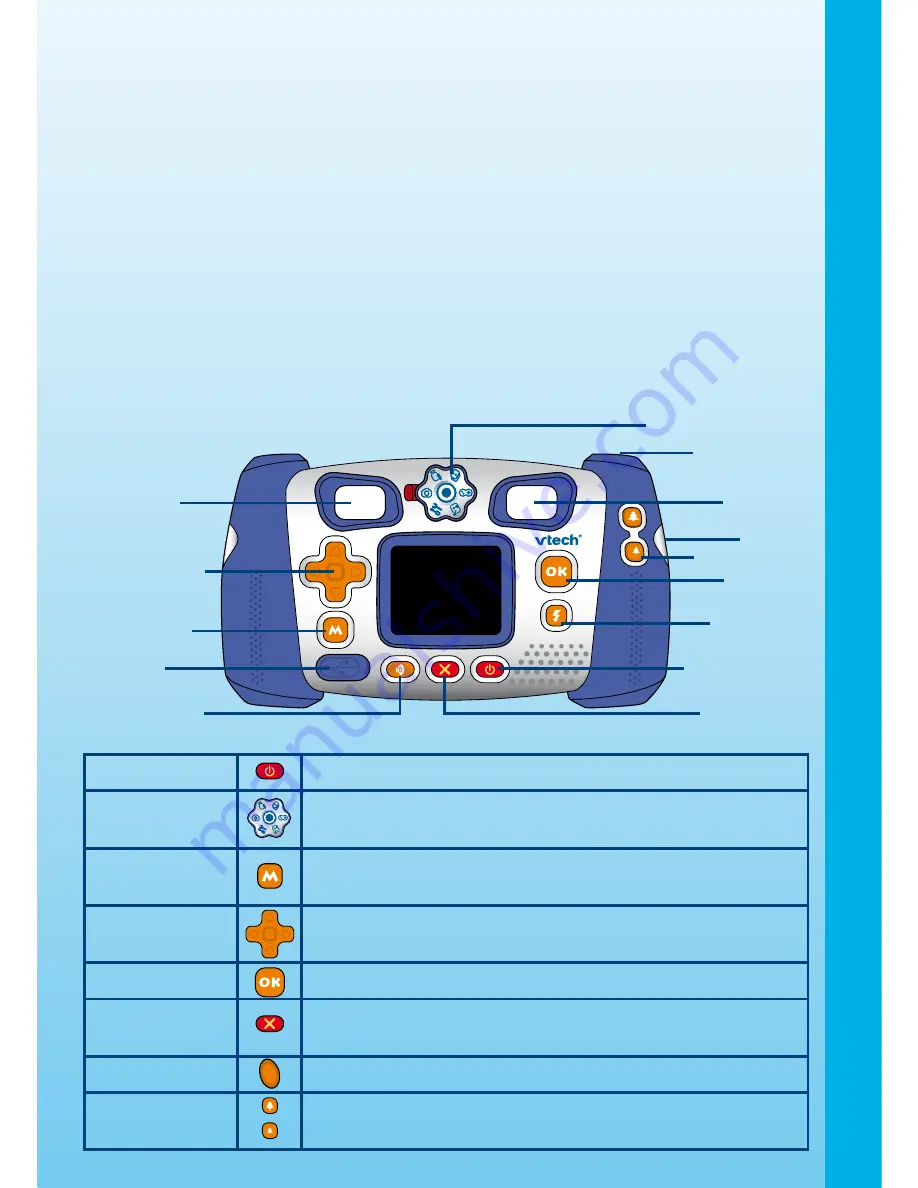
Product Layout
ON/OFF Button
Press this button to turn the camera ON or OFF.
Activity
Selector Dial
Turn the Activity Selector Dial to choose different activities.
Menu Button
Press this button to select different functions, or to move
back one level in the activity menus.
4-Directional
Cursor Buttons
Press these buttons to move the cursor and make
selections.
OK Button
Press this button to confirm a choice or action.
Delete Button
Press this button to delete the selected file or exit an
activity.
Shutter Button
Press this button to take a photo or start recording a movie.
Zoom Buttons
Press these buttons to zoom in and out when taking
pictures or movies.
Introduction
Activity Selector Dial
Viewfinder
Shutter Button
A/V Port
Zoom Buttons
OK Button
Flash Button
ON/OFF Button
Delete Button
Volume Button
Menu Button
USB Port
4-Directional
Cursor Buttons
Viewfinder
Summary of Contents for Kidizoom Plus
Page 1: ...User s Manual ...
Page 2: ......
Page 20: ... 2009 VTech Printed in China 91 002381 004 000 ...


