background image

6

Getting Started

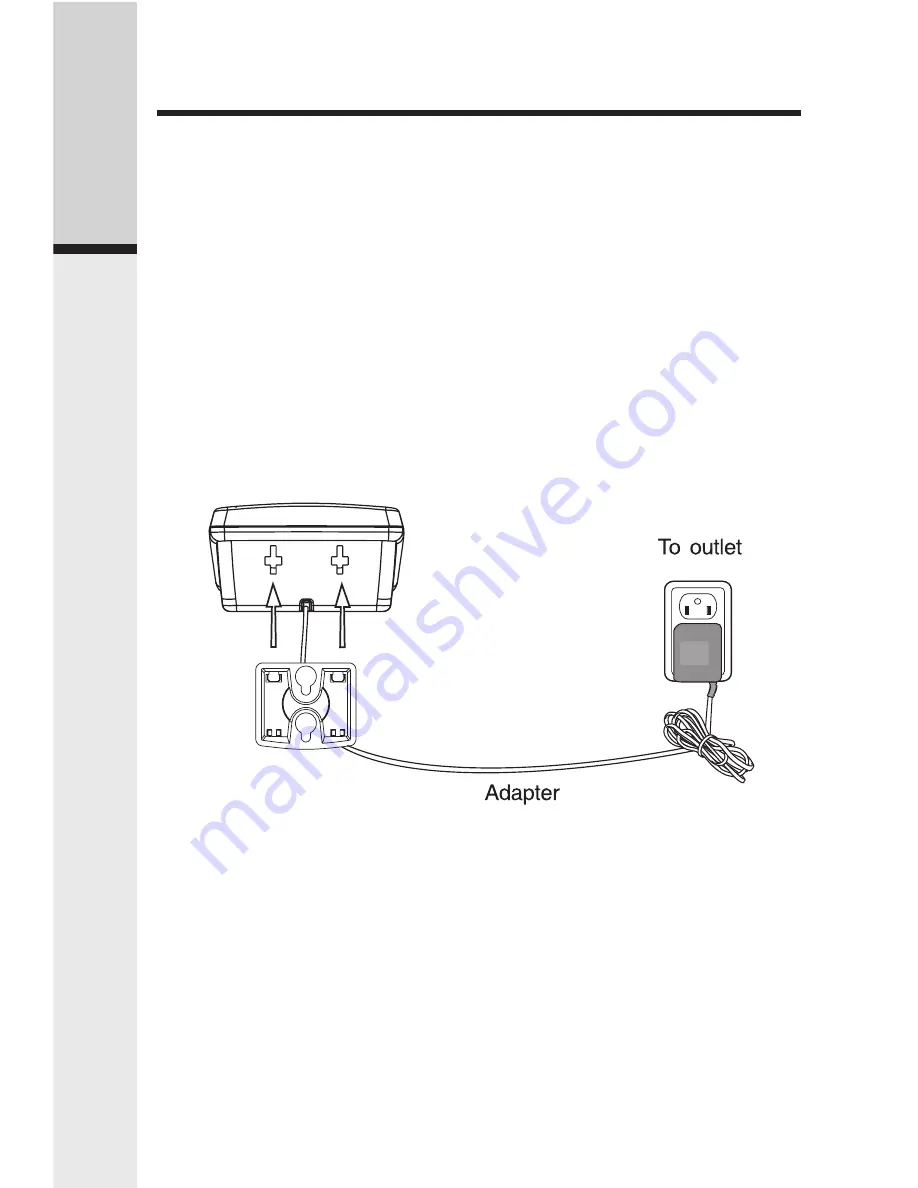
Wall Mounting

The wall mount brackets are designed for use on standard wall mount plates 

only. Wall mounting is optional. Only the handset chargers (not the main base 

unit) can be wall mounted.

.   Plug the power adapters into electrical outlets, and the connector to the bot-

tom of the handset charger.

2.   Line up the tabs on the wall mount brackets with the holes at the back of the 

handset charger. Snap the wall mount bracket firmly in place.

3.  Mount the handset charger on the wall. Position the handset charger so the 

mounting studs will fit into the holes on the wall mount bracket. Slide handset 

charger down on the mounting studs until it locks into place.


Summary of Contents for IP8100-1

Page 1: ...Model IP8100 series telephone...

Page 2: ...2 Handset LEDs 12 Base LEDs 12 Handset Operation 13 Making Calls 13 Answering Calls 13 Adjust the Handset Volume 13 Flash Function 13 Redial Function 13 dial Vonage Voicemail 14 Mute Function 14 Inter...

Page 3: ...aiting 23 Clear Message waiting 23 Advanced Operation 24 Headset Operation 24 Additional Information 25 Troubleshooting 25 Maintenance 29 Warranty Statement 30 Important Safety InstructIONS 33 FCC and...

Page 4: ...dband cordless telephone set capable of sup porting four handsets This manual is designed to familiarize you with this Broadband cordless telephone We strongly recommend you read the manual before usi...

Page 5: ...ol 4 CID Scroll Down 5 On Flash 6 Voicemail 7 Dialing Keys 0 9 8 Redial Pause The Handset Layout 9 Speakerphone 10 LCD Display 11 Select Menu 12 Phonebook Scroll Up 13 Headset Jack 2 5mm 14 Off Clear...

Page 6: ...The Base Unit Layout 1 Message Waiting LED 2 Page key 3 In Use LED 4 Service Status LED 5 LAN Port 6 WAN Port 7 DC Connector Jack 8 Reset Switch...

Page 7: ...y pack Toxic substances may be released causing harm to eyes or skin 3 Exercise care in handling batteries in order to prevent an accidental short of the charge contacts potentially causing the batter...

Page 8: ...battery pack with other electrical devices Reset Switch The reset switch when quickly pressed and released will reset the phone and restart the software Beware that when the reset switch is pressed an...

Page 9: ...to electrical outlets and the connector to the bot tom of the handset charger 2 Line up the tabs on the wall mount brackets with the holes at the back of the handset charger Snap the wall mount bracke...

Page 10: ...oved DSL or Cable modem with proper electrical isolation PC LAN Port STEP 1 Unplug the power cord from your Cable or DSL modem the device your ISP provided which provides high speed Internet Make sure...

Page 11: ...s gone from flashing yellow to a steady green Helpful Hint Use only the power cord provided in this package using an older power cord can damage the broadband telephone STEP 7 Turn your computer on an...

Page 12: ...r the default password VTech and click on login B On the Setup Wizard screen click Run Wizard to start the set up C Follow Wizard screens to complete the setup STEP 9 Check for dial tone by pressing t...

Page 13: ...your router Connect the device you just unplugged from your router to the yellow PC LAN port located on the back of IP8100 series broadband telephone base unit STEP 2 Plug the power cord into the powe...

Page 14: ...urns the IP8100 series broadband telephone on Helpful Hint DO NOT interrupt this registration process by unplugging the power or by using the handsets until the READY indicator light on the front of b...

Page 15: ...on steady connected blinking activity detected Yellow Connection speed indicator off 10Mb s on 100Mb s WAN LAN port Solid Red Internet Service currently not available No connection to the ISP Either a...

Page 16: ...rent call This adjustment is temporary and only last for the current ringing call The ringer volume will return to it s normal setting once the call is answered or when the ringing stops Adjust the Ha...

Page 17: ...set number The other handset will ring and the screen will display HANDSET X IS CALLING Press INT PHONE SPEAKER or any of the dial pad keys on handset X to answer the intercom call The screens will di...

Page 18: ...ed within 30 seconds the external call will end automati cally Conference Call It is possible to establish a conference between two handsets and the external line If a handset already has a connection...

Page 19: ...ORE Press SEL You will be prompted to ENTER NUMBER Use the dialing keys to enter the number you wish to store in the phonebook Press the MUTE DELETE key to backspace and make corrections Press SEL You...

Page 20: ...ne press SEL again OR With the handset idle press and the handset jumps directly into the phonebook review mode The first phonebook entry will be displayed Scroll through the phonebook entries using o...

Page 21: ...ok Pressing SEL will append the selected redial number to the current editing number Press SEL to confirm the number and enter name edit mode Press MUTE DELETE to backspace and use the digit keys to e...

Page 22: ...incompatibilities caller ID information may not be available for every call you receive In addition the calling party may intentionally block their name and or phone number from being sent As new call...

Page 23: ...will show EDIT NUMBER You will hear a happy tone then the screen will display If the caller ID isn t able to detect a name ENTER NAME will be prompted If unable to detect the number ENTER NUMBER will...

Page 24: ...te the desired re cord A confirmation tone will sound and the previous caller ID record will be displayed on the screen To delete all the caller ID records press and hold the DELETE key The screen wil...

Page 25: ...f mode press MENU then or key to RINGER TONE Press SEL You will be prompted to choose INTERCOM CALL or OUTSIDE CALL Press or to select the desired option Press SEL again You can then use or or enter d...

Page 26: ...ge waiting alert will automatically be turned off Handset Settings Clear Message Waiting If after reviewing all new voicemail messages the message waiting alert still remains on the screen and the MES...

Page 27: ...to the jack under a small rubber flap on the cordless handset The plug should fit securely Do not force the connection NOTE Whenever a compatible headset is connected to the cordless handset the micro...

Page 28: ...Windows XP rewall may block access to the con guration pages If you have DSL and use a PPPoE client such as WinPoet or EnterNet300 you should disable this software as well Check the help les included...

Page 29: ...Properties Step 3 Make sure the IP Address tab is selected Con gure the adapter to Obtain an IP address Then Click OK out to the desktop to apply the changes Reboot the computer when prompted When the...

Page 30: ...button to release the IP address b Click the Renew button to obtain a new address If you are unable to obtain a valid IP address con rm that you have a good physical connection between the computer a...

Page 31: ...ion I followed the Quick Start Guide for a Static IP but I wasn t able to suc cessfully con gure the IP8100 series telephone What else can I do From the computer that was previously connected to the b...

Page 32: ...ms Electrical storms can sometimes cause power surges harmful to electronic equipment For your own safety use caution when using electric appliances during storms Cleaning your telephone Your telephon...

Page 33: ...l retain defective parts modules or equipment Repair or replacement of Product at VTech s option is your exclusive remedy You should expect the repair or replacement to take approximately 30 days How...

Page 34: ...for damage or loss of the Product in transit If the Product failure is not covered by this limited warranty or proof of purchase does not meet the terms of this limited warranty VTech will notify you...

Page 35: ...anty lasts so the above limitation may not apply to you In no event shall VTech be liable for any indirect special incidental con sequential or similar damages including but not limited to lost profit...

Page 36: ...ur home consult your dealer or local power company 8 Do not allow anything to rest on the power cord Do not locate this product where the cord will be abused by persons walking on it 9 Never push obje...

Page 37: ...istinct change in performance 13 Avoid using a telephone other than cordless during an electrical storm There may be a remote risk of electric shock from lightning 14 Do not use this or any cordless t...

Page 38: ...or tele vision reception which can be determined by turning the equipment off and on the user is encouraged to try and correct the interference by one or more of the following measures Reorient or rel...

Page 39: ...the equipment Users should ensure for their own protection that the electrical ground connec tions of the power utility telephone lines and internal metallic water pipe system if present are connecte...

Page 40: ...o environmental conditions at the time of use SIZE Handset 182mm x 55 3mm x 40mm including antenna Base 169 1mm x 60 7mm x 157 2mm Charger 76 5mm x 79 4mm x 45 2mm WEIGHT Handset 146 grams excluding b...

Page 41: ...ndicators 12 Handset Icons 12 Handset LEDs 12 Handset Operation 13 Handset Settings 22 Headset Operation 24 I Important Safety Instructions 33 Installation of Battery Pack in Handset 4 Installation Wi...

Page 42: ...D A member of THE VTECH GROUP OF COMPANIES Distributed in the U S A by VTech Communications Inc Beaverton Distributed in Canada by VTech Telecommunications Canada Ltd Richmond B C Copyright 2005 for V...

Reviews: