background image

w w w . v o l t l i g h t i n g . c o m

[email protected] • 813.978.3700

- 4 -

- 5 -

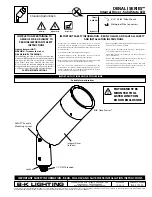
Place Marks for Wall Anchor Bolts

1

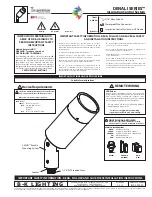
Install Wall Anchors

2

VOLT

®

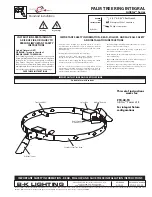
 Floodlight with Motion Sensor

VFL-40XX-MS-ABZ

Product Dimensions

Wall

Fixture

Mark

Yoke Mount

Hold the yoke mount to your 

desired mounting surface. 

Place a mark on the wall using 

the holes of the mount. These 

marks will be used for the wall 

anchors.

Wall Anchors

Hole

Wall

Drill the holes for the wall anchors 

using the marks on the wall. Insert 

the wall anchors into the drilled 

holes. Tighten the hex nuts on the 

bolts until they are secure to the 

wall.

INSTALLATION INSTRUCTIONS

10W Flood Light

30W Flood Light

8.25”

4.25”

7.35”

8.85”

8.5”

5”

R0.175”

Ø0.85”

3”

5”

2.85”

4.25”

3.45”

6”

3.5”

4.25”

4.5”

2.15”

2.55”

2.85”

R0.15”

Ø0.85”

Summary of Contents for VFL-40 MS-ABZ Series

Page 1: ... MS ABZ INSTALLATION INSTRUCTIONS Specifications and product details subject to change without notice Copyright 2019 VOLT Lighting Lutz FL USA 33549 All rights reserved customersupport voltlighting com 813 978 3700 Help Hotline 1 813 978 3700 Mon Fri 8am 8pm Sat Sun 10am 6pm EST 1 ...

Page 2: ...atts 25 AMPS at 12 volts 4 Underground Low Energy Cable must not be buried over 6 15 2 cm in order to connect to the main low voltage cable 5 Wiring connections must be made with wire connectors that is suitable for outdoor use 6 Position the wire connector so that it is located within 6 inches 15 2 cm from a building structure a luminaire or fitting INSTRUCTIONS PERTAINING TO A RISK OF FIRE OR IN...

Page 3: ...mounting surface Place a mark on the wall using the holes of the mount These marks will be used for the wall anchors Wall Anchors Hole Wall Drill the holes for the wall anchors using the marks on the wall Insert the wall anchors into the drilled holes Tighten the hex nuts on the bolts until they are secure to the wall INSTALLATION INSTRUCTIONS 10W Flood Light 30W Flood Light 8 25 4 25 7 35 8 85 8 ...

Page 4: ...fixture to your desired orientation and tighten set screws with a wrench Adjust the IR sensor to proper orientation After installation but before power is on A Check whether the lighting fixture is firmly fixed B Check whether wires are connected properly Infrared IR Sensor max 11 48 Ft min 6 56 Ft This product can be installed outdoors It is recommended to install in these orientations to protect...

Page 5: ...nated 15 minutes after the sensor is triggered b At the minimum setting the fixtured is illuminated 7 seconds after the sensor is triggered 3 SENS If the sensor is too sensitive or not sensitive enough it can be adjusted here Replace IR Sensor 1 Remove Backing with IR Sensor Rotate the bracket so that the backing can easily be removed from the fixture Remove the backing with IR sensor from the fix...

Page 6: ...ectors with pliers to engage crimp connectors Back Fixture IR Sensor Supply Cable Connector Wires Brown Wire from Sensor Black Wire from Supply Cable Connector Red Wire from Sensor Blue Wire from Sensor Red Wire from Luminaire Black Wire from Luminaire White Wire from Supply Cable 4 Make Connections of IR Sensor Wires Carefully tuck all the wires inside of the back housing Place the backing with t...

Page 7: ... without notice Copyright 2019 VOLT Lighting Lutz FL USA 33549 All rights reserved customersupport voltlighting com 813 978 3700 w w w v o l t l i g h t i n g c o m IS VFL 40XX MS ABZ ver1 pdf Help Hotline 1 813 978 3700 Mon Fri 8am 8pm Sat Sun 10am 6pm EST ...

Reviews: