Vollrath Stoelting DQU411 Series Operator'S Manual Download Page 7

513687 REV.2 

DQU411-I2 OPERATOR’S MANUAL 

7

Section 2: Operation

MAINTENANCE

P

A

R

T

S

TROUBLESHOO

TING

OPERA

TION

INTRODUCTION

Before using the machine for the fi rst time, complete 
machine disassembly, cleaning and sanitizing 
procedures need to be followed. Routine cleaning 
intervals and procedures must comply with the local 
and state health regulations. Inspection for worn or 
broken parts should be made at every disassembly 
of the machine. All worn or broken parts should be 
replaced to ensure safety to both the operator and the 
customer and to maintain good machine performance 
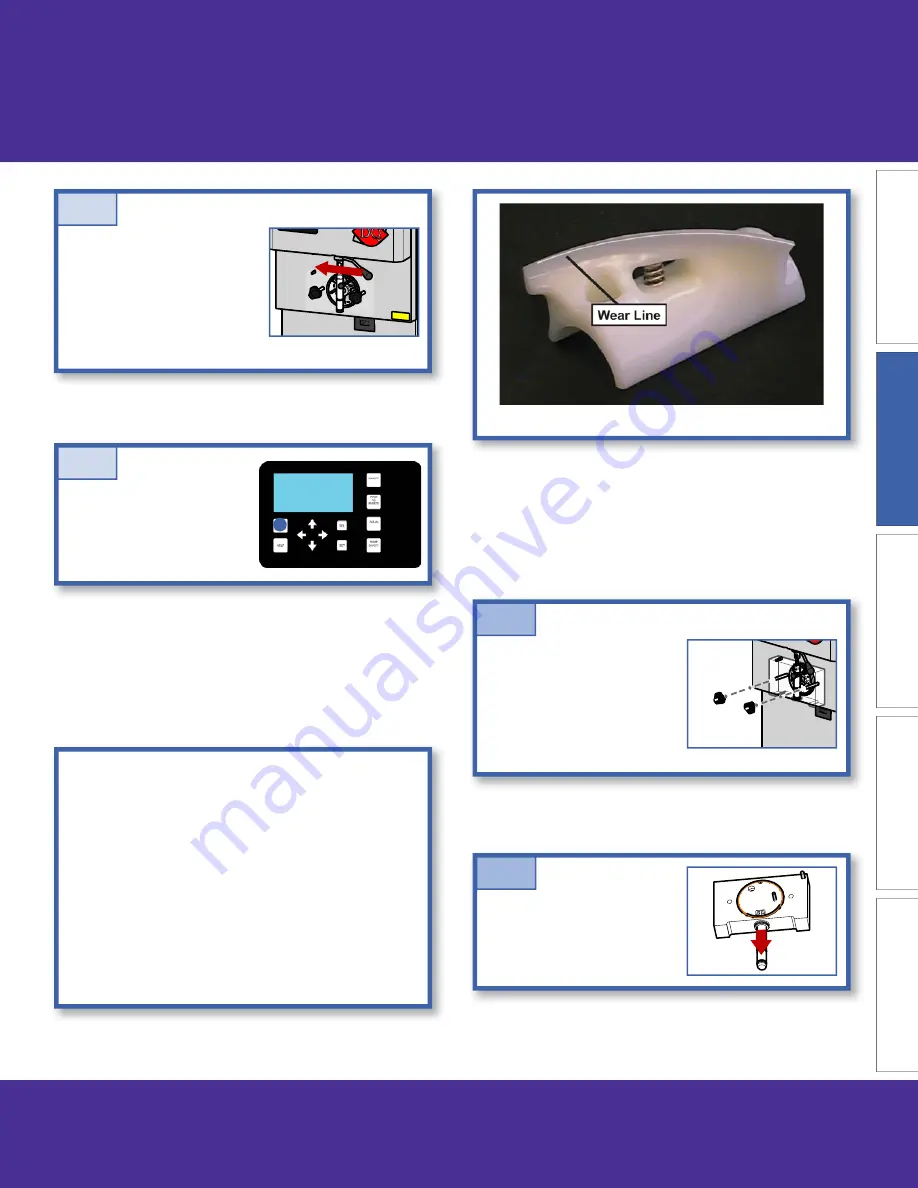
and a quality product. Check the wear line on the auger 
fl ights on a regular basis and replace as needed.

B. Disassemble Parts

Auger Flight Wear

Press and hold the Main 
Freezer Power button for 
three seconds to turn off  
the power.

A.8

1. Front Door Disassembly

Remove the spigot extension 
or rosette cap if installed.

Unscrew the knobs on the 
front door and remove the 
door.

B.1

Remove the front door o-ring 
and remove the spigot from 
the front door.

B.2

Remove the bucket in the 
cab and turn on the pump to 
clear any remaining liquid in 
the hoses.

Open the spigot to drain the 
freezing cylinder.

A.7

Summary of Contents for Stoelting DQU411 Series

Page 1: ...A VOLLRATH DIVISION Model DQU411 Operator s Manual 513687 Rev 2...

Page 2: ...reserve the right to make changes to the machine without notice and without incurring any obligation to modify or provide new parts for machines built prior to date of change DO NOT ATTEMPT to operate...

Page 3: ...t E Daily Procedures Morning MAINTENANCE A Auger Shaft Front Door Parts B Cab Tubing PARTS A Troubleshooting Flow Charts TROUBLESHOOTING A Empty the Freezing Cylinders Start here if cleaning a machine...

Page 4: ...ERATOR S MANUAL 513687 REV 2 Section 1 Introduction MAINTENANCE PARTS TROUBLESHOOTING OPERATION INTRODUCTION A Parts of the DQU411 I2 Machine IntelliTec2 Freezing Cylinder Cabinet IntelliTec2 Touchpad...

Page 5: ...37 5 8 95 6 cm 48 121 9 cm 37 5 8 95 6 cm 48 121 9 cm Weight 450 lbs 204 1 kg 650 lbs 294 8 kg 450 lbs 204 1 kg 650 lbs 294 8 kg Electrical 1 PH 3 PH 1 PH 3 PH running amps 17A 15A 18A 16A connection...

Page 6: ...er draining from the freezing cylinder is clear A 5 Remove any remaining water from the bucket in the cabinet Drain the water and press the Clean button to stop the auger A 6 If the Clean Time Exceede...

Page 7: ...placedtoensuresafetytoboththeoperatorandthe customerandtomaintaingoodmachineperformance andaqualityproduct Checkthewearlineontheauger ights on a regular basis and replace as needed B Disassemble Parts...

Page 8: ...Remove front auger support and bushing and remove the auger from the freezing cylinder As the auger is being pulled out remove the plastic ights with springs B 5 Wipe any remaining lubricant off the...

Page 9: ...ion Rinse all parts with clean 90 to 110 F 32 C to 43 C water Then place all parts in a sanitizing solution for at least 1 minute then remove and let air dry completely before assembling in machine C...

Page 10: ...o ring with a generous amount of sanitary lubricant E 1 The exterior of the machine should be kept clean at all times to preserve the luster of the stainless steel A high grade of stainless steel has...

Page 11: ...ter and install it onto the auger DO NOT lubricate the outside of the rear seal E 2 Screw the springs onto the studs in the plastic ights The springs must be screwed into the ights completely to provi...

Page 12: ...auger support and install the auger support into the front of the auger Rotate the auger support so that one leg of the support points straight up E 8 Assemble the air bleed valve o ring onto the air...

Page 13: ...lace the front door assembly onthemountingstudsandthe push front door against the machine carefully E 15 Secure the front door to the machine by placing the knobs on the studs and tightening until fin...

Page 14: ...es to be sanitized for 5 minutes Any sanitizer must be used only in accordance with the manufacturer s instructions and to provide a 100 parts per million strength solution F Sanitizing Sanitizingmust...

Page 15: ...terthepumpshutsoff press the air bleed valve to release theairpressure Allowwaterto ll the freezing cylinder F 4 Sanitize immediately before use Make sure the display shows the freezing cylinder is of...

Page 16: ...dapter into a bag of mix Close the cab door Press the Pump button to turn the pump on G 1 Allow the cylinder to ll until the pump shuts off Press the valve to release pressure in the cylinder Thecylin...

Page 17: ...208135 208465 208380 208485 208467 208387 Part Number Where Used 208135 Freezing cylinder 208465 Front door check valve block pump hose 208380 Front door pump hose mix sensor 208467 Front door manifo...

Page 18: ...TOR S MANUAL 513687 REV 2 Section 2 Operation MAINTENANCE PARTS TROUBLESHOOTING OPERATION INTRODUCTION I Lubrication Points O Ring Hex End of Auger O Ring ONLY Inside Metal Adapter Inside Outside of B...

Page 19: ...TENANCE PARTS TROUBLESHOOTING OPERATION INTRODUCTION J Pump Hose Routing Mix Bag Adapter 3 8 Clear Hose 24 Mix Sensor Tan Pump Hose Tee 1 2 Clear Hose 6 1 4 Clear Hose 13 Mix Bag Adapter 3 8 Clear Hos...

Page 20: ...of failure NOTE Turn the pump on and pull down on the pickup end of the tan hose until a few inches of tubing is visible The pickup end is on the left side Then turn the pump off A 1 Loosen the clamp...

Page 21: ...OEM part 756204 to prevent risk of failure NOTE Connect a new length of tan hose to the mix sensor using a clamp A 5 Turnthepumponandfeedthe other end of the tan hose into theleftsideoftheblackcover...

Page 22: ...when the cleaning solution is pumped through the machine WARNING Hazardous Moving Parts Revolving pump head can grab mangle and cause serious crushing injury Make sure the display shows the freezing...

Page 23: ...he back wall of the cab B 4 Remove the hose assembly from the cab B 5 2 Inspect and Cleaning Thoroughly clean the parts with 90 to 110 F detergent water and brushes provided Rinse with clean 90 to 110...

Page 24: ...the cover to prevent the hose from looping around twice NOTE Turnthepumponandfeedthe tan hose into the left side of the black cover clamp B 12 Connect the tan hose to opposite end of the tee and tight...

Page 25: ...ne as per instructions outlined in Section 2 F B 19 Adjust the clear hose so that itisnotkinkedandtightenthe clamp holding the hose to the bag adapter B 17 Connect the air hose to the tube at the back...

Page 26: ...Press the SEL button to toggle between freezing cylinders C 3 From the Current Status screen press theleftarrowbuttonto access the password screen Press the right arrow then the SEL button C 1 Press...

Page 27: ...dry D 2 Install the spigot extensions E 2 Check the mix level of the mix bags in the cab Add new mix bags as necessary E 3 Wipe the exterior clean with a mild detergent water to remove spilled or drie...

Page 28: ...mal operation No Product is Too Firm Decrease the fine consistency Contact your authorized Stoelting distributor for further assistance Is the product still too Soft Yes Continue normal operation No P...

Page 29: ...No Error Code E2 High Torque Error Code E3 Run Time Water Cooled Machines Error Code E9 High Pressure Cutout Air Cooled Machines Error Code E9 High Pressure Cutout Water Cooled Machines Go to the flow...

Page 30: ...on around the machine Move anything blocking the louvered panels and make sure there is enough air clearance around the machine Is the problem fixed No Yes Yes No Contact your authorized Stoelting dis...

Page 31: ...he water or glycol lines kinked or damaged Yes Yes Turn the system on Is the problem fixed No No No Yes Yes Repair or replace the lines Is the problem fixed No No Yes Yes No Does the error occur immed...

Page 32: ...t Examples include Ice Machine Grill Hot Dog Steamer Contact your authorized Stoelting distributor for further assistance Is there an air flow restriction around the machine Is there an exterior heat...

Page 33: ...thorized Stoelting distributor for further assistance Is the water or glycol system turned off Are the water or glycol lines kinked or damaged Yes Yes Turn the system on Is the problem fixed Continue...

Page 34: ...Ring Rear Seal Black 1 625133 O Ring Front Door Black 1 667868 Seal Rear Auger Orange 1 694200 Spring Air Bleed Valve 1 694255 Spring Auger Flight 6 1151859 Adapter Rear Seal Code 1 1 2183106 Valve A...

Page 35: ...lamp Metal 14 1 4 ID Tubing Cab 264241 Clamp Metal 21 1 2 ID Tubing Cab 376041 Tee Connector 3 Way Stainless Cab 1 756067 Tubing 1 4 ID Clear Air Line Per Inch Cab 756067 13 Tubing 1 4 I D Clear Air L...

Page 36: ......

Reviews: