background image


3


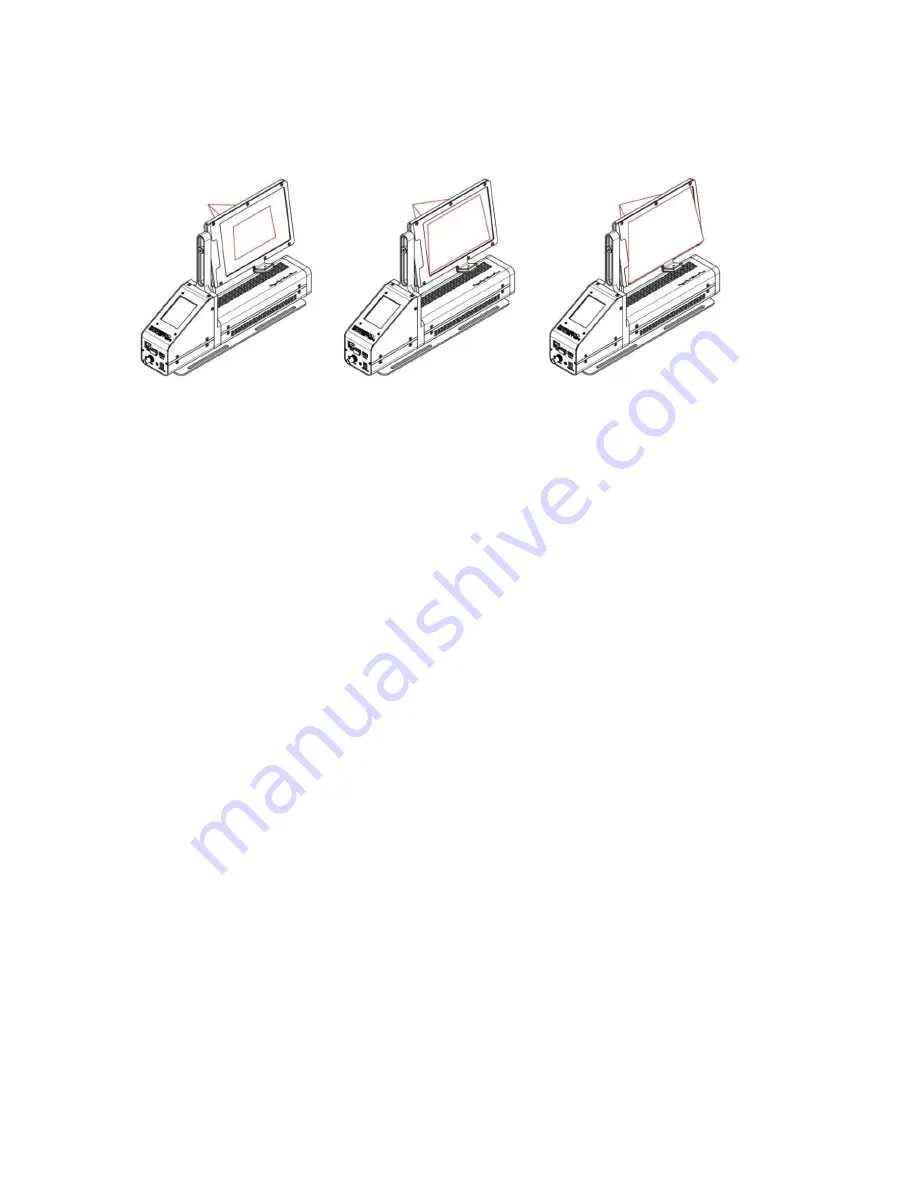
The SmartCrystal Pro™ Booster must be positioned such that light from the projector 
that passes through the polarizer fills the largest possible width of the filter. (See figure 
below) 


The  position  of  the  frame  is  flexible.  To  raise  /  lower  or  tilt  the  frame,  unscrew  the 
frame fixing screw using the supplied Allen wrench. Move the frame to the desired 
position and re-tighten the screws.


Summary of Contents for SMARTCRYSTAL PRO BOOSTER

Page 1: ...1 model VPSP 10 000 Scp_Booster_Quick_Start_And_User_Guide EN A00 QUICK START GUIDE...

Page 2: ...Booster quickly without reading all the information in the complete user manual For optimal use of the product it is recommended to read the manual Important recommendations for the installation of t...

Page 3: ...asses through the polarizer fills the largest possible width of the filter See figure below The position of the frame is flexible To raise lower or tilt the frame unscrew the frame fixing screw using...

Page 4: ...n Throw Ratio TR Before making any installation it is important to ensure that the device is compatible with the configuration required The Throw Ratio Throw Ratio TR must satisfy the following requir...

Page 5: ...ng the ON OFF button and checking the LCD The first SmartCrystal Booster Pro are delivered with a WiFi dongle connected to one of its USB ports The new devices have this WiFi dongle directly integrate...

Page 6: ...ace is also accessible from a remote computer via an Ethernet connection and or a smartphone connected via WIFI to the SmartCrystal Pro Booster see 9 USER INTERFACE Enjoy your brilliant 3D image Come...

Page 7: ...7 model VPSP 10 000 Scp_Booster_Quick_Start_And_User_Guide EN A00 USER GUIDE...

Page 8: ...7 2 Projector Settings 16 7 3 Fixing Position 17 7 4 Positioning of the SmartCrystal Pro Booster 18 7 5 Ceiling mounting 19 8 USE THE SMARTCRYSTAL PRO BOOSTER 21 8 1 Connections 21 8 2 Start up 22 9 U...

Page 9: ...n order to view a 3D image of the highest quality a polarization preserving silver screen specifically designed for 3D projection is required If your screen is not designed for 3D you may experience a...

Page 10: ...with all types of 3D projectors only one projector required Connecting to a computer using an Ethernet cable or WIFI Monitoring the polarizer s temperature Automatic adjustment of the fan speed accord...

Page 11: ...7kW Maximum switching speed 400Hz Optical light efficiency static LEF 15 5 Optical light efficiency dynamic LEF 14 5 Upgradeable software for optimal 3D quality Operating Temperature 0 C to 40 C Stor...

Page 12: ...GE CONTENT OF THE SMARTCRYSTAL PRO BOOSTER 1 SmartCrystal Pro Booster 2 BNC Sync Cable 3 VESA Sync Cable 4 Power supply 110 240V Adapter EUR US UK AUS 5 BTR4 Allen key 6 USB stick with User manual 1 2...

Page 13: ...AL PRO BOOSTER 1 Polarizer 2 Fan 3 Temperature Sensors 4 Graphic display 5 Connectors 1 Ethernet connector 2 WIFI Dongle 3 Reset Button 4 BNC 3D Sync 5 LED power indicator 6 Power Connector 7 USB port...

Page 14: ...ion of SmartCrystal Pro Booster It is essential to comply with the following requirements to ensure the longevity of the SmartCrystal Pro Booster and obtain optimal 3D projection The distance between...

Page 15: ...s flexible To raise lower or tilt the frame unscrew the frame fixing screw using the supplied Allen wrench Move the frame to the desired position and re tighten the screws 7 2 Projection position Thro...

Page 16: ...16 At this distance the throw ratio TR should meet the following criteria THROW RATIO 1 2 7 2 Projector Settings The Dark Time should be adjusted to its minimum The delay should be adjusted to 0 s 40...

Page 17: ...Pro Booster shall be placed on a stable surface and fixed with 4 screws The SmartCrystal Pro Booster should be placed in front of the projector lens There is a Projector Side printed on the product t...

Page 18: ...Booster The polarizer of the window should be approximately perpendicular to the axis of the light beam This is indicated in the following illustrations Correct LCP panel position Wrong LCD panel posi...

Page 19: ...tal Pro Booster to the ceiling In this case you must position the LCD frame upside down as explained below Completely unscrew the frame holding screw 2 Remove the connecting cable from its holding tra...

Page 20: ...ix the frame with the holding screw The SmartCrystal Pro Booster is now ready to be mounted on the ceiling the inscription Projector Side should face the projector the temperature sensor should be at...

Page 21: ...ered with a WiFi dongle connected to one of its USB ports The new devices have this WiFi dongle directly integrated in the electronic board For the proper functioning of this product it is essential t...

Page 22: ...larity left right image inversion of the polarizer press the box Polarity and in the new window that appears enter the polarity to apply This may be used to correct left right image inversion 5 Fan mo...

Page 23: ...ration of the Sync Delay press the box Delay Sync set the new value Confirm with OK The display will go into sleep mode black after a period of inactivity of 60 seconds To activate it again click with...

Page 24: ...figured with an IP address in the same sub network as the SmartCrystal Pro Booster Please refer to the user instructions network settings for your computer or ask your network administrator Using an i...

Page 25: ...erface via remote PC Smartphone It is possible to access the user interface from a remote computer by running a web browser to the IP address of the SmartCrystal Pro Booster The display in the browser...

Page 26: ...ase of ceiling mounting upside down Date Time settings Changes the time and date of the product Setting ON OFF control of the fan Selects the mode of operation for the fan between 2 modes ON The fan i...

Page 27: ...the power connector indicates the operating status for the SmartCrystal Pro Booster A white LED below the display shows the SmartCrystal Pro Booster synchronization status ON OFF Green LED nbr 5 p 7 T...

Page 28: ...tick into the port USB 2 of the SmartCrystal Pro Booster 3 From a smartphone or a remote computer connect to the user interface of your SmartCrystal Pro Booster and select SW Update 4 Wait for complet...

Page 29: ...configured correctly 3 and 4 Check the connections of SmartCrystal Pro Booster the status of the white LED indicator synchronization with the 3D projector and the green LED power indicator 4 Remove th...

Page 30: ...ng patterns of light may cause epilepsy symptoms for some viewers If you or any member of your family has a history of epilepsy Volfoni strongly recommends that you consult a physician before using th...

Page 31: ...o avoid breaking the base of the product 16 WARRANTIES AND COMPLIANCE The Volfoni Group reserves the right to make changes in the hardware packaging or other documentation without prior written notice...

Page 32: ...n Any changes or modifications not expressly approved by the party responsible for compliance could void the user s authority to operate the equipment European Union Disposal information This symbol m...

Page 33: ...d in France by VOLFONI SAS 29 rue Jean Jacques Rousseau 75001 Paris France Distributed in Americas by VOLFONI Inc 3450 Cahuenga Bd West Unit 504 Los Angeles CA90068 USA Distributed in Spain by VOLFONI...

Reviews: