background image

5

25

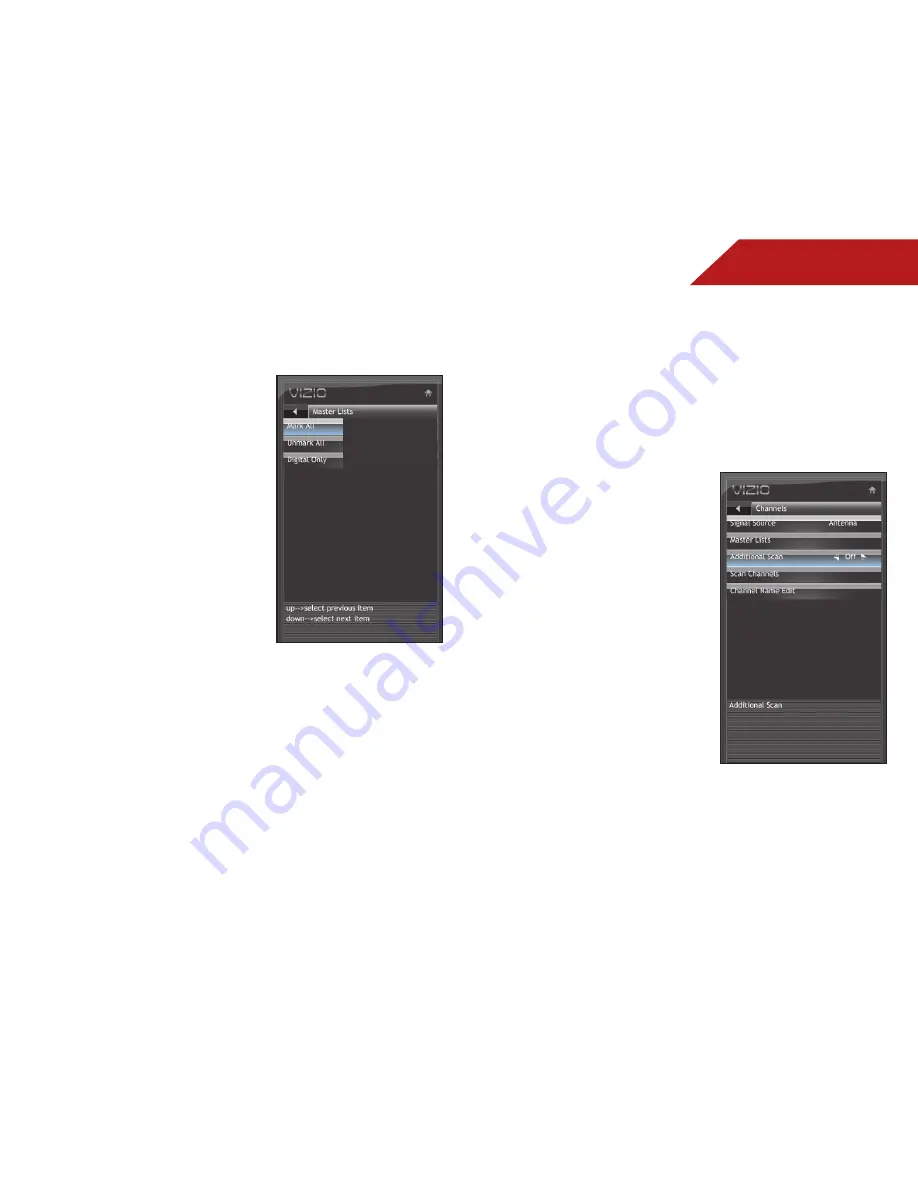
Customizing the Master Channel List

By customizing the master channel list, you can choose which 

channels can be displayed.

1.  Press the 

MENU

 button on the 

remote. The on-screen menu is 

displayed.

2.  Use the 

Arrow

 buttons on the 

remote to highlight the 

TV 

icon 

and press 

MENU/OK

. The TV 

Settings menu is displayed.

3.  Use the 

Arrow

 buttons to 

highlight 

Channels 

and press 

MENU/OK

.

4.  Use the 

Arrow

 buttons to 

highlight 

Master Lists

, then 

press 

MENU/OK


The master channel list is 

displayed.

5.  To add a channel to the list, highlight the channel and press 

MENU/OK

. When a channel is available, a check mark is 

displayed next to the channel. 


To remove a channel from the list, highlight the channel and 

press 

MENU/OK

. When the channel has been removed, the 

checkmark next to the channel will disappear. 


To add all available channels to the list, highlight 

Mark All


and press 

MENU/OK

To remove all available channels from the list, highlight 

Unmark All 

and press 

MENU/OK


To include only digital channels in the list, highlight 

Digital 

Only

 and press 

MENU/OK

.

6.  Press 

EXIT

.

Scanning for New or Additional Channels

When a new channel becomes available in your area, you do not 

have to rescan all channels to add the new channel. Using the 

add channel feature, you can restrict the scan to new channels 

only. 

This is useful because your master channel list settings are 

preserved.

To scan for new channels:

1.  Press the 

MENU

 button on the 

remote. The on-screen menu is 

displayed.

2.  Use the 

Arrow

 buttons on the 

remote to highlight the 

TV 

icon 

and press 

MENU/OK

. The TV 

Settings menu is displayed.

3.  Use the 

Arrow

 buttons to 

highlight 

Channels 

and press 

MENU/OK

.

4.  Use the 

Arrow

 buttons to 

highlight 

Additional Scan

.

5.  Use the 

Left/Right Arrow


buttons to change the option 

to 

On

 or 

Off

.

6.  Perform a channel scan. See 

Scanning for Channels on 

page 25.

Summary of Contents for E321VT

Page 1: ...ALLING YOUR new TV CONTROLS CONNECTIONS CONNECTING YOUR DEVICES USING THE ON SCREEN MENU USING THE USB MEDIA PLAYER TROUBLESHOOTING SUPPORT SPECIFICATIONS SAFETY LEGAL MODELS E3D320VX E3D420VX E3D470V...

Page 2: ...be achieved Changing the factory default picture settings or enabling other features will increase power consumption that could exceed the limits necessary to qualify for ENERGY STAR rating HDMI the H...

Page 3: ...design limits Misuse may result in electric shock or fire To prevent your TV from being damaged the following instructions should be observed for the installation use and maintenance of your TV Read...

Page 4: ...to power surges Do not attempt to repair or service your TV yourself with the apparatus When a cart is used use caution when moving the cart apparatus combination to avoid injury from tip over Unplug...

Page 5: ...he power cord To reduce risk of electric shock do not touch the connector with wet hands Insert batteries in accordance with instructions Incorrect polarities may cause the batteries to leak which can...

Page 6: ...vision stations and with cable and satellite TV services gaming consoles VCRs DVD players and similar products For additional information please contact the parties listed below as appropriate FCC US...

Page 7: ...to grounding electrodes and requirements of the grounding electrode Ground Clamp Antenna Lead In Wire Antenna Discharge Unit NEC Section 810 20 Grounding Conductors NEC Section 810 21 Ground Clamps P...

Page 8: ...he Audio Settings 19 Enabling or Disabling SRS TruSurroundHD 19 Enabling or Disabling SRS TruVolume 20 Adjusting the Equalizer Settings 20 Adjusting Bass and Treble Levels 21 Adjusting the Speaker Bal...

Page 9: ...tory Defaults 31 Displaying System Information 31 Restoring the TV to the Factory Default Settingss 32 Restarting the Setup App 32 Using the USB Media Player 33 Using the USB Media Player 33 Connectin...

Page 10: ...ge contents you can begin installing the TV Your TV can be installed in two ways On a flat surface using the included stand On a wall using a VESA standard wall mount not included Installing the TV St...

Page 11: ...below to find the appropriate mount for your TV model Installing a TV on a wall requires lifting To prevent injury or damage to the TV ask someone to help you E321VT Screw Size M4 Screw Length 20mm S...

Page 12: ...F audio device such as home audio receiver Stereo Audio Out Connect 3 5mm cable to audio device such as sound bar HDMI 3 Connect HDMI device PC Audio In Connect 3 5mm PC audio cable RGB Connect RGB ca...

Page 13: ...2 6 Front Panel Front Panel REMOTE SENSOR When using the remote aim it directly at this sensor...

Page 14: ...dio off or on Back Go to the previous on screen menu Power Turn TV on or off Menu Display the on screen menu Info Display the info window Number Pad Manually enter a channel Volume Up Down Increase or...

Page 15: ...d symbols inside the battery compartment 3 Replace the battery cover Use only good quality batteries Inserting the batteries incorrectly may result in cracking or leakage that may cause a fire or resu...

Page 16: ...AUDIO Game Console Cable Satellite Box DVD Blu ray Player Your TV can be used to display output from most devices 1 Verify that your device has a video port that matches an available port on the TV HD...

Page 17: ...ed to display output from a personal computer To use your TV as a PC display 1 Connect an RGB cable not included to your PC and the RGB port on the back of the TV This cable transmits video 2 Connect...

Page 18: ...Bar CONNECTING AN AUDIO DEVICE Your TV can output sound to an audio device such as a receiver or sound bar 1 Verify that your device has a audio port that matches an available port on the TV Optical e...

Page 19: ...n the remote The TV powers on and the Setup App starts 2 Use the Right Arrow button to go to the next screen 3 Press the Arrow buttons on the remote to highlight your preferred language Press the Righ...

Page 20: ...icture settings Adjust the audio settings Change TV settings Navigating the On Screen Menu To open the on screen menu press the MENU OK button on the remote Use the Arrow buttons to highlight a menu o...

Page 21: ...press OK Normal preserves the content s original aspect ratio Since the 4 3 aspect ratio is not large enough to fill the TV s screen black bars are added to the left and right of the display image Wid...

Page 22: ...ay different languages For example CC1 may display English captions and CC2 may display Spanish captions Changing the Appearance of Digital Closed Captions Digital closed captions can be displayed acc...

Page 23: ...Settings Using the Picture menu you can adjust the following settings Change the picture mode Adjust noise reduction Enable or disable Fast Response Enable or disable the ambient light sensor Reset th...

Page 24: ...arpness Adjusts the edge sharpness of picture elements It can be used to sharpen non HD high definition content however it will not produce detail that does not otherwise exist Backlight Adjusts the L...

Page 25: ...On 5 Press EXIT Enabling or Disabling the Ambient Light Sensor When enabled the ambient light sensor detects the light levels in the room to optimize the brightness of the TV s backlight To enable or...

Page 26: ...ualizer settings Adjust bass and treble levels Adjust speaker balance Enable or disable the built in speakers Select the digital audio output mode Change the audio language Reset the audio settings En...

Page 27: ...Adjusting the Equalizer Settings Your TV features six preset equalizer settings These settings allow you to customize your TV s sound to match the type of programming you most often enjoy The Equalize...

Page 28: ...o highlight Bass or Treble and press MENU OK 5 Use the Left Right Arrow buttons to increase or decrease the level When you are finished press EXIT Adjusting the Speaker Balance The built in speakers c...

Page 29: ...s to select On or Off and press EXIT Changing the Audio Language Some digital free to air and cable channels broadcast programs in more than one language The TV s MTS Multichannel Television Sound fea...

Page 30: ...settings for use with a PC Customizing and Removing Input Names When you have multiple devices connected to your TV it can become difficult to remember the inputs to which they are connected Your TV...

Page 31: ...rce you wish to remove then press MENU OK 5 Use the Arrow buttons to highlight Skip Input and press MENU OK 6 Press EXIT Setting Up Channels From the channel menu you can Change the signal source Cust...

Page 32: ...e channels to the list highlight Mark All and press MENU OK To remove all available channels from the list highlight Unmark All and press MENU OK To include only digital channels in the list highlight...

Page 33: ...The channel scan begins 6 Wait for the channel scan to reach 100 then press EXIT Customizing Channel Names Your TV features the ability to customize channel names making them easy to identify Custom n...

Page 34: ...ess MENU OK 5 Press EXIT Setting the TV s Date and Time From the Date Time menu you can Set the time zone Adjust the time for daylight savings Enable or disable automatic date and time updates Set the...

Page 35: ...nge the setting to Enable or Disable 6 Press EXIT Enabling or Disabling Automatic Date and Time Updates The current date and time is broadcast digitally in many areas Your TV can automatically set the...

Page 36: ...for Use with A PC Your TV can be used to display output from a home computer using the RGB port These settings are only available when viewing content from the RGB port To adjust the PC settings 1 Pr...

Page 37: ...he Parental Controls menu highlight Channel Locks and press OK The Channel Locks menu is displayed 2 Highlight the channel you want to lock or unlock and press OK 3 When a channel is locked the Lock i...

Page 38: ...Number Pad on the remote to re enter your new 4 digit parental control passcode 4 Write down your new parental control passcode and save it in a secure location 5 Press the EXIT button on the remote...

Page 39: ...nd press MENU OK The TV displays Are you sure you would like to Restore Defaults This will erase any custom settings 4 Highlight Yes and press MENU OK 5 Press EXIT Restarting the Setup App The TV s Se...

Page 40: ...d file type The USB thumb drive must have a minimum 1GB memory The TV will not play media from external hard drives or mp3 players To play your USB media 1 Load your photos onto a USB thumb drive usin...

Page 41: ...t Folder Displays the folder path Next Press the Play button on the remote control if you would like to start the Photo Slideshow Previous Press the Stop button on the remote control if you would like...

Page 42: ...LL FREE techsupport VIZIO com www VIZIO com support Hours of operation Monday Friday 5 am to 9 pm PST Saturday Sunday 8 am to 4 pm PST The VIZIO support team is highly trained and is based in the Unit...

Page 43: ...o the TV Check the audio connections of external devices Blu ray player game console cable satellite box that are connected to the TV If you are using an antenna the signal strength of the channel may...

Page 44: ...or always lit Your HDTV is precision manufactured using an extremely high level of technology However sometimes pixels may not display correctly These types of occurences are inherent to this type of...

Page 45: ...onent Video Inputs 1 Composite Inputs 1 Shared with Component RF Coaxial Input 1 USB Ports 1 USB Photo Slideshow Yes USB Individual Photo View Yes USB Video No USB Music Player No USB Firmware Upgrade...

Page 46: ...of customer misuse modifications or adjustments as well as installation and set up issues or any repairs attempted by anyone other than by aVIZIO authorized service center Products with unreadable or...

Page 47: ...between the equipment and receiver 3 Connect the equipment into an outlet on a circuit different from that to which the receiver is connected 4 Consult the dealer or an experienced radio TV technician...

Page 48: ...MODELS E3D320VX E3D420VX E3D470VX 2012 VIZIO INC All rights reserved 1205230C A...

Reviews: