background image

VIZIO 

E

260VP User Manual 


23 


www.VIZIO.com


Using Coaxial (Antenna) (Good) 


1.  Turn off the power to your HDTV. 
2.  Connect the coaxial (RF) connector from your antenna or digital cable to the 

DTV/TV 

CABLE/ANTENNA

 connector on your HDTV. 

3.  Turn on the power to your HDTV. 
4. Select 

TV

 using the 

INPUT

 button on the remote control or side of the TV. 

5.  Search for new channels. See

 Auto Channel Search

 on page 36 for more information on 

scanning for channels. 

Connecting Your DVD Player 


Using HDMI (Best) 

 
DVD players that have a HDMI digital interface should be connected using HDMI for optimal results. To 
maintain image quality, use a VIZIO certified HDMI cable. This cable is available in 6, 15, and 30 foot 
lengths. Visit www.VIZIO.com or call 

877-MYVIZIO 

(877-698-4946) for details. 


1.  Turn off your HDTV and DVD player.  
2.  Connect a HDMI cable to the HDMI output of your DVD player and the other end to the 

HDMI 1 

or 2

  jack on your HDTV. 

3.  Turn on the power to your HDTV and your DVD player.  
4. Select

 HDMI-1 or HDMI-2


using the 

INPUT

 button on the remote control or side of the TV. 

Note: 

  The HDMI input on your HDTV supports High-bandwidth Digital Content Protection (HDCP).  

HDCP encrypts the transmission between the video source and the digital display for added 
security and protection. 

  Refer to your DVD player user manual for more information about the video output requirements. 


Summary of Contents for E 260VP

Page 1: ...r located on the back of your HDTV for easy reference when obtaining warranty support Serial _____________________ Purchase Date _____________________ VIZIO is a registered trademark of VIZIO Inc dba...

Page 2: ...vided for ventilation To ensure reliable operation of your HDTV and to protect it from overheating be sure these openings are not blocked or covered Do not place your HDTV in a bookcase or cabinet unl...

Page 3: ...ry to repair your HDTV yourself Avoid using dropped or damaged appliances If your HDTV is dropped and the housing is damaged the internal components may function abnormally Unplug the power cord immed...

Page 4: ...structure grounding of the lead in wire to an antenna discharge unit size of the grounding conductors location of antenna discharge unit connection to grounding electrodes and requirements of the gro...

Page 5: ...ntinue to work as before to receive low power Class A or translator television stations and with cable and satellite TV services gaming consoles VCRs DVD players and similar products For additional in...

Page 6: ...ST TIME 18 Select an Input Source 18 Watching a TV Program 18 Viewing Digital TV Program Information 19 CHAPTER 6 CONNECTING EQUIPMENT 20 Which Video Connection Should I Use 20 Connecting Your Cable o...

Page 7: ...ep Timer Menu 32 Picture Menu 32 Picture Mode 32 Backlight 32 Brightness 32 Contrast 33 Color 33 Tint 33 Sharpness 33 More 33 Audio Menu 35 Audio Mode 35 Balance 35 Lip Sync 35 TV Speakers 35 Advanced...

Page 8: ...E AND TROUBLESHOOTING 43 Cleaning the TV and Remote Control 43 Troubleshooting Guide 43 Telephone Technical Support 46 Compliance 46 FCC Class B Radio Interference Statement 46 CHAPTER 10 SPECIFICATIO...

Page 9: ...trol AA batteries for the remote control 2 Power Cord Detachable base with thumbscrew This user manual Quick Setup Guide Registration Card HDTV Accessories and Services Additional certified accessorie...

Page 10: ...oid tipping For proper ventilation you must allow space between the back of your HDTV and the wall Avoid installing your HDTV in places with high humidity dust or smoke so you do not shorten the servi...

Page 11: ...the two top foam end caps 2 Remove the stand base and accessory box from packaging 3 Remove the TV from the box and lay it face down on a clean padded flat surface Note Make sure that the surface is...

Page 12: ...ur HDTV face down on a soft flat surface to prevent damage to the screen c Remove the cover on the stand neck d Remove the four 4 screws holding the stand neck and then remove the neck and base Note T...

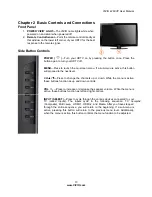
Page 13: ...button will proceed to the next level CH Press to change the channels up or down While the menu is active these buttons function as up and down controls VOL Press to increase or decrease the speaker...

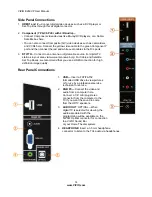
Page 14: ...rvice 2 RGB PC Connect the video and audio from a computer here Connect a 1 8 mini plug stereo connector from the computer to the TV if you want the sound to come from the HDTV speakers 3 AUDIO OUT OP...

Page 15: ...e Point the remote control directly at this sensor for the best response to the remote signal Do not place any obstacles between the remote control and the remote control sensor The effective range of...

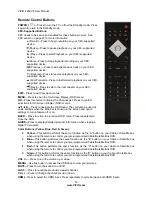
Page 16: ...he slide bar is shown on the screen and option settings to turn a feature off or on BACK Press to return to a previous OSD menu Press repeatedly to close the OSD GUIDE Press to display detailed progra...

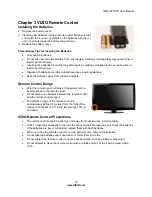
Page 17: ...n your TV for the first time Follow the on screen directions to easily setup your new HDTV 1 Insert the batteries into the remote control 2 Connect the power cord to the power cord connector on the ba...

Page 18: ...ns are secure Also verify that the AC DC power adapter is plugged into a correctly grounded electrical outlet or surge protector 1 Press the power button on the remote control The VIZIO logo on the fr...

Page 19: ...ewing Digital TV Program Information When the channel is changed or when you press the GUIDE button an information header is shown over the picture for a few seconds Each press of the GUIDE button wil...

Page 20: ...to connect your computer so you can use your HDTV as your monitor Better analog Component consists of three cables for transmitting video and two cables for transmitting audio one red and one white Co...

Page 21: ...an HDMI cable to the HDMI output of your Cable Satellite box and the other end to the HDMI 1 or 2 jack on your HDTV 3 Turn on the power to your HDTV and your Cable Satellite box 4 Select HDMI 1 or HDM...

Page 22: ...or side of the TV Note There are no dedicated audio ports for HDMI so there may or may not be audio from the TV with this connection Using Composite AV Video Good 1 Turn off the power to your Cable S...

Page 23: ...esults To maintain image quality use a VIZIO certified HDMI cable This cable is available in 6 15 and 30 foot lengths Visit www VIZIO com or call 877 MYVIZIO 877 698 4946 for details 1 Turn off your H...

Page 24: ...nnect the Component cables green blue and red from your DVD player to the COMPONENT jacks on your HDTV 3 Connect the audio cables white and red from your DVD player to the COMPONENT L and R AUDIO jack...

Page 25: ...for more information on scanning for channels Connecting Your VCR or Video Camera Note Refer to your VCR or Video Camera user manual for more information about the video output requirements of the pro...

Page 26: ...optical See your Home Theater user manual for more information Connecting a Computer RGB VGA 1 Set computer to a resolution supported by your HDTV see Preset PC Resolutions on page 49 If your computer...

Page 27: ...d to the HDMI 1 or 2 jack on your HDTV 3 Connect the 1 8 inch audio cable from your computer to the RGB PC Audio jack on your HDTV This step is optional and only needed if you want to transmit audio f...

Page 28: ...l as other factors Viewing Pictures 1 Insert a USB device with digital content such as photos music and movies into the Multimedia port on the side of your HDTV If a USB device is already connected pr...

Page 29: ...on is set to On the selected picture will be displayed until you press EXIT Sequence will show your pictures in the order they are listed on your USB device until you stop the slideshow Shuffle will s...

Page 30: ...menu options may have additional submenus for example the TV Rating submenu for Parental Controls 1 Press MENU The OSD opens 2 Press or on the remote control to select one of the menu options Input W...

Page 31: ...e entire picture Recommended for HDMI and RGB Computer viewing so you can see the complete picture without the image overstretching beyond the viewing area If you experience noise along the border swi...

Page 32: ...ndow Color Choose a text frame color for CC text Window Opacity Make the text frame for CC text more or less transparent Sleep Timer Menu Select the timer to turn off the TV in 30 60 90 120 or 180 min...

Page 33: ...icture Mode is set to Custom Sharpness Adjust the sharpness of the edges of elements in the picture It does not produce detail that otherwise does not exist This adjustment is helpful when viewing Sta...

Page 34: ...ion of certain colors and improving flesh tones Choose from Off Normal Rich Color Green Flesh and Green Blue Adaptive Luma Large areas of brightness in the picture will result in a higher Average Pict...

Page 35: ...ess Choose from On or Off Note When SRS TruSurround HD is ON Equalizer adjustments are not available SRS TruVolume When the programming switches to a commercial or when changing from channel to channe...

Page 36: ...accept it Note Only settings under the Audio menu will be reset Settings Menu Tuner Note The tuner option can only be selected when your HDTV is in TV input mode Tuner Mode Select Cable or Antenna dep...

Page 37: ...ransmitting the audio with the program you are watching This signal is usually Spanish Choose from Mono Stereo or SAP Name Input This feature makes it easier for you to recognize the devices you have...

Page 38: ...he side of the TV The remote control buttons do not control the LOCK menu To access or navigate the UNLOCK menu you can use the Arrow and OK buttons on the remote Enter your PIN when prompted Lock and...

Page 39: ...vailable G General audience 8 ans General not recommended for young children 13 ans Not suitable for children under 13 years of age 16 ans Not suitable for under 16 years of age 18 ans Adults only Alt...

Page 40: ...a CEC supported Blu ray DVD player is connected to your HDTV through HDMI 2 and that player is powered on your HDTV will automatically change to the HDMI 2 input Similarly if your HDTV is powered on...

Page 41: ...set to On the selected picture will be displayed until you press EXIT Sequence will show your pictures in the order they are listed on your USB device until you stop the slideshow Shuffle will show yo...

Page 42: ...it Note This does NOT reset the Parental Control Password Clear Memory Factory Default Use this function to reset the TV to the default factory settings The screen will display a message to confirm t...

Page 43: ...s at techsupport vizio com General TV Problems Solution Receive the error message No Signal Press the INPUT button on the remote control to select a different input source If you are using cable conne...

Page 44: ...rams where possible If HD content is not available view Standard Definition from a digital source Standard analog TV will always be noticeably inferior to HD because your digital flat panel TV has vid...

Page 45: ...rely to the TV and move the antenna around the room or close to a window You switch to a different input and the volume changes The TV remembers the volume level from the last time you adjusted it If...

Page 46: ...adio Interference Statement NOTE This equipment has been tested and found to comply with the limits for a Class B digital device pursuant to Part 15 of the FCC Rules These limits are designed to provi...

Page 47: ...udio Amplifier Dolby Digital for ATSC QAM Signal Compatibility 480I SDTV 480P EDTV 720P HDTV 1080I HDTV 1080P FHDTV Channel Skip Add VIDEO INPUT Naming Capability Closed Caption Parental Control V CHI...

Page 48: ...ns CSA CSA US FCC Class B Compliances Energy Star 4 1 ATSC Spec A 65 EIA CEA 766 A Note The Federal Communications Commission FCC the Consumer Electronics Association CEA and the Consumer Electronics...

Page 49: ...9 500 Windows 6 1024 x 768 60 48 363 60 004 N N 65 000 Windows 7 1024 x 768 70 56 476 70 069 N N 75 000 Windows 8 1024 x 768 75 60 023 75 029 P P 78 750 Windows 9 720 x 400 70 31 469 70 087 N P 28 322...

Page 50: ...kmanship Items not covered include but are not limited to cosmetic damage normal wear and tear misuse signal issues power surges and damages from shipping acts of God any sort of customer misuse insta...

Page 51: ...ront Panel 13 Jag Wheel 13 Daylight Savings setting 40 DTV Transition 5 DVD Player Connecting 23 DVI Cable Box 22 Satellite Box 22 EPG 19 Getting Started 17 Grounding 4 GUIDE Button 19 HDMI 20 HDTV Lo...

Page 52: ...rch for channels 36 Setting Up 10 Settings Menu Audio 35 37 CEC 40 Menu Language 40 Parental Controls Menu 38 Time Local Settings 40 Tuner 36 Setup Wizard 17 Sharpness 33 Skip Channel 37 Slideshow Dur...

Reviews: