Vizio D24hn-G9 User Manual Download Page 20

3

20

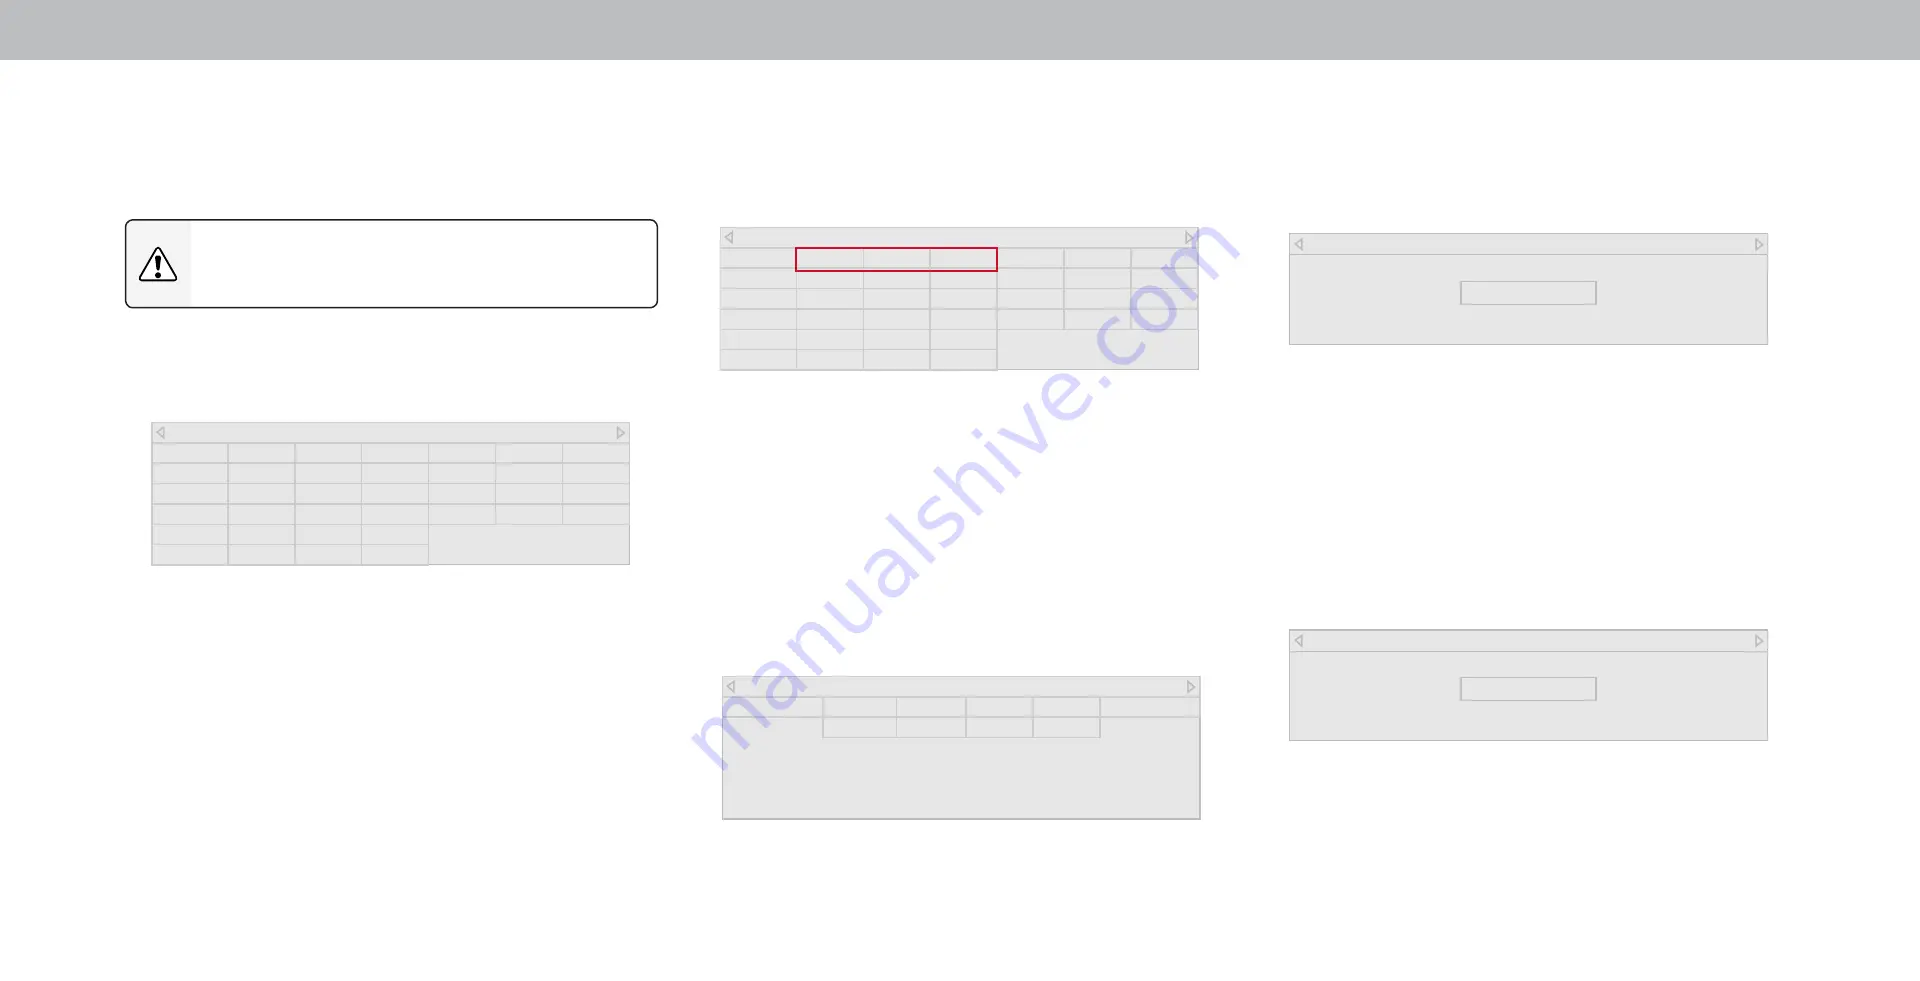
To turn color channels off and on:

1.  From the COLOR CALIBRATION menu, use the 

Arrow buttons to 

highlight 

Color Tuner, and then press OK. The COLOR TUNER 

menu is displayed.

2.  Use the 

Arrow buttons on the remote to highlight RedGreen, or 

Blue.

3.  Press the 

OK  button to turn the color channel off or on. An X 

appears over a color channel that has been turned off.

4.  Use the 

Arrow buttons to highlight another color channel to turn 

off or on. Only two color channels can be turned off at the same 

time.

5.  When you have finished with the color channels, press the 

Exit 

button.

Color Tuner

Red

Green

Blue

Cyan

Magenta

Yellow

Hue

0

0

0

0

25

-14

Saturation

-1

5

-4

0

-2

0

Brightness

-24

0

-22

0

0

0

Offset

0

0

0

Gain

0

0

0

To adjust the 11 Point White Balance settings:

1.  From the Color Tuner menu, use the 

Arrow buttons to highlight 

Color Tuner, and then press the Left/Right Arrow buttons until 

the 11 POINT WHITE BALANCE menu is displayed.

2.  Use the 

Arrow buttons on the remote to highlight the Gain and 

Color values you wish to adjust. Press the OK  button and use 

the 

Left/Right Arrow buttons to adjust the value. When you are 

finished, press the 

OK button to save the setting.

3.  When you have finished, press the 

Exit button.

11 Point White Balance

Gain

Red

Green

Blue

5%

0

0

0

Adjusting the Color Tuner Settings
The Color Tuner settings allow you to adjust the HSB color and 11 point 

white balance, turn color channels off for testing, and display color bar, 

flat, and ramp test patterns.

The Color Tuner, 11 Point White Balance, and test patterns 

allow technicians to manually calibrate the TV. Calibration 

requires specialized training, an input with precisely set 

colors, and a specialized light meter.

To adjust the HSB color settings:

1.  From the COLOR CALIBRATION menu, use the Arrow buttons to 

highlight 

Color Tuner, and then press OK. The Color Tuner menu 

is displayed.

2.  Use the 

Arrow buttons on the remote to highlight the Hue, 

Saturation, Brightness, Offset, or Gain of the color you wish to 

adjust. Press the 

OK button.

3.  Use the

 Left/Right Arrow buttons to adjust the value. When you 

are finished press the 

OK button to save the setting. 

4.  When you have finished adjusting the color tuner settings, press 

the

 Exit button.

Color Tuner

Red

Green

Blue

Cyan

Magenta

Yellow

Hue

0

0

0

0

25

-14

Saturation

-1

5

-4

0

-2

0

Brightness

-24

0

-22

0

0

0

Offset

0

0

0

Gain

0

0

0

To show or hide the Flat Test Pattern:

1.  From the Color Tuner menu, use the 

Arrow buttons to highlight 

Calibration Tests, and then press the Left/Right Arrow buttons 

until the FLAT TEST PATTERN menu is displayed.

2.  Use the 

Arrow buttons on the remote to highlight Off. Use the 

Left/Right Arrow buttons to select the percentage brightness for 

the flat test pattern. Selecting a percentage immediately shows 

the flat pattern at that brightness. 


—or— 


To disable the Flat Test Pattern, use the 

Left/Right Arrow 

buttons to highlight 

Off.

3.  When you are finished, press the 

Exit button.

To show or hide the SMPTE Test Pattern:

1.  From the Color Tuner menu, use the 

Arrow buttons to highlight 

Calibration Tests, and then press the Left/Right Arrow buttons 

until the SMPTE TEST PATTERN menu is displayed.

2.  Use the 

Arrow buttons on the remote to highlight Off. Use the 

Left/Right Arrow buttons to highlight On to show the SMPTE 

Pattern.  

—or— 


To hide the SMPTE Test Pattern, use the 

Left/Right Arrow 

buttons to highlight 

Off.

3.  When you are finished, press the 

Exit button.

SMPT Test Pattern

Off

Flat Test Pattern

Off

Summary of Contents for D24hn-G9

Page 1: ...USER MANUAL Model D24hn G9...

Page 2: ...from the apparatus Only use attachments accessories specified by the manufacturer Use only with the cart stand tripod bracket or table specified by the manufacturer or sold with the apparatus When a...

Page 3: ...of the following occurs contact the dealer The power cord fails or frays Liquid sprays or any object drops into your TV Your TV is exposed to rain or other moisture Your TV is dropped or damaged in an...

Page 4: ...information with regard to proper grounding of the mast and supporting structure grounding of the lead in wire to an antenna discharge unit size of the grounding conductors location of antenna dischar...

Page 5: ...ia Interface and the HDMI Logo are trademarks or registered trademarks of HDMI Licensing Administrator Inc For DTS patents see http patents dts com Manufactured under license from DTS Inc DTS the Symb...

Page 6: ...nnels 24 Scanning for Channels 24 Skipping Channels 24 Listening to Alternate Audio 25 Changing the Analog Audio Language 25 Parental controls 26 Using Parental Controls 26 Enabling or Disabling Progr...

Page 7: ...cator When using the remote aim it directly at this sensor The power indicator flashes on when the TV turns on then goes out after several seconds To keep the power indicator on as long as the TV is o...

Page 8: ...ss the input menu Note The image shown here is for illustrative purposes only and may be subject to change The actual number of ports and their locations may vary depending on the model Volume Press t...

Page 9: ...propriate cable not included to the TV and the device 3 Turn the TV and your device on Set the TV s input to match the connection you used HDMI 1 HDMI 2 etc HDMI R L Y Y L R Pr Cr Pb Cb Coaxial CONNEC...

Page 10: ...TV s input to match the connection you used Component or Composite CONNECTING A DEVICE Video Audio L R Y Pb Pr Component Composite input on back of TV The actual ports and their locations may vary dep...

Page 11: ...matches an available port on the TV Optical RCA etc 2 Connect the appropriate cable not included to the TV and the device 3 Turn the TV and your device on HDMI R L Optical CONNECTING A DEVICE AUDIO C...

Page 12: ...t can scratch or damage the TV 3 If attached remove the stands by loosening and removing the screws 4 Attach your TV and wall mount to the wall carefully following the instructions that came with your...

Page 13: ...the number pad 18 Dash Use with number pad to manually enter a digital sub channel For example 18 4 or 18 5 1 2 3 4 5 6 8 7 9 10 11 12 14 15 17 18 13 16 Replacing the Batteries 1 Find the notch on the...

Page 14: ...stalled and the power cord should be connected to an electrical outlet Choose your mode Select Store demo for in store display Select Home Use for in home use Store Demo Home Use TV SIGNAL Select how...

Page 15: ...to your TV To use one of these devices with your TV you must first change the input source using the Input menu To change the input sources 1 Press the Input button on the remote The Input menu is dis...

Page 16: ...spect ratio and size Stretch expands a widescreen image to fill the screen from top to bottom and stretches it half as much from right to left Figures appear tall and thin Wide stretches a 4 3 aspect...

Page 17: ...w buttons on the remote to highlight Picture Mode then use the Left Right Arrow buttons to change the picture mode Standard mode sets the picture settings to the default settings Calibrated mode sets...

Page 18: ...TURE menu use the Arrow buttons to highlight Picture Mode Edit and then press OK The PICTURE MODE EDIT menu is displayed 2 Use the Arrow buttons to highlight the setting you wish to adjust then press...

Page 19: ...s Deleting a Custom Picture Mode Custom picture modes that are no longer needed can be deleted Inputs assigned to a deleted custom picture mode become assigned to the Calibrated picture mode To delete...

Page 20: ...ng an input with precisely set colors and a specialized light meter To adjust the HSB color settings 1 From the COLOR CALIBRATION menu use the Arrow buttons to highlight Color Tuner and then press OK...

Page 21: ...uttons to highlight Off 3 When you are finished press the Exit button Ramp Test Pattern Off To show or hide the Uniformity Analyzer Test Pattern 1 From the Color Tuner menu use the Arrow buttons to hi...

Page 22: ...play image and the accompanying audio track Digital Audio Out Changes the type of processing for digital audio out and HDMI ARC output when connected to a home theater audio system Select Auto PCM Dol...

Page 23: ...e finished setting the sleep timer press the Exit button on the remote Setting the Auto Power Off Feature To help save energy your TV is set by default to turn off after 10 minutes without a video or...

Page 24: ...r a channel scan is completed you may find that some channels are too weak to watch comfortably There may also be some channels you do not want to view You can remove these channels from the TV s memo...

Page 25: ...with Secondary Audio Programming To use the Analog Audio feature 1 From the Channels menu highlight Analog Audio and press OK The Analog Audio menu is displayed 2 Select Stereo SAP secondary audio pr...

Page 26: ...ed the Lock icon appears locked The channel is not accessible unless the parental PIN is entered 4 When a channel is unlocked the Lock icon appears unlocked The channel is accessible Blocking and Unbl...

Page 27: ...h to change then use the Left Right Arrow buttons to change the setting Caption Style Choose As Broadcast to keep default settings or Custom to manually change each setting Text Style Change the font...

Page 28: ...e text appears This is the typical As Broadcast mode Opaque background and window in the same color When text appears the entire line fills with color at once In the example the closed caption text is...

Page 29: ...ETTINGS menu is displayed 3 Highlight the input device that you want to rename and press OK To use a preset input name Highlight the Name Input row and press OK Highlight the input name and use the Le...

Page 30: ...the system information 5 When you are finished reviewing the system information press the Exit button on the remote Changing the On Screen Menu Language Your TV can display the on screen menu in diff...

Page 31: ...the remote to highlight System and press OK The SYSTEM menu is displayed 5 Use the Arrow buttons on the remote to highlight CEC and press OK The CEC menu is displayed 6 Highlight CEC and press OK Sel...

Page 32: ...system PIN enter it now The TV displays Select Reset to restore all TV settings to factory defaults and clear all account information 5 Highlight Reset and press OK 6 Wait for the TV to turn off The...

Page 33: ...OW The Info Window can be displayed by pressing the Info button on the remote Press the Info button one time to display the current input time and picture mode INFO WINDOW Time Picture Mode 5 00 pm Cu...

Page 34: ...photos Note The image shown here is for illustrative purposes only and may be subject to change The actual number of ports and their locations may vary depending on the model You can display your phot...

Page 35: ...ew Product Setup Connecting Your Devices Technical Problems Product Updates And More You can also contact our award winning support team at Phone 877 698 4946 TOLL FREE Live Chat Support Available Do...

Page 36: ...REGISTER YOUR VIZIO PRODUCT NOW Customized Support Get assistance quickly with your information on hand News Offers Take advantage of the latest news and special offers from VIZIO Safety Satisfaction...

Page 37: ...re Settings Select a pre set picture mode See Adjusting the Picture Settings VIZIO recommends selecting Calibrated Check all cables to ensure they are securely attached The image quality is not good F...

Page 38: ...Mounting Screw Size M4 Hole Pattern 100 mm x 100 mm Maximum Resolution 720p LCD Backlight Edgelit LED Refresh Rate 60 Hz INPUTS OUTPUTS HDMI Inputs 2 Component Video Inputs 1 Ethernet Input 0 RF Atenn...

Page 39: ...ference caused by unauthorized modification to this equipment It is the responsibilities of the user to correct such interference FCC Warning Changes or modifications not expressly approved by the par...

Page 40: ...aining portion of the original warranty or for ninety 90 days from warranty service whichever is longer Types of Service TVs that are 32 inches or larger will usually be serviced in home In home servi...

Page 41: ...ES OTHER THAN THOSE DESCRIBED ABOVE ANY IMPLIED WARRANTIES INCLUDING ANY IMPLIED WARRANTY OF MERCHANTABILITY AND FITNESS FOR A PARTICULAR PURPOSE WILL BE LIMITED IN DURATION TO THE WARRANTY PERIOD SET...

Page 42: ...h Definition Multimedia Interface and the HDMI Logo are trademarks or registered trademarks of HDMI Licensing Administrator Inc For DTS patents see http patents dts com Manufactured under license from...

Page 43: ...2018 VIZIO INC ALL RIGHTS RESERVED 0821DL...

Reviews: