background image


DIP SWITCH SETTING


A. FACTORY DEFAULT SETTING 

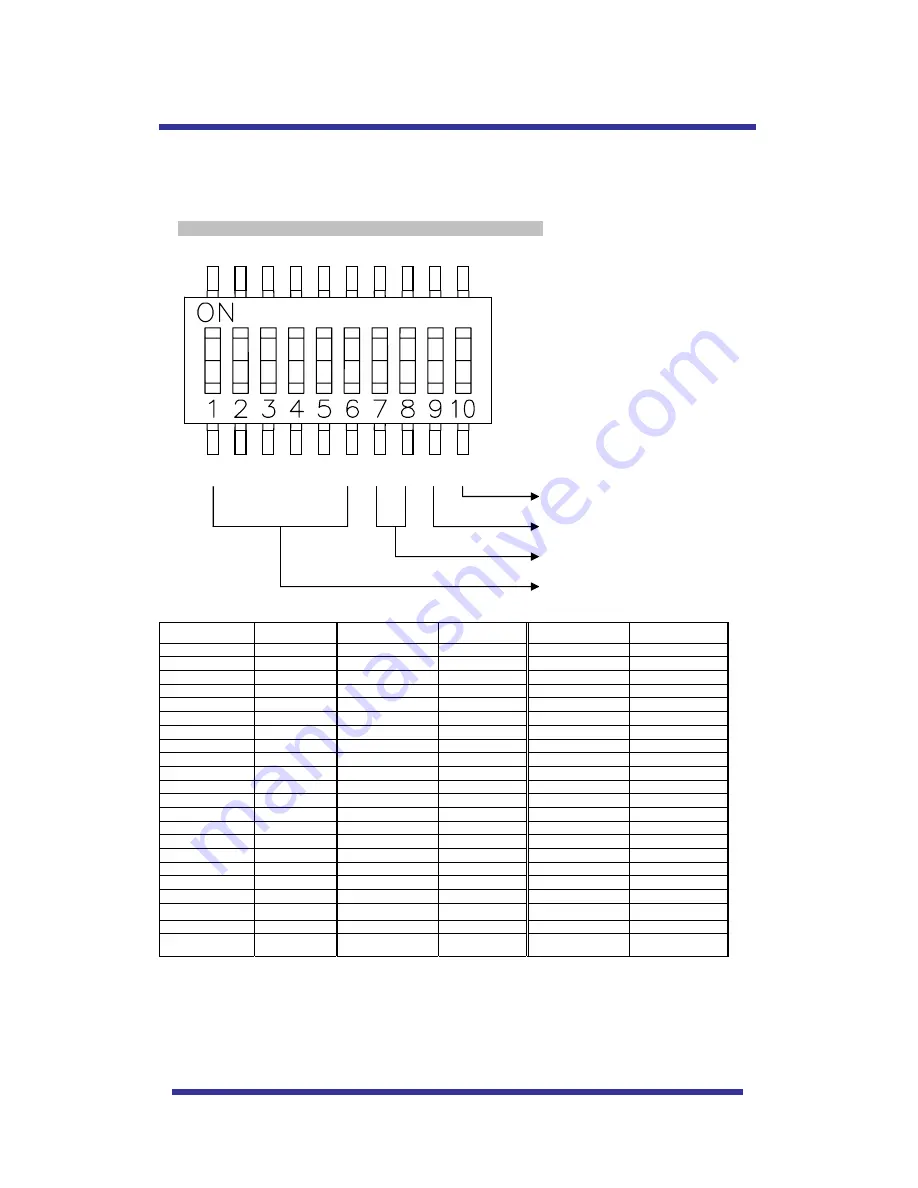
The dome cameras RS 485 address is set using switches 1-6 of DIP SW1, refer to the table below...   

Open the camera case to set ID using DIP SW1. 

      * Factory default: Camera ID = 1, PELCO-D Baud Rate: 2400bps 


Termination

Protocol

ID Set

Baud rate


B. ID SETTING (1-ON, 0-OFF) (1

Î

10) 

DIP SW 

ID VALUE 

DIP SW 

ID VALUE 

DIP SW 

ID VALUE 

100000XXXX


1 111010XXXX


23 101101XXXX


45 

010000XXXX


2 000110XXXX


24 011101XXXX


46 

110000XXXX


3 100110XXXX


25 111101XXXX


47 

001000XXXX


4 010110XXXX


26 100011XXXX


48 

101000XXXX


5 110110XXXX


27 100011XXXX


49 

011000XXXX


6 001110XXXX


28 010011XXXX


50 

111000XXXX


7 101110XXXX


29 110011XXXX


51 

000100XXXX


8 011110XXXX


30 001011XXXX


52 

100100XXXX


9 111110XXXX


31 101011XXXX


53 

010100XXXX


10 000001XXXX


32 011011XXXX


54 

110100XXXX


11 100001XXXX


33 111011XXXX


55 

001100XXXX


12 010001XXXX


34 000111XXXX


56 

101100XXXX


13 110001XXXX


35 100111XXXX


57 

011100XXXX


14 001001XXXX


36 010111XXXX


58 

111100XXXX


15 101001XXXX


37 110111XXXX


59 

000010XXXX


16 011001XXXX


38 001111XXXX


60 

100010XXXX


17 111001XXXX


39 101111XXXX


61 

010010XXXX


18 000101XXXX


40 011111XXXX


62 

110010XXXX


19 100101XXXX


41 111111XXXX


63 

001010XXXX


20 

010101XXXX


42 


101010XXXX


21 110101XXXX


43  


011010XXXX


22 

001101XXXX


44  


36

Summary of Contents for KA-SD10

Page 1: ...MINI SPEED DOME CAMERA 10X Mini Speed Dome Camera Instruction Manual Rev 1 05 dated on August 15st 2007 ...

Page 2: ...nt Type Quick Operating Keys Diagnostic OSD Menu Setting A OSD Menu Table B DOME SET C CAMERA SET D PRESET E AUTO SCAN SET F TOUR SET G PRIVACY SET H PATTERN SET I ALARM SET J SECTOR SET DIP Switch Setting A Factory Default setting B ID Setting 1 ON 0 OFF 1 10 C Protocol Setting D Baud Rate Setting E 485 Terminations Trouble Shooting Specification Dimension 29 30 31 32 33 34 35 36 36 36 37 37 37 3...

Page 3: ...iance This symbol is intended to alert the user to the presence of un insulated dangerous voltage within the product s enclosure that may be of sufficient magnitude to constitute a risk of electric shock to persons Never install the product in area exposed to water oil or gas Never install the product on a ceiling that cannot hold its weight Never touch the power cord with wet hands Clean only wit...

Page 4: ... by most keyboards and DVRs that have Pelco protocol support Various Surveillance Functions Auto Scan repeats pan and tilt between two preset positions with different speed and dwell time 8 Group Tour up to 8 Programmable Group tours are available with each group is consisting of up to 60 preset steps with different speed and dwell times along with 16 character titling 165 Preset positions up to 1...

Page 5: ...NAMES OF EACH PART 4 Terminal Block 5 Main body 1 Surface Mount Adaptor 2 Cap Screw PT3 4 1EA 3 Dip Switch 5 ...

Page 6: ...from the main base These are captive screws that do not remove 3 Connect power to Power and GND 4 Connect video to video and GND 5 Connect communication cable to RS 485 connectors 6 Connect alarm common cables to GND Connect the alarm input cables to their relevant terminal 1 4 Alarm polarity can be programmed as N O or N C z Do not over tighten screws This can cause damage 12VDC type 24VAC type F...

Page 7: ...OUNT TYPE FIG 4 FIG 3 1 Fix the surface mount adaptor with 4pcs of screws on the place where you want to install FIG 3 2 When you use pipe please note the standard size of pipe FIG 4 3 Re assemble the dome FIG 5 7 ...

Page 8: ... on the ceiling FIG 6 DECORATION COVER CAMERA M3 0 SCREW HOLDER LOCK LEVER LOCK LEVER LOCK LEVER SAFETY WIRE HOLE SUSPENSION LOCK LEVER Embedded mount bracket 1ea Holder 3ea Decoration cover 1ea Safety wire 1ea Contents Screw M3 0 x 6 5ea Screw ø4 0 x 16 1ea 8 ...

Page 9: ...ews FIG 7 3 Fix the decoration cover on the rear of camera by holder screws M3 0 FIG 8 4 Hook the safety wire on the suspension and connect it to camera FIG 9 5 Install the camera by inserting cover lock and twisting it clockwise FIG 10 6 Fix the decoration cover by screw Ø4 0x16 FIG 10 FIG 9 FIG 10 9 ...

Page 10: ...16 4ea SCREW M4x8 4ea BRACKET RUBBER BOTTOM VIEW RUBBER BOTTOM COVER FIG 11 1 As above FIG 11 assemble rubber and bracket on the bottom of camera 2 After finishing assembly it will be shown as below FIG 12 FIG 12 3 If you want to install the speed dome on the concrete wall you need to make 12 5mm 10 ...

Page 11: ...les by drill like FIG 13 Depth 37mm 4 Install SET ANCHOR BOLT on the holes 5 As shown on FIG 14 after assembling mini PTZ and bottom cover assembly drive the pipe mount bracket and fix FIG 14 FIG 13 FIG 2 FIG 14 11 ...

Page 12: ... FIG 15 1 If you want to install the speed dome on the concrete wall you need to make 12 5mm diameter 4 holes by drill like FIG 15 Depth 37mm 2 Install SET ANCHOR BOLT on the holes 3 As shown on FIG 16 after assembling mini PTZ and bottom cover assembly drive the gooseneck mount bracket and fix FIG 16 FIG 16 12 ...

Page 13: ... the concrete wall you need to make 12 5mm diameter 4 holes by drill like FIG 1 Depth 37mm FIG 17 2 Install SET ANCHOR BOLT on the holes 3 To install Wall Mount Bracket Tip Select a ceiling board strong enough to hold 4 times the total weight of the camera Weight combined camera approx 5kg FIG 17 the cable into the ceiling the cable out of the ceiling FIG 18 13 ...

Page 14: ...4 Assemble a wall mount bracket and camera by Hexagon socket head cap screws M4 0X16 FIG 19 HEXAGON SOCKET HEAD CAP SCREW M4 0x16 4EA FIG 19 14 ...

Page 15: ... 5mm diameter 4 holes by drill Depth 37mm 3 Install SET ANCHOR BOLT on the holes 4 Fix the wanted bracket on the corner mount bracket with 4 ea of M10 BOLT before you install the corner mount bracket FIG 21 5 Screw the set anchor bolt of the bracket by nut on the wall FIG 22 FIG 20 FIG 22 FIG 21 6 After driving a bottom cover assembly to gooseneck mount bracket as shown on FIG23 15 ...

Page 16: ...assemble mini PTZ with bottom cover assembly FIG 23 FIG 23 16 ...

Page 17: ...l the pole mount bracket FIG 24 2 Tie the bracket with SUS BAND tightly FIG 25 3 As shown FIG 26 after installing a wall mount bracket fix a camera on the wall mount bracket FIG 26 FIG 24 FIG 25 FIG 26 HEXAGON SOCKET HEAD CAP SCREW M4 0x16 4EA Contents Pole mount adaptor 1ea Band Clamp 2ea M10 Bolt Nut 4ea 17 ...

Page 18: ...93 Preset BLC MODE Selectable On Off in BLC function 94 Preset D N MODE Selectable Day Night Mode Auto Day Night Mode 95 Preset OSD MAIN MENU To enter OSD Main Menu 96 Preset FOCUS ADJUST Focus adjustment 97 Preset ALARM Selectable Enable Disable all Alarms Quick Operation Keys Table 2 Use these function keys if controller has these keys z 65 preset Status Report is displayed to remove this screen...

Page 19: ...e ALARM Selectable Enable Disable all Alarms 93 Preset Save BLC MODE Selectable On Off in BLC function 94 Preset Save OSD MAIN MENU To enter OSD Main Menu 95 Preset Save D N MODE Selectable Day Night Mode Auto Day Night Mode 96 Preset Save SECTOR SECTOR setting menu entrance 97 Preset Save DOME Reset Initial DOME Reset Rebooting 98 Preset Save AUTO PAN AUTO PAN setting menu entrance 99 Preset Save...

Page 20: ...for commands from a controller to the dome If no commands are detected the test will exit after 60 seconds During the 60 seconds the camera must receive a signal from the controller or DVR so please operate the controller during this phase As soon as the dome detects a command OK will be displayed and the test will move on to the next step If the Tx connection test fails check the RS 485 wiring D ...

Page 21: ...E AND EXIT EXIT SECTOR SET SECTOR NO 01 SECTOR ID SECTOR01 SECTOR START XXX X XX X SECTOR END XXX X XX X SAVE EXIT PATTERN SET PATT NO 01 PATT TITLE PATTERN01 DATA FILL 100 SAVE EXIT ALARM SET ALARM NO 01 ALARM INPUT OFF ALARM ACT 01 SAVE EXIT PRIVACY SET PRIVACY NO 01 DISPLAY ACTION SAVE EXIT TOUR SET TOUR NO 01 TOUR TITLE TOUR01 TOUR STEP 01 PRESET NO 01 DWELL TIME 10 SPEED 200 S SAVE AND EXIT E...

Page 22: ...SECTOR EXIT DOME SET CAMERA ID CAM1 RECOVER OFF MANUAL SPEED 100 S AUTO FLIP OFF ZOOM SPEED FAST ALARM DISABLE LANGUAGE ENGLISH NEXT PAGE SAVE AND EXIT EXIT DEFAULT SETTING B 1 DOME SET CAMERA ID To set camera name and select a title of up to 16 characters using left or right direction keys or joystick Press ZOOM TELE button to move to the next character from left to right direction and ZOOM WIDE ...

Page 23: ...on can be recalled by pushing 67 preset button B 5 DOME SET ZOOM SPEED Zoom speeds are selectable as FAST or SLOW mode The default setting is FAST B 6 DOME SET ALARM You must enable the alarms for them to operate The default setting is DISABLED This function can be recalled by pushing 97 preset button B 7 DOME SET LANGUAGE Multiple languages are selectable English Italian German Dutch Danish Polis...

Page 24: ...TER PASSWORD BY ENTERING PRESET CODE PASSWORD CONFIRM ENTER PASSWORD BY ENTERING PRESET CODE PASSWORD CONFIRM CANCELLED ENTER PASSWORD BY ENTERING PRESET CODE PASSWORD CONFIRM CONFIRMED CONFIRMED CANCELLED If you press an incorrect number between PASSWORD and CONFIRM CANCELLED is displayed on the monitor and the menu will return to the previous page automatically after 3 attempts When a password h...

Page 25: ...ting Refer to page 29 30 and 31 Firmware version and upgraded date will be changed if the dome has been upgraded The camera module type is stated as follows SDM100 SAMSUNG 10X ZOOM CAMERA MODULE B 8 5 DOME SET NEXT PAGE INITIALIZATION To clear the current settings select the item that you wish to reset back to factory defaults SYSTEM STATUS PROTOCOL PELCO D P BAUD RATE 2400 BPS FIRMWARE VER X XX U...

Page 26: ...L DATA INITIALIZING To clear all data and return to factory defaults move the joystick right or press the pan right key to when the cursor is at LOAD OPTIMIZED DEFAULT to enter the next page Move joystick or the pan right keys so that the cursor is over YES then press the FOCUS NEAR button ALL DATA INITIALIZING is then displayed for about 5 7 seconds and then the menu is returned to the previous p...

Page 27: ...ge left and right as if looking into a mirror The default setting is OFF C 3 CAMERA SET APERTURE Aperture correction enhances the picture details and sharpness by increasing the gain of the caemra Increade the value to sharpen the image decrease to soften it The default seeting is 10 the aperture level is from 01 15 C 4 CAMERA SET D ZOOM If neabled digital zoom is applied when the zoom lens has re...

Page 28: ... and will switch depending on lighting conditions Alternatively it can be forced into color only mode The default setting is AUTO MODE This function can be recalled by pushing 94 preset button C 9 CAMERA SET DSS MODE DIGITAL SLOW SHUTTER If digital slow shutter is enabled the exposure time of the camera is increased this allowing more light to be collected and improving low light response This set...

Page 29: ...character from left to right and ZOOM WIDE button moves to the next character from right to left Space displays when appears D 3 PRESET PAN XXX X TILT XX X Press FOCUS FAR button in order to set preset position then use the joystick or pan left right keys to the position where memorized preset number is needed Then press FOCUS FAR button again after setting a preset location D 4 PRESET SAVE Move t...

Page 30: ... 3 AUTO SCAN DIRECTION Auto Scan directions are available as CW or CCW CW Clock wise direction Default CCW Count Clock Wise Direction E 4 AUTO SCAN ENDLESS Auto Scan can be set to endless rotation by enabling the endless option The default setting is OFF E 5 AUTO SCAN SPEED Auto scan speed can be programmed from 05 S up to 35 S The default setting is 10 S E 6 AUTO SCAN DWELL TIME The dwell time at...

Page 31: ...appears The tour title is not displayed on the monitor and is only for the reference of user F 3 TOUR SET TOUR STEP Each tour group consists of up to 60 preset steps with different dwell time and speed It is possible to match any preset for any tour step F 4 TOUR SET PRESET NO For each tour step it is possible to select any preset number up to 64 The default setting is BLK F 5 TOUR SET DWELL TIME ...

Page 32: ...rom MOVE MODE To adjust the size of the blocking area move the joystick or use the pan keys when the cursor is on ACTION After it has changed to ADJUST MODE press FOCUS FAR button in order to adjust the size of the blocking area The size of the blocking area can be adjusted by using joystick up down or left right or the pan and tilt keys After adjusting the size of the blocking area press FOCUS FA...

Page 33: ... the left right and ZOOM WIDE button moves to the next character from the right left Space displays when appears The pattern title is not displayed on the monitor but only for the reference of the user H 3 PATTERN SET DATA FILL To memorize a pattern press FOCUS FAR button in order to start the process The progress is shown as filled Press FOCUS FAR button again in order to escape H 4 PATTERN SET S...

Page 34: ...ult setting is OFF I 3 ALARM SET ALARM ACT Active alarms can trigger modes such as presets Group tours 1 8 and Patterns 1 8 Use the joystick or pan keys to select any preset number group tour no or pattern no I 4 ALARM SET SAVE After setting up the alarm features to save the data move the joystick right or press the pan right key when the cursor is on SAVE After saving the data the cursor moves to...

Page 35: ...o right and ZOOM WIDE button to move to the next character from right to left Space displays when appears J 3 SECTOR SET SECTOR START To set a SECTOR START position press FOCUS FAR button then move the joystick or pan keys to set the position Press FOCUS FAR button again to escape J 4 SECTOR SET SECTOR END To set a SECTOR END position press FOCUS FAR button then move the joystick or pan keys to se...

Page 36: ... 48 101000XXXX 5 110110XXXX 27 100011XXXX 49 011000XXXX 6 001110XXXX 28 010011XXXX 50 111000XXXX 7 101110XXXX 29 110011XXXX 51 000100XXXX 8 011110XXXX 30 001011XXXX 52 100100XXXX 9 111110XXXX 31 101011XXXX 53 010100XXXX 10 000001XXXX 32 011011XXXX 54 110100XXXX 11 100001XXXX 33 111011XXXX 55 001100XXXX 12 010001XXXX 34 000111XXXX 56 101100XXXX 13 110001XXXX 35 100111XXXX 57 011100XXXX 14 001001XXX...

Page 37: ...ch is used for BAUD RATE setting DIP SW can be changeable to 2400bps 9600bps Factory Default 2400bps If user selects Vicon protocol then Baud rate is automatically set as 4800bps DIP SW1 9 th BAUD RATE OFF 2400bps Default 4800bps VICON ON 9600bps E 485 TERMINATIONS 10th Dip Switch is used for 100Ω termination Set on 10th Dip Switch only for the last looped camera from the controller Even in case o...

Page 38: ...s connected correctly Check camera ID setting Check the RS 485 termination No picture Check if all the cables are connected correctly Check if the monitor is adjusted correctly Check for video locally at the dome Dark screen Check video termination and monitor settings Abnormal camera Check if PSU voltage level at the dome operation Check the RS 485 termination TROUBLE SHOTING 38 ...

Page 39: ...on 12V DC 9W Max Heater Type 15W Consumption 24V AC 18W Max Heater Type 30W Power Supply 12V DC DC12V 750mA Heater Type DC12V 1 2W POWER Power Supply 24V AC AC 24V 650mA Heater Type AC24V 1 3W Construction die casting Anti vandal dome cover Dimensions 158 8φ D 163 0mm H Weight 1 5 kg Motor Type Stepper Motor Micro Steps 1 4 Step Storage Temperature 10 60 Operating Temperature 0 50 OTHERS Certifica...

Page 40: ...DIMENSIONS 40 ...

Reviews: