background image

26

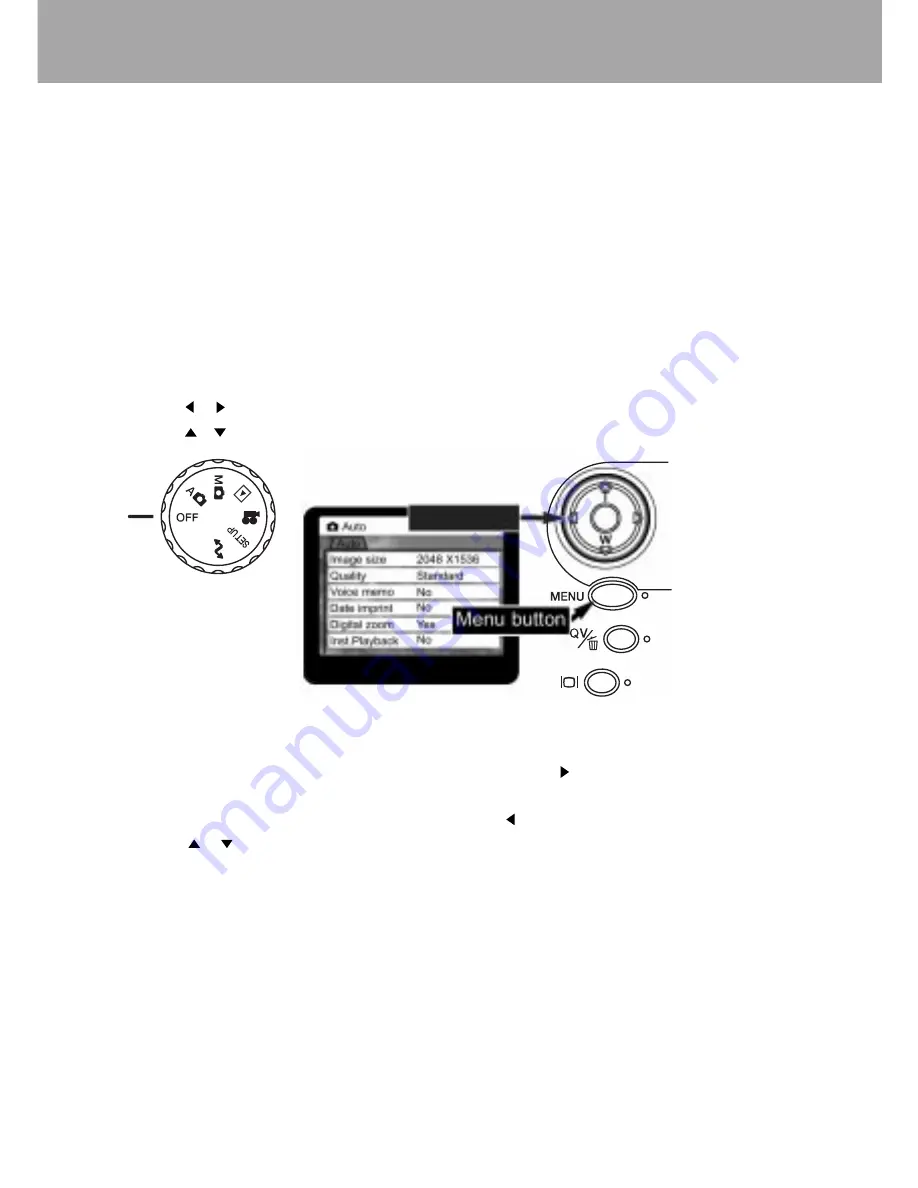
Navigating the menu

You can access the advanced camera setting to customize your camera according to your personal

preference. To access the advanced camera setting with different camera modes (Auto Recording,

Manual Recording, SETUP), the built-in Color LCD monitor is required.

Settings made with the mode menu will remain in effect until changed or the camera is reset to its

default settings.

Navigating the Menu of each camera operating mode:

1. Set the main switch to the desired operating mode.

2. Press the MENU button.

3. Use the     /     buttons of 5-way button to highlight the appropriate menu tab.

4. Use the     /     buttons of 5-way button to scroll through menu options.

Making a menu selection:

5. With the menu option to be changed highlighted, press the       button. A drop down menu

    appears, listing the available options. The settings will be displayed with the current setting

    highlighted. To return to the menu option, press the      button.

6. Use the      /      buttons to highlight the new settings

7. Press the center of Enter button to confirm

    a setting.

8. Once a setting has been set, the cursor will

    return to the menu options and the new setting

    will be displayed. Repeat steps 3~7 for any

    additional menus. To exit the menu mode,

    press the MENU button again.

Advanced Operating

Modes and Menus

5-way button

Summary of Contents for Vivicam 3725

Page 1: ...Vivicam 3725 User Manual English 021009...

Page 2: ...le protection against harmful interference in commercial installation This equipment generates uses and can radiate radio frequency energy and if not installed and used in accordance with the instruct...

Page 3: ...ter you have disconnected the camera Then contact your dealer or your local authorized service facility Do not continue to use the camera as this may cause a fire or an electrical shock Do not use the...

Page 4: ...n objects into the camera through access points such as the memory card slot This may cause a fire or an electrical shock Do not attempt to modify this camera This may cause a fire or an electrical sh...

Page 5: ...cause a fire Always use the camera and its accessories in well ventilated locations Handle the camera carefully and do not bump the camera into any hard object Handling the camea roughly may cause a m...

Page 6: ...g or leaking and causing a fire injury or soiling of the battery compartment When fitting batteries into the camera check the polarity markings on the battery and to ensure that you insert the battery...

Page 7: ...17 Macro Mode 18 Portrait Mode 18 Landscape Mode 18 Night Portrait Mode 18 Text Mode 18 Selecting the Flash Modes 18 Auto Flash Mode 18 Fill in Flash Mode 18 Flash Off Mode 19 Red Eye Reduction Mode...

Page 8: ...Auto Recording Mode Menu 27 Image Size 27 Quality 27 Voice Memo 28 Date Imprint 28 Digital Zoom 28 Inst Playback 29 Manual Recording Mode Menu 29 Exposure Mode 30 White Balance 31 Focus Mode 31 Sensi...

Page 9: ...Time Set 37 Date Format 37 Video Output 38 Transferring data to the Computer 38 System Requirements 38 Driver Installation 38 Downloading Images 39 Viewing Images on a PC 39 Playing back Movie on a P...

Page 10: ...s please read this User s Manual carefully and keep them in a safe place for future reference Checking Accessories Software CD ROM AV Cable USB Cable Battery Remote Control Lens Cap Pouch and Neck Str...

Page 11: ...mer Remote control LED Viewfinder window Flash Strap holder Lens Battery door Battery door lock Tripod socket Viewfinder LCD monitor 5 way button T W and center Enter buttons Terminal door release Men...

Page 12: ...on Pressing the center acts as the ENTER button to display menus of various camera modes to quick view or delete recorded images to toggle the Color LCD monitor with information on with information of...

Page 13: ...switch to the OFF position before changing power supply Loading the batteries 1 Slide the battery door lock to open position 2 Slide the battery door in the direction indicated by the arrow 3 Insert A...

Page 14: ...adapter suitable for the power plug of the destination country in advance Auto shut off function When using the camera with batteries and no operation is made for a certain time the camera power will...

Page 15: ...the terminal door Warning Improper use of the CompactFlash Card may cause data loss or damage It is recommended to make a backup copy of any important data in another storage media such as hard disk...

Page 16: ...te Time set item is highlighted Press the button then press Enter button 8 Select a field month day year hour minutes by pressing the buttons The pair of arrowheads that appears over a field indicates...

Page 17: ...shutter button after locking the focus position will cancel the focus lock If the subject to focus is not in the center of the viewfinder perform Focus Lock Recording page 17 7 Make sure the subject...

Page 18: ...nter of the viewfinder position the subject so that it falls within the focus frame and lightly press the shutter button halfway While continuing to hold the shutter button down lightly halfway re pos...

Page 19: ...e flash will not fire in this mode when set to an auto flash mode Use of a tripod is recommended Selecting the Flash Modes Toggle the flash mode button to select Auto flash Fill in Off Auto flash with...

Page 20: ...r a delay so that the person making the recording can be included in the image The self timer LED on the front of the camera will blink in red and the shutter will be released after about 10 seconds T...

Page 21: ...flash 1 To adjust the exposure press the EV button The EV icon will appear on the color LCD Monitor 2 Use the buttons to adjust the exposure compensation value 3 Press the EV button to set the adjustm...

Page 22: ...ulb photographs can be taken in the manual exposure mode Exposures up to 15 seconds can be made by pressing and holding the shutter button Use a tripod to avoid camera shake 1 Set the camera to manual...

Page 23: ...mode menu Page 30 Changing the ISO The ISO setting controls the imager sensitivity to the light The ISO range for your camera is 100 to 800 The higher the number the greater the sensitivity ISO is se...

Page 24: ...ion before pressing the shutter button 4 Lightly press the shutter button halfway to lock the focus and exposure 5 Gently press the shutter button completely to start movie recording Press the Shutter...

Page 25: ...ack Press ENTER button again to resume the playback Press the button to stop the playback When playback is finished the screen returns to the initial screen Viewing Multiple Images Index Playback Imag...

Page 26: ...amera 2 Insert the mini plug end of the AV cable into the camera s video out terminal 3 Plug the other end of AV cable into the video and audio input terminals on the TV The yellow plug is for video o...

Page 27: ...s of 5 way button to highlight the appropriate menu tab 4 Use the buttons of 5 way button to scroll through menu options Making a menu selection 5 With the menu option to be changed highlighted press...

Page 28: ...rate of compression and the larger the file sizes Image Quality Description File Type Super fine the highest quality image and the largest file sizes TIFF Fine high quality image JPEG Standard the de...

Page 29: ...he date will continue to be imprinted until the function is reset a yellow bar is displayed behind the frame counter on the monitor to indicate the imprinting function is active Date imprinting is act...

Page 30: ...pher the freedom to shoot without having to worry about the technical details of exposure settings The shutter speed and aperture values of the exposure are displayed on the monitor If shutter speed a...

Page 31: ...eds can be changed in half stop increments between 1 1000 and 4 seconds The shutter speed and aperture display will turn red on the monitor if the image is extremely under or overexposed Press the EV...

Page 32: ...l produce excellent results in almost every situation Under some special condition autofocus system does not work accurately manual focus are used Manual Focus MF 1 Select the MF in the Focus mode opt...

Page 33: ...segments to measure luminance and color This data is combined with distance information to calculate the camera exposure This advanced metering system will give accurate exposures in almost all situa...

Page 34: ...the Delete option in the basic section 2 Use the buttons to highlight the image to be deleted 3 Press the button to mark the image with a trash can icon To deselect an image for deletion highlight it...

Page 35: ...four or nine images This affects all index displays The custom 1 section of the playback mode menu controls slide show function Slide show Enter To start the slide show During the slide show press the...

Page 36: ...in the folder The number of images printed per sheet differs between printers The information printed with the thumbnails can vary Cancel print All frames F To delete all DPOF printing files in the f...

Page 37: ...rom being deleted when the card is formatted Always format the CompactFlash card using the camera never use a computer to format a card Power Save The auto shut off time can be changed You can choose...

Page 38: ...d or edited Except for the all frames C setting in the custom2 of the playback mode menu changes made with menus only affect the images in the selected folder To make changes to all images in multiple...

Page 39: ...etup program starts Press the Camera driver icon and follow the on screen instructions to complete the camera driver installation 3 Restart the computer For Macintosh 1 Insert the software CD ROM disc...

Page 40: ...Do not change the file name of image data saved on an CompactFlash Card using a PC or save files other than image data taken by this camera Viewing Images on a PC Downloaded still images can be viewe...

Page 41: ...g Warning If the shutter speed falls below the point where the camera can be safely hand held the camera shake warning will appear on the LCD monitor and the orange focus LED will blink slowly Camera...

Page 42: ...light reading spot reading White balance Auto daylight cloudy fluorescent tungsten custom Shutter speed 4 1 1000 sec bulb 15 sec maximum Flash Built in Auto Fill in Fill off Red eye Reduction Digital...

Reviews: