13
Video Capture Mode
The Video Capture Mode allows you to capture videos with your digital camcorder.
When the camcorder is first powered ON, it will be in Video Capture Mode.
TAKING A VIDEO
1)
Selecting the Scene Using the LCD Display:
While in Video Capture mode, flip open the LCD panel and use the LCD display to direct the
camcorder at the scene you would like to capture.
2)
Zoom Options:
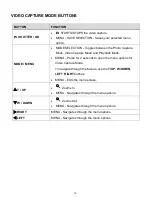
Use the
T/ Zoom In (Up)
and
W /
Zoom Out (Down)
buttons located to the left of the LCD
screen to better set the camcorder display if desired. You can magnify your subject up to 2
times using the digital zoom. A magnifying glass icon
appears on the bottom right of the
LCD screen indicating the selected zoom.
3)
Capturing the Video:
START: Press the
Shutter
button to start the video capture.
While recording, a
red, blinking icon appears at the top of the LCD screen indicating
that the recording is in progress. The elapsed video recording time appears on the
top-right of the LCD.
STOP: To stop recording the video, press the
Shutter
button again.
The video is automatically saved to the
camcorder’s SD Memory card.
Note
: The amount of recording time available for the resolution selected appears on the top-right
of LCD screen while in ‘Standby’ mode. The lower the resolution setting the more recording time
is available. However, please note that videos recorded at lower resolution are of less quality than
videos recorded at the higher resolution.
Remember, the amount of time that you can capture videos also depends on the size of the SD
memory card inserted as well as the video resolution selected.


