Vitrifrigo Trivalente 5040 User, Maintenance And Installation Manual Download Page 16


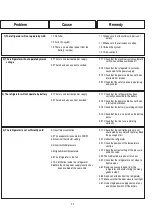
applicable  national  regulations  and  standards  in  force  with  regard  to: 

“Standards  for  the  safe  use  of  combustible  gas  ”,  “Standards  for 
combustion appliances and ventilation devices on road vehicles”.  


The gas connection to the refrigerator must be made using an approved 

flexible pipe for LPG. This hose must be no more than  


1.5 m in length and the connections must comply with those 

of the 

destination  country.  To  ensure  that  the  pressure  of  gas  entering  the 

refrigerator  is  equal  to  that  shown  on  the  rating  label,  it  is  necessary  to 
connect  the  other  end  of  the  flexible  pipe  to  the  gas  cylinder  using  a 

pressure  reducing  valve.  The  openings  through  which  the  pipe  passes 
must be fitted with abrasion safeguards and all connections must be made 
using pipe clamps. Furthermore, an approved shut-off valve must be fitted 

(in accordance with the standards and regulations in force in the different 
countries).  

 
UNIT VENTILATION  
 

Optimum  refrigerator  operation  is  guaranteed  by  adequate  ventilation, 
which occurs through two openings “B” (Fig.4) to be made on the upper 

and lower part of the vehicle. These openings allow air flow re-circulation: 
air enters through the bottom opening and warm air is discharged through 
the top opening.  


The top opening must be positioned above the condenser and as high up 

as possible (as shown in Fig. 4). The bottom grid must be flush with the 
base of the refrigerator (Fig. 4). In the event of wind, the grid “I” must be 

covered  with  mosquito  netting  on  the  inside,  as  well  as  with  the  winter 
shield  (not  supplied  with  the  refrigerator)  “C”,  or  the  vehicle  must  be 
parked with the openings downwind.  

 
2  

The surfaces that allow air to enter must be at least 250cm and equipped 
with the proper grids “I” with sufficient heat resistance qualities.  
 

During  winter  periods,  it  is  advisable  to  fit  the  protective  covers  “C”  in 
order  to  prevent  air  that  is  too  cold  from  entering  into  the  system.  We 

recommend fitting these covers “C” when the vehicle is left idle during the 
winter period.  


DISPOSAL OF COMBUSTION FUMES  

 
By insulating the rear part of the refrigerator from the living area, sealing 

the  strips  “A”  properly  (as  shown  in  Fig.  4),  and  applying  a  sheet  of 
aluminium “D” (as shown in Fig. 4-C) exhaust fumes and currents of cold 
air  from  the  outside  are  prevented  from  entering  the  vehicle  and  at  the 

same  time  adequate  heat  insulation  is  guaranteed.  In  this  way  it  is  no 
longer necessary to use the T-extension “E” and relevant accessories (as 

shown in Fig. 4-D) and it is possible to use the same grid for both the top 
and bottom ventilation openings without the housing for the draft tube. If 

the rear part of the refrigerator is not insulated or no aluminium sheet “D” 
is applied as shown in Fig. 4-C, fit the T-extension “E”, the extension “F”, 
cap “G” and cover “H” (as shown in Fig. 4-D) and use the grid with draft 

tube housing for the top opening.  


14 


5.

USE  


Switching On  


The power source is selected by pressing button (3). Selection occurs in 
the following sequence: mains power (4), battery power (5), gas power 
(6).  

Mains Power

 (Fig.3)  


Press  button  (3)  until  the  indicator  light  (4)  switches  on.  To  operate  the 
refrigerator,  it  is  necessary  to  provide  a  mains  voltage  source.  The 

electronic thermostat is enabled and can be set.  
 
WARNING: Make sure that the gas safety device (9) is in the OFF 

position.  
 

Battery Power  

Press  button  (3)  until  the  indicator  light  (5)  switches  on.  To  operate  the 
refrigerator, it is necessary to make sure that a battery is connected to the 

line  input  terminals  operated  by  the  key.  The  electronic  thermostat  is 
automatically set to the maximum temperature and CANNOT be adjusted.  


WARNING: Make sure that the gas safety device (9) is in the OFF 

position

.  

 
Gas power (Fig.3)  

 
Make sure that :  

the safety valve on the gas cylinder has been opened and that the 
cylinder contains gas;  
the central valve on the vehicle (if fitted), is open.  

 
In  this  position,  the  electronic  card  will  only  supply  power  to  the  spark 

device that ignites the pilot flame. It is necessary to provide a source of 
gas.  When  the  gas  operation  mode  has  been  selected,  if  the  indicator 

light  (10)  is  off,  this  means  that  the  burner  is  operating  normally;  if  the 
indicator  light  (10)  flashes,  this  means  that  the  burner  is  at  the  ignition 
stage.  


1 Press button (3) until the indicator light (6) switches on. The indicator 

light (10) will start to flash.  

2 Press the safety device (9) and turn it to the position marked by the 

large flame.  

3 Hold down the safety device knob (9).  
4 When the indicator light (10) ceases to flash, wait 3-4 seconds and 

then release the safety device knob (9).  

5 If the indicator light (10) continues to flash after 30-40 seconds, 
release the safety device knob (9) for a few seconds and then repeat 

steps 3 and 4.  


Gas operation is not possible if there is no direct battery power 
supply (service).  

!


In order to operate, the refrigerator must 

be connected to the 12 V DC current 

directly from a battery (service).   


Summary of Contents for Trivalente 5040

Page 1: ...manutenzione ed installazione Pag 1 IT CH User Maintenance and Installation Manual Page 9 GB Bedienungs wartungs und i handbuch Seite 18nstallations DE AT CH Mode d emploi d entretien et d installati...

Page 2: ...igorifero e deve seguire il percorso di vendita fino all utilizzatore finale e che la Vitrifrigo n vieta la riproduzione di qualsiasi parte Ogni frigorifero prima di lasciare il nostro stabilimento so...

Page 3: ...g 5 Alimentazione da rete pag 5 Alimentazione a batteria pag 5 Alimentazione a gas pag 6 Funzionamento del frigorifero pag 6 Funzionamento a gas pag 6 Funzionamento con energia elettrica a tensione di...

Page 4: ...itivi di sicurezza Il presente prodotto non deve essere gettato nei rifiuti urbani ma deve essere smaltito come raccolta separata Contattare i centri di raccolta Rifiuti Apparecchiature Elettriche ed...

Page 5: ...e Apparecchiatura a tenuta stagna di tipo C11 Questa apparecchiatura deve essere installata in accordo alle istruzioni riportate nel manuale di istruzione Apparecchiatura non raccordata di tipo A1 Usa...

Page 6: ...COLLEGAMENTO ELETTRICO Tutti cavi devono essere cablati nei connettori P Fig 1 come da Fig 10 facendo attenzione a serrare bene le viti e verificando che il collegamento sia effettuato a regola d arte...

Page 7: ...opertura H come da fig 4 D ed utilizzare per l apertura superiore la griglia con l alloggiamento per il camino o il camino separato 5 Utilizzazione Accensione Si deve inoltre provvedere all installazi...

Page 8: ...VENTOLA Fig 3 L attivazione della ventola avviene tramite il tasto 1 Quando la ventola in funzione la spia 2 accesa La ventola pu essere attivata con qualsiasi fonte di alimentazione selezionata ma p...

Page 9: ...tualiferiteallemani Non utilizzare nella pulizia prodotti abrasivi detergenti o saponi Tabella manutenzioni pulizie da effettuare Tutte le attivit non previste dalla tabella 1 sono da considerarsi rip...

Page 10: ...ido sui poli della batteria 3 2 1 Verificare che il fusibile della linea sia funzionante 3 Non funziona a batteria 3 2 E avvenuto un sovraccarico di corrente 4 1 Aerazione insufficiente 4 2 L Evaporat...

Page 11: ...hich it must accompany from the moment of sale to the end user and that Vitrifrigo prohibits the reproduction or copying of any part whats o ever Before leaving the factory every refrigerator is subje...

Page 12: ...f Combustion Fumes p 14 5 USE p 14 Switching On p 14 Mains power p 14 Battery power p 14 Gas power p 14 Refrigerator Operation p 15 Gas operation p 15 Main power operation p 15 Battery peration p 15 S...

Page 13: ...nd for models 5040 5060 5070 5075 5080 5090 5105 and 5150 It is intended as a guide for the correct and safe use of these refrigerators as well as to their proper maintenance To learn in a short space...

Page 14: ...st be done with the utmost care and the use of protective gloves to prevent accidental injuries to hands is strongly recommended After unpacking the appliance make sure that it is not damaged in any w...

Page 15: ...P Fig 1 as shown in Fig 10 making sure that the screws are properly tightened and ensuring that the connection has been made perfectly Check that the voltage used corresponds to that printed on the a...

Page 16: ...lation is guaranteed In this way it is no longer necessary to use the T extension E and relevant accessories as shown in Fig 4 D and it is possible to use the same grid for both the top and bottom ven...

Page 17: ...r knives to remove the ice as these could damage the appliance When the refrigerator has been defrosted switch it on again WINTER OPERATION During winter it is advisable to apply protective panels to...

Page 18: ...l conditions of use Take these times into account and if necessary carry out the recommended checks on a more frequent basis Montly Maintenance Operations EXTERNAL Cleaning Wash the outside of the ref...

Page 19: ...Check that the battery is working correctly 3 1 4 Check that there is no oxide on the battery poles 3 2 1 Check that the line fuse is working correctly 4 1 Insufficient ventilation 4 2 The evaporator...

Page 20: ...usammen mit dem K hlschrank zum Benutzer gelangen muss Vitrifrigo untersagt hiermit die Vervielf ltigung des Handbuches odervonTeilendesselben Jeder K hlschrank wird bevor er unser Werk verl sst einer...

Page 21: ...externen Gebl ses falls vorhanden Seite 23 Gasanschluss Seite 23 Bel ftung Seite 23 Entsorgung der Abgase Seite 23 5 BENUTZUNG Seite 23 Einschalten Seite 23 Gasbetrieb Seite 24 Netzbetrieb Seite 24 Ba...

Page 22: ...rheitsvorrichtung stets funktionstauglich halten Nie die Schutzvorrichtungen Verkleidung des K hlschrankes entfernen Die in Kapitel 7 beschriebenen berpr fungen Kontrollen und Wartungsarbeiten stets d...

Page 23: ...ng W 8 Gasverbrauch Wasserdichte Ausr stung Typ C11 Dieses Ger t muss gem den Anweisungen in der Bedienungsanleitung installiert warden Nicht geschlossene A1 Ausr stung Verwenden Sie nur einen gut bel...

Page 24: ...rliegenden Seite anbringen AUSWECHSELN DER T R Beim Ausbauen und oder Auswechseln des Paneels A Abb 1 wie folgt vorgehen Die T r ausbauen wie im vorausgehenden Abschnitt beschrieben Die an der unteren...

Page 25: ...en mit Schlauchmanschetten vorgenommen werden Au erdem muss bei der Installation ein normgerechtes Absperrventil eingesetzt werden in Abh ngigkeit von den in den verschiedenen Nationen geltenden Besti...

Page 26: ...durch Drehen des Schalters auf die kleine Flamme NETZBETRIEB Abb 3 Die Temperatureinstellung erfolgt ber den Thermostat 8 auf der rechten Seite des Schaltfelds Der Thermostat kann auf 7 durch 4 LEDs...

Page 27: ...Winterschutzvorrichtungen angebracht werden Bei der Nichtbenutzung des Fahrzeuges sollten die Schutzpaneele an den L ftungsrosten angebracht werden In regelm igen Abst nden sicherstellen dass die L ft...

Page 28: ...uwarmem Wasser mit Natriumbikarbonat oder Essig vornehmen Nachwischen und mit einem weichen Tuch abtrocknen Die Verwendung von scheuernden Produkten Reinigungsmitteln oder Seife vermeiden J hrlich dur...

Page 29: ...rstellen dass das Versorgungskabel nicht unterbrochen ist 3 1 3 Sicherstellen dass die Batterie ordnungsgem funktioniert 3 1 4 Sicherstellen dass die Pole der Batterie nicht oxydiert sind 3 2 1 Sicher...

Page 30: ...doit suivre le parcours de vente jusqu l utilisateur Vitrifrigointerditsareproductionm mepartielle Chaque r frig rateur avant de quitter notre tablissement est soumis toute une s rie d essais et de c...

Page 31: ...en marche pag 33 Alimentation secteur pag 33 Alimentation par batterie pag 33 Fonctionnement gaz pag 34 Fonctionnement du r frig rateur pag 34 Fonctionnement gaz pag 34 Fonctionnement avec energie ele...

Page 32: ...absolument interdit d utiliser le r frig rateur pour des usages autres que ceux qui sont pr vus Soignez toujours le parfait nettoyage et maintenez toujours en bon tat les dispositifs de s curit N tez...

Page 33: ...nce nominale W 8 Consommation de gaz 4 INSTALLATION Avertissement Equipement tanche de type C11 Cet quipement doit tre install conform ment aux instructions du manuel d instructions Mat riel de type A...

Page 34: ...sur la base inf rieure et enlevez la tez le panneau en le faisant glisser vers le bas Montez le nouveau panneau la place de celui que vous avez t en le faisant glisser vers le haut jusqu Remontez la...

Page 35: ...ile permettant l entr e de l air devra tre de 250cm au moins et munie de grilles appropri es I dot es d une r sistance thermique suffisante Pendant l hiver il est opportun de monter les calottes de pr...

Page 36: ...e Vcc FONCTIONNEMENT GAZ Fig 3 Le r glage de la temp rature s effectue au moyen du dispositif de s curit 9 La temp rature la plus froide s obtient en positionnant la manette sur la flamme grande dimen...

Page 37: ...isez toujours des dispositifs de protection personnelle marque CE pour se prot ger des ventuelles blessures aux mains N utilisez ni produits abrasifs ni d tergents ni savons pour nettoyer 35 Tableau d...

Page 38: ...r que la batterie marche correctement 3 1 4 V rifier qu il n y ait pas d oxyde sur les p les de la batterie 3 2 1 V rifier le fonctionnement du fusible de la ligne de la batterie 3 Le frigo ne marche...

Page 39: ...te integrante del frigor fico y debe seguir el recorrido de venta hastaelusuarioyquelaVitrifrigoprohibelareproducci ndecualquieradesuspartes Cada frigor fico antes de abandonar nuestro establecimiento...

Page 40: ...2 Alimentaci n de red p g 42 Alimentaci n mediante bater a p g 42 Alimentaci n a gas p g 43 Funcionamiento del frigor fico p g 43 Funcionamiento a gas p g 43 Funcionamiento con energ a el trica de ten...

Page 41: ...para usos diferentes de aquellos previstos Cuidar siempre la perfecta limpieza y tener siempre eficientes los dispositivos de seguridad No sacar nunca las protecciones c rter del frigor fico Efectuar...

Page 42: ...CI N Advertencias Equipo tanche de tipo C11 Consiga un equipo con instalaci n instalada con instrucciones del manual de instrucciones Mat riel de tipo A1 no se detuvo Utilizez uniquement une pi ce bie...

Page 43: ...en el siguiente modo Sacar la puerta siguiendo las indicaciones del p rrafo precedente Destornillar los tornillos presentes en la base inferior y extraerla Retirar el panel haci ndolo deslizar hacia...

Page 44: ...o aplicar la protecci n invernal C suministrada como accesorio La superficie til que permite el ingreso del aire deber ser de al menos 250 cm y dotada de apropiadas rejillas I con una suficiente esist...

Page 45: ...n procedente de la bater a de servicio Vcc CONSERVACI N DE LOS ALIMENTOS La mayor parte de los alimentos indican las propias modalidades de conservaci n Atenerse a tales indicaciones Es conveniente co...

Page 46: ...rar reparaciones y por lo tanto deben ser realizadas por personal altamente cualificado Es obligatorio dirigirse al propio revendedor de confianza o al constructor mismo Las operaciones de mantenimien...

Page 47: ...el cable no est cortado 3 1 3 Verificar que la bater a sea eficiente 3 1 4 Verificar que no haya xido sobre los polos de la bater a 3 2 1 Verificar que el fusible de la l nea de 12 Voltios funcione 4...

Page 48: ...l deel uit makend van de koelkast U dient de handleidingsamenmetdekoelkastvandeverkopertekrijgen Vitrifrigoverbiedtenigdeeluitdezehandleidingteverveelvoudigen Voordat de koelkasten onze bedrijfsplaats...

Page 49: ...ndingsgassen pag 51 5 GEBRUIK pag 51 Aanzetten pag 51 Aansluiten op stroom pag 51 Aansluiten op de accu pag 51 Aansluiten op gas pag 51 Koelkast op gas pag 52 Koelkast op netstroom pag 52 Koelkast op...

Page 50: ...choon en zorg ervoor dat de veiligheidsmechanismen altijd goed werken Verwijder nooit de afschermingen carters van de koelkast Voer altijd de geplande controles inspecties en onderhoudswerkzaamheden u...

Page 51: ...talleerd volgens de instructies in de instructiehandleiding Type A1 materiaal niet gesloten Gebruik alleen een goed geventileerde verhoogde ruimte beschermd tegen de regen Controleer of de verpakking...

Page 52: ...als volgt te werk De deur eraf halen zoals beschreven in de vorige paragraaf De schroeven op de onderkant van de deur losdraaien en de onderkant demonteren Het paneel naar onder eraf schuiven Het nie...

Page 53: ...ndensor zitten zoals op de afbeelding 4 De onderste luchtopening moet op gelijke hoogte met de basis van de koelkast komen afb 4 Als er wind is moet op het onderste luchtrooster I een stukje vliegenga...

Page 54: ...op de hoogste stand zetten warm laatste lampje links brandt KOELKAST OP ACCUSTROOM afb 3 Als de koelkast op de accu werkt kan de temperatuur niet worden geregeld In deze situatie staat de thermostaat...

Page 55: ...die door de constructeurvandekoelkastzijnvoorgeschreven Draag persoonlijke beveiligingsmiddelen met CE markering tijdens het reinigen of onderhouden om uw handentebeschermentegeneventueleverwondingen...

Page 56: ...erde gasdruk 4 5 Hoge omgevingstemperatuur 4 6 Te volle koelkast 4 7 Te veel luchtinfiltratie in de koelkast 4 1 1 Controleren of de ventilatieroosters niet verstopt zijn met voorwerpen die de luchtdo...

Page 57: ...Fig 1 Fig 2 Fig 3 C 10 20 mm D B Fig 4 55...

Page 58: ...40 33 608 154 520 452 154 40 50 554 615 608 154 D 15 175 520 452 40 44 485 850 823 794 154 255 452 40 44 485 850154 823 154 255 Fig 4 I 452 56...

Page 59: ...40 53 823 485 154 15 175 452 520 40 53 667823 823 485 154 15 120 D 452 520 40 79 654810 525 597 154 15 140 452 540 154 40 60 525 1245 1089 154 Fig 4 II 140 15 540 452 57...

Page 60: ...Fig 5 Fig 6 Fig 7 Fig 8 A B Fig 9 Fig 10 58...

Page 61: ...C8 C13 C12 220 V12V XC 1 SONDA C Q4 R12 C5 C R13 Q3 C3C4 70 TT U2 C R14 U1 Q2 40 WA TT C R15 C2 B COMUNE ROSSO BIANCO RV1 CN3 D3 R7 CN5 C R10A R9A Q5 C2A C1A RV2 EARTH R4A R3A R2A R1A D1 D2 C7 D8 JP1...

Page 62: ...5 485 485 485 525 525 H mm 590 615 823 823 823 823 810 1245 H1 mm 230 230 P1 mm 41 41 41 41 41 41 41 41 P2 mm 425 450 450 450 505 505 505 505 P3 mm 225 225 A mm 393 488 488 488 488 488 528 528 B mm 59...

Page 63: ...utton 8 Selected temperature indicator 9 Gas shut off and adjustment knob gas safety device 10 Burner on indicator light Steuerung 1 Taste zum Ein und Ausschalten des L fters 2 L fterstatusanzeige 3 T...

Page 64: ...ura 8 Indicador de temperatura seleccionado 9 Bot n de regulaci n y parada de gas dispositivo de seguridad antig s 10 Luz indicadora del quemador encendida Controls 1 Knop ventilator aan uit 2 Ventila...

Page 65: ...ter optional 6 Z ndschalter der Gasanlage Contr les 1 Interrupteur de batterie 2 Interrupteur ON OFF pour le fonctionnement sur tension secteur 3 Bouton de r glage de la temp rature thermostat Fonctio...

Page 66: ...4 Temperaturregler Thermostat f r Gasbetrieb 5 Gasanlage Ein Aus Schalter 6 Gasz ndungswarnleuchte Contr les 1 Interrupteur marche arr t 2 Bouton de r glage de la temp rature secteur pour le fonctionn...

Page 67: ...Gas Ein Aus Hahn mit Sicherheitsvorrichtung 4 Gasanlage Ein Aus Schalter 5 Gasz ndungswarnleuchte Contr les 1 Interrupteur marche arr t 2 R gulateur de temp rature thermostat pour le fonctionnement su...

Page 68: ...cherheitsanforderungen 2014 35 UE 2014 30 UE 2016 426 UE EU Richtlinie Gas KONFORM IST D CLARATION DE CONFORMIT La soussign e soci t VITRIFRIGO srl dont le si ge est rue Mazzini 75 frazione Montecchio...

Reviews: