


11
12
13
14
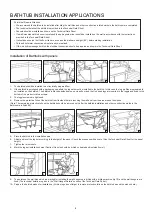
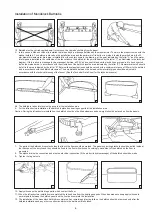
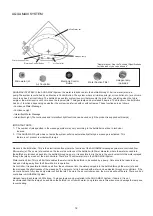
11- Apply s l cone on the s phon dra n seal and the bear ng seal,
12- Install the bathtub s phon you’ve prepared.
13- It s not requ red to fix the leg set of the bathtub to the floor when wall hangers are used. However for un stra ght walls. The bathtub leg set
nstallat on holes are dr lled w th a dr ll ng mach ne (t p 7-8) (Caut on: No hole should be dr lled on heated and solated floors.)
14- Screw the leg set to the floor.
18
19
20
21
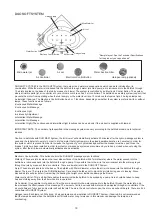
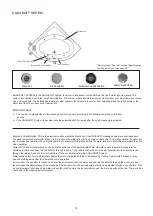
18-19- If the s de panel w ll be used w th the product, mark the floor where the panel supports are to be fixed and fix the panel supports to the
floor us ng s l cone.
20- Remove the protect ve fol o on the panels.
Note: If th s Is a hydro massage bathtub, the electr cal connect on should be made.
21- For rectangular bathtubs, first the s de panel and later the front panel are nstalled to the bathtub. For corner bathtub panels, fixed metal
cl ps are ava lable for panel nstallat on under the front s de r ms of bathtub to fix the panel. The panel’s nstallat on s started from one corner
by attach ng the top band of the panel to these cl ps.
22
23
24
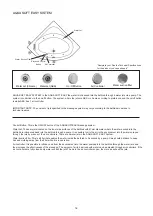
22- S l cone s appl ed between the bathtub and the wall n order to prevent any leakage
23- Add t onal edge lath appl cat on can be carr ed out f requ red. However solat on between wall and bathtub must be ensured before the
appl cat on of edge lath. The edge lath s nstalled by apply ng s l cone along the length of both surfaces of the edge lath wh ch w ll come nto
contact w th the bathtub and the wall.
24- The nstallat on of the bathtub s complete. Any protect ve fol o rema n ng on the bathtub should be removed only after all of the construct on
works n the bathroom are fin shed.
15
16
17
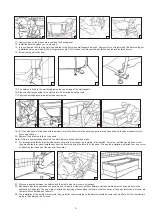
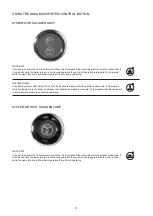
15- The bathtub s fixed to the wall by t ghten ng the cap screws of the wall hangers.
16- S phon outlet Is connected to the water dra n. Perform leak proofing tests.
17- Panel support ng brackets are adjusted and screwed.
5
Summary of Contents for K-5900573
Page 1: ...ACRYLIC HYDROMASSAGE BATHTUBS User Manual ...
Page 20: ......


