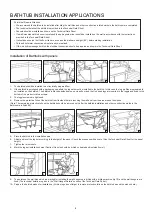
BATHTUB INSTALLATION APPLICATIONS
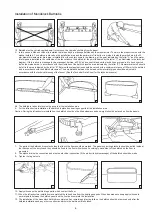
Installat on of Bathtubs w th panels
1
5
9
10
6
7
8
2
3
4
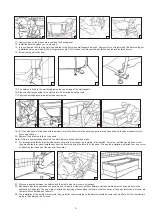
1- The bathtub should be nstalled to a structurally prepared floor.
2- If the bathtub s purchased w th a packag ng on pallets, the leg sets must be nstalled to the bathtub. In th s case the leg profiles are prepared to
be nstalled on the bathtub. The bathtub s placed ups de down on a clean floor and the U shaped legs are nserted to the toggle and fixed to the
bottom of the product v a two screws.
3- The toggle screws are t ghtened.
4- Remove the protect ve fol o of the bathtub from Its s des that are touch ng the wall and from the area around the s phon.
(Note: The rema n ng protect ve fol o on the bathtub should be removed only after the bathtub nstallat on and other construct on works n the
bathroom are fin shed.)
5- Place the bathtub to the nstallat on area.
6- Adjust and level the leg set accord ng to the he ght of the panel. Check the evenness w th a scale. (See the Techn cal Data Sheet for the panel
he ght).
7- T ghten the let sets nuts.
8- Mark the leg set nstallat on holes (Caut on! No hole should be dr lled on heated and solated floors!).
9- The po nts on the wall t les wh ch are marked for nstall ng the wall hangers are dr lled w th a dr ll ng mach ne (t p 10) and the wall hangers are
fixed (The techn cal deta ls are g ven n the "Wall Hanger Deta ls” sect on of the Techn cal Data Sheet.)
10- Prepare the bathtub s phon for nstallat on. (At th s stage do not forget to remove protect ve fol o on the bathtub around the s phon hole.)
4
Po nts that Requ re Attent on:
• We recommend the bathtub to be nstalled after t l ng the wall t les and other construct on related works n the bathroom are completed.
• The techn cal deta ls of the bathtub s prov ded n the Techn cal Data Sheet.
• Faucets should be nstalled as shown on the Techn cal Data Sheet.
• If a wall-mounted bathtub m xer s preferred the appropr ate m xer should be nstalled on the wall n accordance w th the nstruct ons
prov ded n the Techn cal Data Sheet.
• It should be ensured that the floor t les are even and the walls are stra ght (90 °) before start ng nstallat on.
• Cold and hot water connect ons must already be real zed.
• If th s s a hydromassage bathtub the electr cal connect on should be prepared as shown n the Techn cal Data Sheet.
Summary of Contents for K-5900573
Page 1: ...ACRYLIC HYDROMASSAGE BATHTUBS User Manual ...
Page 20: ......


