background image

3

ENGLISH          

MANICURE SET

Description

1.  Motor unit
2.  Safety cover
3.  LED illumination
4.  Attachment  rotation  speed  control 

touch buttons «+»/«-»

5.  Attachment rotation direction touch 

button 


6.  Power adapter connection socket
7.  On/off button «0/I»
8.  Felt cone
9.  Large cone attachment
10.  Small attachment
11.  Pointed attachment 
12.  Fine disk
13.  Coarse disk
14.  Rough skin removing attachment
15.  Power adapter
16.  Storage case

SAFETY MEASURES

Before using the manicure set, read this 
manual  carefully  and  keep  it  for  future 
reference.  Use  the  unit  for  intended 
purposes only, as specified in this man-
ual. Mishandling the unit can lead to its 
breakage and cause harm to the user or 
damage to his/her property. 

• 

Before  plugging  the  unit  in  make 
sure that the power adapter operat-
ing voltage corresponds to voltage 
of your mains.

• 


To  ensure  proper  operation  of 

the  unit,  it  is  recommended  to 
switch it off for 15 minutes after 
every  20  minutes  of  continuous 
operation.

• 

Do  not  use  the  unit  near  heat 
sources or open flame.

• 

Provide that the adapter cord does 
not  touch  hot  surfaces  and  sharp 
edges of furniture.

• 

In order to avoid electric shock do 
not immerse the power adapter into 
water or other liquids.

• 

Do  not  use  the  unit  while  taking 
a  bath  or  a  shower.  Do  not  use 
or  keep  the  unit  in  places  where 
it  can  fall  into  a  bath  or  sink  filled 
with water.

• 

Use only the attachments supplied.

• 

Do  not  leave  the  operating  unit 
unattended.

• 

Switch  the  unit  off  and  remove 
the  power  adapter  from  the  mains 
before  cleaning  or  if  you  are  not 
using the unit.

• 

Do  not  use  the  adapter  cord  for 
carrying the unit.

• 

Do not use the unit if you are sleepy 
or tired.

• 

Do  not  allow  children  to  use  the 
unit as a toy.

• 

This  unit  is  not  intended  for  usage 
by  children  or  disabled  persons 
unless they are given all the neces-
sary  and  understandable  instruc-
tions  by  a  person  who  is  respon-
sible for their safety on safety mea-
sures  and  information  about  dan-
ger that can be caused by improper 
usage of the unit.

• 

For  children  safety  reasons  do  not 
leave polyethylene bags, used as a 
packaging, unattended. 

Attention!

 Do not allow children to play 

with  polyethylene  bags  or  packaging 
film. 

Danger of suffocation!

• 

Do  not  use  the  unit  if  your  skin  or 
nails are damaged.

• 

If  you  have  diabetes  or  vascular 
disease  see  your  doctor  before 
using the unit.

• 

If  you  find  any  damages  of  the 
unit, stop using it and apply to the 
authorized  service  center.  Do  not 
repair the unit by yourself.

THE  UNIT  IS  INTENDED  FOR 
HOUSEHOLD USE ONLY

BEFORE THE FIRST USE
In case of unit transportation or stor-
age  at  low  temperature  it  is  nec-
essary  to  keep  it  for  at  least  two 
hours  at  room  temperature  before 
switching on.

–  Unpack  the  unit  and  remove  any 

stickers that can prevent unit oper-
ation.

–  Clean  the  unit  body  (1)  with  a  soft, 

slightly damp cloth and then wipe dry.

VT-2205_IM_100х165.indd   3

21.01.2013   9:31:11

Summary of Contents for VT-2205 W

Page 1: ...1 3 6 10 15 19 23 27 31 35 VT 2205_IM_100 165 indd 1 21 01 2013 9 31 11...

Page 2: ...T 2205_IM_100 165 indd 2 21 01 2013 9 31 11...

Page 3: ...ed with water Use only the attachments supplied Do not leave the operating unit unattended Switch the unit off and remove the power adapter from the mains before cleaning or if you are not using the u...

Page 4: ...tion by touching the button 5 if the button glows red the attachment rotates counterclock wise and if the button glows green the attachment rotates clockwise LED illumination 3 is switched on when the...

Page 5: ...LEANING AND CARE Disconnect the unit from the mains before cleaning Wipe the unit body with a soft damp cloth and then wipe dry Do not use abrasives and solvents to clean the unit body Never immerse t...

Page 6: ...offenem Feuer nicht Achten Sie darauf dass das Kabel des Netzadapters hei e Oberfl chen oder scharfe M belecken nicht ber hrt Tauchen Sie den Netzadapter ins Wasser oder andere Fl ssigkeiten nicht um...

Page 7: ...en Sie den Schutzschirm 2 aufs Geh use des Ger ts auf Stecken Sie den Stecker des Netzadapters 15 in die Anschlussstelle 6 ein Stecken Sie den Netzadapter 15 in die Steckdose ein dabei ert nt ein Tons...

Page 8: ...her Hautstellen benutzt Bewegen Sie den Aufsatz ber die bearbeitete Nagel oder Hautoberfl che sorg f ltig Kleiner Aufsatz 10 Wird zur Bearbeitung der Finger und Zehenn gel benutzt Spitzaufsatz 11 Wird...

Page 9: ...l ssigkeiten nicht Wischen Sie die Aufs tze mit medizinischem Alkohol zur Desinfizierung periodisch AUFBEWAHRUNG Reinigen Sie das Ger t Bewahren Sie das Ger t den Netzadapter und die Aufs tze in der A...

Page 10: ...10 1 2 3 4 5 6 7 0 I 8 9 10 11 12 13 14 15 16 15 20 T 2205_IM_100 165 indd 10 21 01 2013 9 31 12...

Page 11: ...11 1 9 14 1 8 14 2 15 6 15 5 0 I 7 5 4 VT 2205_IM_100 165 indd 11 21 01 2013 9 31 12...

Page 12: ...12 3 4 4 5 0 I 7 4 4 5 0 I 7 5 5 3 7 0 I 4 5 7 0 I 8 9 T 2205_IM_100 165 indd 12 21 01 2013 9 31 12...

Page 13: ...13 10 11 10 11 12 13 12 13 12 13 14 VT 2205_IM_100 165 indd 13 21 01 2013 9 31 12...

Page 14: ...14 16 1 7 1 1 1 1 100 240 50 60 190 12 600 3 38 7 1070 T 2205_IM_100 165 indd 14 21 01 2013 9 31 12...

Page 15: ...15 1 2 3 4 5 6 7 0 I 8 9 10 11 12 13 14 15 16 20 15 VT 2205_IM_100 165 indd 15 21 01 2013 9 31 12...

Page 16: ...16 1 9 14 1 8 14 2 15 6 15 5 0 I 7 5 4 3 4 4 5 0 I 7 4 4 5 0 I 7 5 T 2205_IM_100 165 indd 16 21 01 2013 9 31 12...
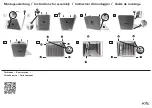
Page 17: ...17 5 3 0 I 7 4 5 0 I 7 8 9 10 11 10 11 12 13 12 13 12 13 14 VT 2205_IM_100 165 indd 17 21 01 2013 9 31 12...
Page 18: ...18 16 1 7 1 1 1 1 100 240 50 60 190 12 600 3 i i i i i i i i i i i i i i i i 89 336 EEC i i i i i i 73 23 EEC T 2205_IM_100 165 indd 18 21 01 2013 9 31 12...

Page 19: ...dispozitivu lui se recomand s l deco necta i pentru 15 minute dup fiecare 20 de minute de func ionare continu Nu folosi i aparatul n apropi ere imediat de surse genera toare de c ldur sau l ng foc des...

Page 20: ...l din accesoriile 8 14 n caz de necesitate instala i pe corpul dispozitivului ecranul de protec ie 2 Introduce i racordul adaptorului de re ea 15 n loca ul 6 Introduce i adaptorul de re ea 15 n priz v...

Page 21: ...uprafe ei unghiilor pentru lefuirea zonelor cu piele ngro at Schimba i cu aten ie pozi ia acce soriului pe suprafa a unghiei i pe suprafa a pielii prelucrate Accesoriu mic 10 Este utilizat pentru prel...

Page 22: ...carcasei aparatului Niciodat nu scufunda i apara tul i adaptorul de re ea n ap sau alte lichide terge i periodic accesoriile cu spirt medicinal pentru dezinfec tare P STRARE Cur a i dispozitivul P st...

Page 23: ...nejm n 15 minut po 20 minutov m nep etr it m provozu Nepou vejte p stroj v bez prost edn bl zkosti zdro j tepla a bl zko otev en ho ohn Dbejte na to aby se p vod n kabel s ov ho adapt ru nedot kal os...

Page 24: ...vc 8 14 Podle pot eby namontujte na t leso p stroje ochrann kryt 2 Vlo te p pojku s ov ho adapt ru 15 do m sta p i pojen s ov ho adapt ru 6 Zapojte adapt r 15 do z suvky p i tom se ozve zvu kov sign l...

Page 25: ...ho nehte nebo povrchu poko ky Mal n stavec 10 Pou v se k o et ov n neht jak na rukou tak na nohou N stavec se z enou pi kou 11 Pou v se k odstran n zrohova t l k e a vrostl ho nehtu Pozn mka p i pr ci...

Page 26: ...y ani rozpou t dla Nikdy nepono ujte p stroj a s ov adapt r do vody nebo jak koli jin kapaliny Pravideln vyt rejte n stavce lihem kv li dezinfekci SKLADOV N Prove te i t n p stroje P stroj a s ov adap...

Page 27: ...27 1 2 3 4 5 6 7 0 8 9 10 11 12 13 14 15 16 15 20 VT 2205_IM_100 165 indd 27 21 01 2013 9 31 13...

Page 28: ...28 1 9 14 1 8 14 2 15 6 15 5 7 0 5 4 3 4 4 5 0 7 4 4 5 0 7 5 T 2205_IM_100 165 indd 28 21 01 2013 9 31 13...

Page 29: ...29 5 3 7 0 4 5 7 0 8 9 10 11 10 11 12 13 12 13 12 13 14 VT 2205_IM_100 165 indd 29 21 01 2013 9 31 13...

Page 30: ...30 16 1 7 1 1 1 1 100 240 50 60 190 12 600 3 89 336 73 23 T 2205_IM_100 165 indd 30 21 01 2013 9 31 13...

Page 31: ...31 1 2 3 4 5 6 7 0 I 8 9 10 11 12 13 14 15 16 15 20 VT 2205_IM_100 165 indd 31 21 01 2013 9 31 13...

Page 32: ...32 1 9 14 1 8 14 2 15 6 15 5 7 0 I 5 4 3 4 4 5 0 I 7 4 4 5 0 I 7 5 T 2205_IM_100 165 indd 32 21 01 2013 9 31 13...

Page 33: ...33 5 3 7 0 I 4 5 7 0 I 8 9 10 11 10 11 12 13 12 13 12 13 14 VT 2205_IM_100 165 indd 33 21 01 2013 9 31 14...

Page 34: ...34 16 1 7 1 1 1 1 100 240 50 60 190 12 600 3 i 89 336 i i i 73 23 EC T 2205_IM_100 165 indd 34 21 01 2013 9 31 14...

Page 35: ...n h r 20 d qiq ishl g nd n k yin 15 d qiq o chirib turish t vsiya qilin di Jih zni o zid n issiq chiq r dig n v sit l r yoki chiq l vg yaqin qo yib ishl tm ng El ktr d pt r simi issiq yuz l rg t gm sl...

Page 36: ...t bil n rting ISHL TISH M t r bl kig 1 birikm l rid n bitt sini 8 14 kiriting Z rur bo ls jih z k rpusig b rkitgich 2 qo ying El ktr d pt r 15 ul gichini ul sh j yig 6 kiriting El ktr d pt rini 15 r z...

Page 37: ...yoq tirn ql rig ishl til di O tkir uchli birikm 11 T rining q tib q lg n j yl ri t rig kirib k tg n tirn qni t z l shg ishl til di Esl tm Birikm l rini 10 11 ishl tg nd tirn q yuz sig t kkizm ng G rdi...

Page 38: ...H Jih zni t z l ng Jih z el ktr d pt r v birikm l rini g il fg 16 s lib s ql ng Jih zni quruq s lqin v b l l rning qo li y tm ydig n j yg lib qo ying TO PL MI K rpusi 1 d n Birikm l ri 7 d n B rkitgic...

Page 39: ...rul de serie pe tabelul cu datele tehnice Num rul de serie reprezint un num r din unsprezece cifre primele patru cifre indic nd data fa bric rii De exemplu dac num rul de serie este 0606xxxxxxx nseamn...

Page 40: ...T 2205_IM_100 165 indd 40 21 01 2013 9 31 14...

Reviews: