D-301436
5
Step 4
Plug in the Base Unit (Figures 5a/b)
During normal operation, your Base Unit runs on
electrical power.
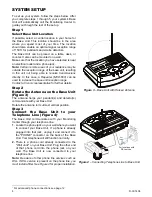
The power cord is looped around a bracket segment
to provide strain relief against inadvertent pulling
and disconnection of the power cord.
1.
Loop the power cord around the bracket segment
as shown in figure 5a.
2.
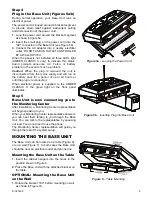
Insert the small plug on the power cord into the
"AC" connector on the Base Unit (see Figure 5b).
3.
Connect the AC adapter into a nearby electrical
outlet. DO NOT USE AN OUTLET CONTROLLED
BY A WALL SWITCH.
When the panel is not installed all three LEDs light
(AMBER CLASSIC X only) to indicate this status.
Audio prompts announce AC, Telco, or battery
problem, in the event of such a problem.
Caution:
When the plug is removed the unit is
disconnected from the mains supply and will run on
the battery pack for a period of up to 24 hours or
until the plug is reconnected.
When electrical power is supplied to the AMBER
CLASSIC X, the green light on the front panel
illuminates.
Step 5
Base Unit is now connecting you to
the Monitoring Center
After installation, a Monitoring Center representative
will begin speaking to you.
When your Monitoring Center representative answers,
you can hear them talking to you through the Base
Unit. You can talk to the representative by speaking
out loud. You do not need to use the phone.
The Monitoring Center representative will guide you
through the rest of the system setup.
Figure 5a
– Looping the Power Cord
Figure 5b
– Inserting Plug into Base Unit
MOUNTING THE BASE UNIT
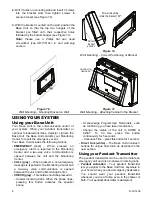
The Base Unit can be located on a table (Figure 6),
or on a wall (Figure 7). In both cases the Base Unit
should be near an electrical outlet and phone line.
Mounting the Base Unit on the Table
1.
Insert the cabinet hangers into the holes in the
position shown in Figure 6.
2
. Place the Base Unit with the attached bracket on
the table.
OPTIONAL: Mounting the Base Unit
on the Wall
1.
Rotate the bracket 180
°
before mounting on wall,
as shown in Figure 7a.
Figure 6
– Table Mounting


