background image

35

Menu Functions

This section will introduce the On-Screen Display (OSD) Menu and its options.

General On-Screen Display (OSD) Menu Operation

NOTE: 


The OSD screenshots in this manual are for reference only and may differ from 

the actual design. Some of the following OSD settings may not be available. 

Please refer to the actual OSD of your projector.

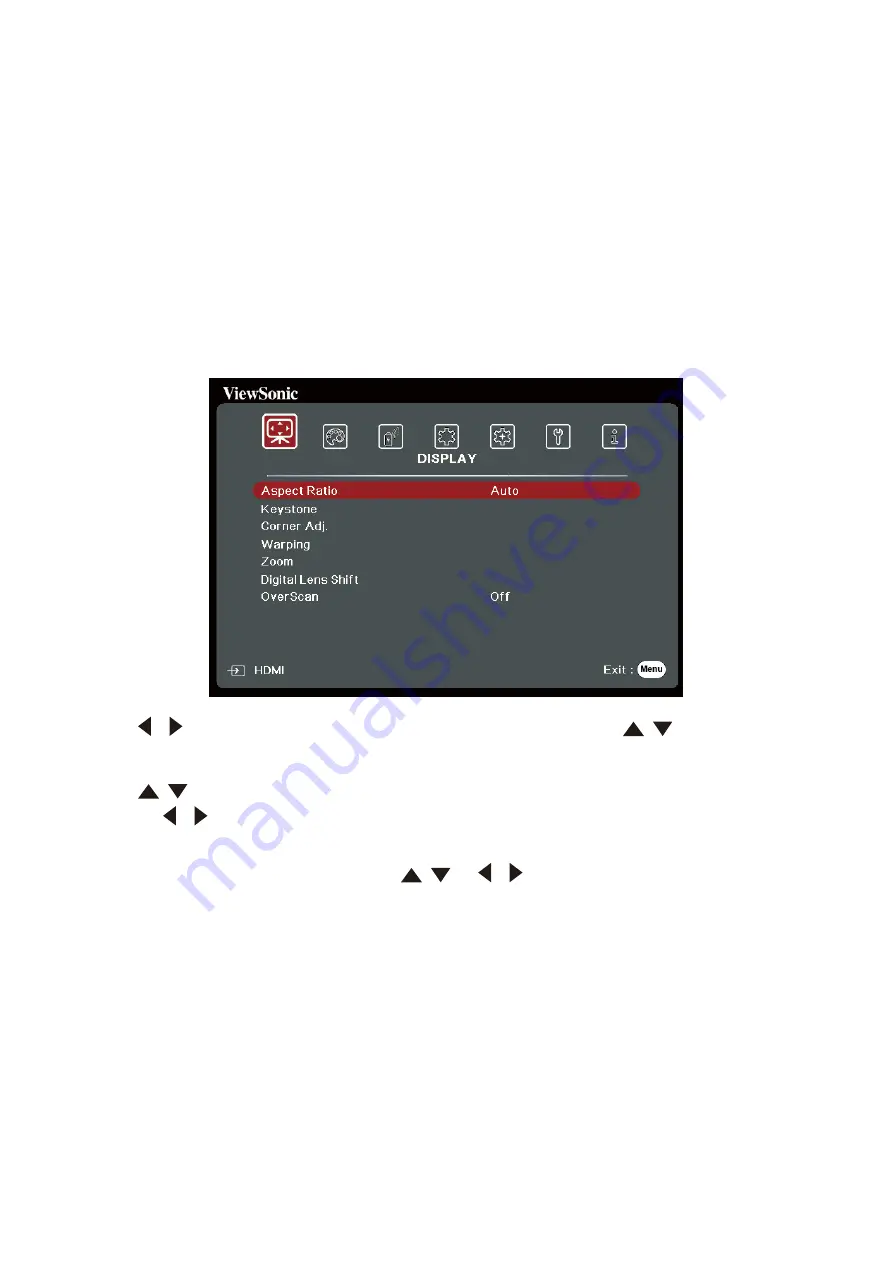
The projector is equipped with an On-Screen Display (OSD) Menu for making 

various adjustments. It can be accessed by pressing 

Menu


on the projector or 

remote control.

1. 

Press 

 /   

 to select a main menu. Then press 

Enter

 or use 

/

 to access the 

sub-menu list.

2. 

Press 

/  

to select the menu option. Then press 

Enter

 to display its sub-menu, 

or press 

 / 

 to adjust/select the setting.

NOTE: 


Some sub-menu options may have another sub-menu. To enter the respective 

sub-menu, press 

Enter

. Use 

/

 or 

 / 

 to adjust/select the setting.

Summary of Contents for PX701-4K

Page 1: ... safe manner as well as registering your product for future service Warranty information contained in this User Guide will describe your limited coverage from ViewSonic Corporation which is also found on our web site at http www viewsonic com in English or in specific languages using the Regional selection box in the upper right corner of our website Antes de operar su equipo lea cu idadosamente l...

Page 2: ...eeding the world s expectations for technological evolution innovation and simplicity At ViewSonic we believe that our products have the potential to make a positive impact in the world and we are confident that the ViewSonic product you have chosen will serve you well Once again thank you for choosing ViewSonic ...

Page 3: ...and deformed or even cause a fire Do not attempt to disassemble the projector There are dangerous high voltages inside which may cause death if you should come into contact with live parts When moving the projector be careful not to drop or bump the projector on anything Do not place any heavy objects on the projector or connection cables Do not stand the projector on end vertically Doing so may c...

Page 4: ...stable This projector is designed to operate safely within a voltage between 100 to 240 volts AC but could fail if power cuts or surges of 10 volts occur In areas where voltage may fluctuate or cut out it is recommended that you connect your projector through a power stabilizer surge protector or uninterruptable power supply UPS If smoke an abnormal noise or a strange odor is present immediately s...

Page 5: ...Dimensions 13 PX701 4K 13 16 9 Image on a 16 9 Screen 13 16 9 Image on a 4 3 Screen 14 PX728 4K PX748 4K 14 16 9 Image on a 16 9 Screen 14 16 9 Image on a 4 3 Screen 15 Mounting the Projector 16 Preventing Unauthorized Use 17 Using the Security Slot 17 Using the Password Function 18 Setting a Password 18 Changing the Password 19 Disabling the Password Function 19 Forgetting the Password 20 Passwor...

Page 6: ...Projector s Height and Projection Angle 28 Auto Adjusting the Image 28 Fine Tuning the Image Size and Clarity 28 Correcting Keystone 29 Adjusting 4 corners 30 Hiding the Image 30 Controlling the Projector through a LAN Environment 31 Configuring the LAN Control Settings 31 General On Screen Display OSD Menu Operation 33 Menu Functions 33 On Screen Display OSD Menu Tree 34 DISPLAY Menu 40 IMAGE Men...

Page 7: ...Common Problems 64 LED Indicators 65 Maintenance 66 General Precautions 66 Cleaning the Lens 66 Cleaning the Case 66 Storing the Projector 66 Disclaimer 66 Light Source Information 67 Light Source Hour 67 Extending Light Source Life 67 Light Source Replacement Timing 68 Replacing the Light Source 68 ...

Page 8: ...Package Contents For PX728 4K PX748 4K NOTE The power cord and video cables included in your package may vary depending on your country Please contact your local reseller for more information Introduction ...

Page 9: ...eystone Keys Manually corrects distorted images resulting from an angled projection Left Right Up Down Selects the desired menu items and makes adjustments when the On Screen Display OSD Menu is activated Menu Exit Turns on or off the On Screen Display OSD Menu Source Displays the input source selection bar Blank Hides the screen picture Enter Enacts the selected On Screen Display OSD Menu item wh...

Page 10: ...CP2 2 HDMI 2 HDCP2 2 RS 232 AUDIO OUT USB 5V 1 5A OUT Service 3 2 3 4 5 6 7 8 2 1 5 1 7 AC Power Cord Inlet Ceiling Mount Holes Security Slot Security Bar Adjuster Foot Port Description 1 AUDIO OUT Audio signal output socket 2 HDMI 1 HDMI port 3 HDMI 2 HDMI port 4 USB C USB C port 5 RS 232 RS 232 control port 6 12V OUT 12V DC output terminal 7 USB 5V 1 5A OUT Service USB Type A port for power supp...

Page 11: ...nd makes adjustments Menu Turns on off the On Screen Display OSD Menu or goes back to previous OSD Menu INFORMATION Displays the INFORMATION menu Exit Exits and saves menu settings Aspect Displays the aspect ratio selection bar Freeze Freezes the projected image Pattern Displays embedded test pattern Blank Hides the screen picture PgUp Page Up PgDn Page Down Operates your display software program ...

Page 12: ... Description Left Right Up Down Selects the desired menu items and makes adjustments Menu Turns on off the On Screen Display OSD Menu or goes back to previous OSD Menu INFORMATION Displays the INFORMATION menu Exit Exits and saves menu settings Aspect Displays the aspect ratio selection bar Pattern Displays embedded test pattern Blank Hides the screen picture 3D Displays the 3D menu NOTE Only avai...

Page 13: ... the finger grip and sliding it down 2 Remove any existing batteries if necessary and install two AAA batteries NOTE Observe the battery s polarities as indicated 3 Replace the battery cover by aligning it with the base and pushing it back into position NOTE Avoid leaving the remote control and batteries in excessive heat or a humid environment Replace only with the same or equivalent type recomme...

Page 14: ...tor and other equipment The projector is designed to be installed in one of the following locations 1 Front The projector is placed near the floor in front of the screen 2 Front Ceiling The projector is suspeneded upside down from the ceiling in front of the screen 3 Rear Ceiling The projector is suspended upside down from the ceiling behind the screen NOTE A special rear projection screen is requ...

Page 15: ...46 41 2 1046 80 2032 105 2661 115 2927 39 996 47 1195 47 1 1195 90 2286 118 2994 130 3293 44 1121 53 1345 52 9 1345 100 2540 131 3326 144 3659 49 1245 59 1494 58 8 1494 110 2794 144 3659 158 4025 54 1370 65 1644 64 7 1644 120 3048 157 3992 173 4391 59 1494 71 1793 70 6 1793 130 3302 170 4324 187 4757 64 1619 76 1943 76 5 1943 140 3556 183 4657 202 5123 69 1743 82 2092 82 4 2092 150 3810 196 4989 2...

Page 16: ...ance among these numbers due to optical component variations It is recommended to physically test the projection size and distance before permanently installing the projector PX728 4K PX748 4K 16 9 Image on a 16 9 Screen a Screen Size b Projection Distance c Image Height d Vertical Offset minimum maximum minimum maximum in mm in mm in mm in mm in mm in mm 60 1524 59 1497 77 1946 29 747 35 897 35 3...

Page 17: ... 3048 108 2748 141 3572 54 1372 65 1646 65 1646 130 3302 117 2977 152 3870 59 1486 70 1783 70 1783 140 3556 126 3206 164 4168 63 1600 76 1920 76 1920 150 3810 135 3435 176 4465 68 1715 81 2057 81 2057 160 4064 144 3664 188 4763 72 1829 86 2195 86 2195 170 4318 153 3893 199 5061 77 1943 92 2332 92 2332 180 4572 162 4122 211 5358 81 2057 97 2469 97 2469 190 4826 171 4351 223 5656 86 2172 103 2606 10...

Page 18: ...sure the most secure installation please use a ViewSonic wall or ceiling mount 2 Ensure the screws used to attach a mount to the projector meet the following specifications Screw type M4 x 8 Maximum Screw length 8 mm 65 89 65 89 113 54 60 01 NOTE Avoid installing the projector near a heat source Keep at least a 10 cm gap between the ceiling and the bottom of the projector ...

Page 19: ... To help prevent the projector from being stolen use a security slot locking device to secure the projector to a fixed object Below is an example of setting up a security slot locking device HDMI 1 HDCP2 2 HDMI 2 HDCP2 2 RS 232 AUDIO OUT USB 5V 1 5A OUT Service NOTE The security slot can also be used as a safety anchor if the projector is mounted to the ceiling ...

Page 20: ... Menu and go to SYSTEM Security Settings and press Enter 2 Highlight Power On Lock and select On by pressing 3 As pictured to the right the four arrow keys represent 4 digits 1 2 3 4 Press the arrow keys to enter a six digit password 5 Confirm the new password by re entering the new password Once the password is set the OSD Menu will return to the Security Settings page 6 Press Exit to leave the O...

Page 21: ... entering the new password 6 To leave the OSD Menu press Exit NOTE The digits being input will display as asterisks Disabling the Password Function 1 Press Menu to open the OSD Menu and go to SYSTEM Security Settings Power On Lock 2 Press to select Off 3 The message Input Password will appear Enter the current password If the password is correct the OSD Menu returns to the Password page with Off s...

Page 22: ...e Password Recall Procedure NOTE If you enter an incorrect password 5 times in succession the projector will automatically shut down for a short time Password Recall Procedure 1 When the message INPUT CURRENT PASSWORD appears press and hold Auto Sync for 3 seconds The projector will display a coded number on the screen 2 Write down the number and turn off your projector 3 Seek help from the local ...

Page 23: ...Panel Key Lock is On no control keys on the projector will operate except Power 1 Press Menu to open the OSD Menu and go to SYSTEM Panel Key Lock 2 Press to select On 3 Select Yes and press Enter to confirm 4 To release panel key lock press and hold on the projector for 3 seconds NOTE You can also use the remote control to enter the SYSTEM Panel Key Lock menu and select Off ...

Page 24: ...2 Plug the power cord into a power outlet HDMI 1 HDCP2 2 HDMI 2 HDCP2 2 NOTE When installing the projector incorporate a readily accessible disconnect device in the fixed wiring or connect the power plug to an easily accessible outlet near the unit If a fault should occur during operation of the projector use the disconnect device to switch off the power supply or disconnect the power plug ...

Page 25: ... you can also connect external speakers to the AUDIO OUT port of the projector NOTE The audio output is controlled by the projector s Volume and Mute settings The connection illustrations below are for reference only The connecting jacks available on the projector vary with each projector model Some cables may not be included with the projector They are commercially available from electronics stor...

Page 26: ...26 PX728 4K PX748 4K HDMI 1 HDCP2 2 HDMI 2 HDCP2 2 RS 232 RJ45 AUDIO OUT USB C USB 5V 1 5A OUT Service 12V OUT ...

Page 27: ...nds before activating the light source To maintain light source life once you turn the projector On wait at least five 5 minutes before turning it off 4 Turn on all of the connected equipment i e notebook and the projector will start to search for an input source NOTE If the projector detects an input source the Source Selection Bar will appear If an input source is not detected the message No Sig...

Page 28: ...t respond in a few seconds after the first press the message will disappear 2 Once the cooling process finishes a Power On Off Ring Tone will play 3 Disconnect the power cord from the power outlet if the projector will not be used for an extended period of time NOTE To protect the light source the projector will not respond to commands during the cooling process Do not unplug the power cord before...

Page 29: ...of the source selection buttons on the remote control or by cycling through the available input sources PX701 4K PX728 4K PX748 4K On Off HDMI 1 HDMI 2 COMP Source Auto Sync To manually select the input source do the following 1 Press Source and a source selection menu will appear 2 Press until your desired signal is selected and press Enter 3 Once detected the selected source information will be ...

Page 30: ...do this press Auto Sync on the remote control Within five 5 seconds the built in Intelligent Auto Adjustment function will re adjust the Frequency and Clock values to provide the best picture quality Upon completion the current source information will appear in the upper left corner for three 3 seconds NOTE This function is only available when the PC D Sub input source analog RGB COMPUTER IN is se...

Page 31: ...ess to correct keystoning at the top of the image Press to correct keystoning at the bottom of the image Press to correct keystoning at the bottom of the image Press to correct keystoning at the right side of the image Press to correct keystoning at the left side of the image On Off HDMI 1 HDMI 2 COMP Source Pattern Brightness Contrast Aspect Color Temp Eco Mode Standard Gaming Sports Movie User B...

Page 32: ...stment press to adjust its shape and size You can press Menu or Exit to go back to a previous step A long press for 2 seconds on Enter will reset the settings on the corner that you chose NOTE Adjusting keystone will reset the Corner Adj settings After the Corner Adj settings have been modified some aspect ratios or timings are not available When that happens reset the settings on all 4 corners Hi...

Page 33: ...e a RJ45 cable and connect one end to the RJ45 LAN input jack of the projector and the other end to the RJ45 port 2 Open the OSD menu and go to the ADVANCED LAN Control Settings menu Press Enter to display the LAN Control Settings page Or you can press Network to open the LAN Control Settings menu directly 3 Highlight LAN Settings and press to select DHCP ON 4 Press to highlight Apply and press En...

Page 34: ... Address Subnet Mask Default Gateway DNS Server settings 4 Press to select the item you want to modify and press Enter 5 Press to move the cursor and the press to enter the value 6 To save the settings press Enter If you do not want to save the settings press Exit 7 Press to highlight Apply and press Enter NOTE If the RJ45 cables are not properly connected the Projector IP Address Subnet Mask Defa...

Page 35: ...tual OSD of your projector The projector is equipped with an On Screen Display OSD Menu for making various adjustments It can be accessed by pressing Menu on the projector or remote control 1 Press to select a main menu Then press Enter or use to access the sub menu list 2 Press to select the menu option Then press Enter to display its sub menu or press to adjust select the setting NOTE Some sub m...

Page 36: ...e Keystone Auto V Keystone Off On Vertical 40 40 Horizontal 40 40 Rotation 40 40 Corner Adj Top Right 45 90 Top Left 45 90 Bottom Right 45 90 Bottom Left 45 90 Warping Enable Off On Control Method OSD RS232 Warping Adj Reset Zoom 0 8X 2 0X Digital Lens Shift Vertical 50 50 Horizontal 50 50 OverScan Off 1 2 3 4 5 ...

Page 37: ... Brightness 0 100 Contrast 50 50 Color Temp 9500K 8500K 7500K 6500K 5500K Red Gain 0 100 Green Gain 0 100 Blue Gain 0 100 Red Offset 50 50 Green Offset 50 50 Blue Offset 50 50 Advanced Color 50 50 Sharpness 0 31 Gamma 1 8 2 0 2 2 2 35 2 5 Cubic sRGB Brilliantcolor Off 1 2 3 4 5 6 7 8 9 10 Color Management Primary Color Hue Saturation Gain ...

Page 38: ...el ISF Mode Only for PX728 4K Password protected Auto Power On Signal Disable HDMI CEC Disable Enable Direct Power On Disable Enable Smart Energy Auto Power Off Disable 10 min 20 min 30 min Sleep Timer Disable 30 min 1 hr 2hr 3 hr 4 hr 8 hr 12 hr Power Saving Disable Enable USB A Power On Off ...

Page 39: ...r Period 1 240 m Timer Display Always 1 min 2 min 3 min Never Timer Position Top Left Bottom Left Top Right Bottom Right Timer Counting Direction Count Down Count Up Sound Reminder Off On Start Counting Off Pattern Off Test Card Blank Timer Disable 5 min 10 min 15 min 20 min 25 min 30 min Message Off On Splash Screen Black Blue ViewSonic ...

Page 40: ...ojector IP Address Subnet Mask Default Gateway DNS Server Standby LAN Control Off On Apply HDR HDR HLG Auto SDR EOTF Low Mid High Ultra Fast Input Inactive Active Light Source Settings Light Source Mode Normal Eco Dynamic Eco SuperEco Reset Light Source Hours LightSourceHoursInformation Light Source Usage Time Normal Eco Dynamic Eco SuperEco EquivalentLightSourceHour Reset Settings Reset Cancel ...

Page 41: ...enter Top Left Top Right Bottom Left Bottom Right High Altitude Mode Off On Quick Auto Search Off On Security Settings Change Password Power On Lock Off On Panel Key Lock Off On Remote Control Code 1 2 3 4 5 6 7 8 Control Method RS 232 USB Baud Rate 2400 4800 9600 14400 19200 38400 57600 115200 INFORMATION Source Color Mode Resolution Color System IP address Only for PX728 4K PX748 4K MAC address ...

Page 42: ...SPLAY menu Then press Enter or use to access the DISPLAY menu 3 Press to select the menu option Then press Enter to display its sub menu or press to adjust select the setting NOTE Some sub menu options may have another sub menu To enter the respective sub menu press Enter Use or to adjust select the setting ...

Page 43: ...e center of the screen with a 16 9 aspect ratio This is most suitable for images which are already in a 16 9 aspect like high definition TV as it displays them without aspect alteration 16 10 Scales an image so that it is displayed in the center of the screen with a 16 10 aspect ratio This is most suitable for images which are already in a 16 10 aspect as it displays them without aspect alteration...

Page 44: ...5 Repeat step 1 to 4 to ajdust another point until you are satisfied with the projected image 6 Press Menu Exit to exit the function Reset Returns settings in the Warping menu to the factory preset values Zoom Magnifies the projected image and allows you to navigate the image Digital Lens Shift Digital lens shift is a tool that assists in properly aligning the projector s image with the projector ...

Page 45: ...MAGE menu Then press Enter or use to access the IMAGE menu 3 Press to select the menu option Then press Enter to display its sub menu or press to adjust select the setting NOTE Some sub menu options may have another sub menu To enter the respective sub menu press Enter Use or to adjust select the setting ...

Page 46: ...lorful movies video clips from digital cameras or DVs through the PC input for best viewing in a blackened low light environment ISF Day ISF Night Only available when ISF Mode is On User 1 User 2 Recalls the customized settings After User 1 User 2 is selected some of the sub menus under the IMAGE menu can be adjusted according to your selected input source Brightness The higher the value the brigh...

Page 47: ... This feature utilizes a new color processing algorithm and system level enhancements to enable higher brightness while providing truer more vibrant colors in the projected picture It enables a greater than 50 brightness increase in mid tone images which are common in video and natural scenes so the projector reproduces images in realistic and true colors If you prefer images with that quality sel...

Page 48: ...e ISF calibration menu is password protected and only accessible by authorized ISF calibrators The ISF Imaging Science Foundation has developed carefully crafted industry recognized standards for optimal video performance and has implemented a training program for technicians and installers to use these standards to obtain optimal picture quality from ISF certified display devices Accordingly we r...

Page 49: ...ANAGEMENT menu Then press Enter or use to access the POWER MANAGEMENT menu 3 Press to select the menu option Then press Enter to display its sub menu or press to adjust select the setting NOTE Some sub menu options may have another sub menu To enter the respective sub menu press Enter Use or to adjust select the setting ...

Page 50: ...at the device is correctly connected to the HDMI input of the projector via an HDMI cable and its CEC function is turned on Depending on the connected device the CEC function may not work Direct Power On Allows the projector to turn on automatically once power is fed through the power cord Smart Energy Auto Power Off Allows the projector to turn off automatically after a set period of time once no...

Page 51: ...ASIC menu Then press Enter or use to access the BASIC menu 3 Press to select the menu option Then press Enter to display its sub menu or press to adjust select the setting NOTE Some sub menu options may have another sub menu To enter the respective sub menu press Enter Use or to adjust select the setting ...

Page 52: ...ecide if you want the timer to show up on the screen for one of the following time periods Always Displays the timer on screen throughout the presentation time 1 min 2 min 3 min Displays the timer on screen in the last 1 2 3 minute s Never Hides the timer throughout the presentation time Timer Position Sets the timer position Timer Counting Direction Sets your desired counting direction between Co...

Page 53: ...en on the blank screen To display the blank screen press Blank on the projector or remote control NOTE Do not block the projection lens as this could cause the blocking object to become heated and deformed or even cause a fire Message Sets reminder messages On or Off Splash Screen Selects which logo screen will appear during projector start up ...

Page 54: ...ANCED menu Then press Enter or use to access the ADVANCED menu 3 Press to select the menu option Then press Enter to display its sub menu or press to adjust select the setting NOTE Some sub menu options may have another sub menu To enter the respective sub menu press Enter Use or to adjust select the setting ...

Page 55: ...cally detect the dynamic range of the source and optimize image gamma and color settings to reproduce contents under wide range of light conditions You also select SDR EOTF The projector can automatically adjust the brightness levels of your image according to the input source Normally the default setting Mid is recommended If the brightness of the projected image is dark please use Low When givin...

Page 56: ...ngs will be automatically retrieved Static IP Select this if you are in a non DHCP environment and make adjustments to below settings Projector IP Address Only available when LAN Settings is set to Static IP Use to select a column and use to adjust the value Subnet Mask Default Gateway DNS Server Standby LAN Control Allows the projector to provide the network function in standby mode Apply Enacts ...

Page 57: ...t Color Settings will not be available when the Light Source Mode is set as SuperEco Reset Light Source Hours Resets the light source timer after a new light source is installed For changing the light source please contact qualified service personnel Light Source Hours Information Light Source Usage Time Displays the number of hours the light source has been used Equivalent Light Source Hour Displ...

Page 58: ...eset values When using Reset Settings the following settings will still remain Zoom Keystone Corner Adj Language Projector Position USB A Power High Altitude Mode Security Settings Remote Control Code Control Method Baud Rate Warping Digital Lens Shift HDR and LAN Control Settings ...

Page 59: ...STEM menu Then press Enter or use to access the SYSTEM menu 3 Press to select the menu option Then press Enter to display its sub menu or press to adjust select the setting NOTE Some sub menu options may have another sub menu To enter the respective sub menu press Enter Use or to adjust select the setting ...

Page 60: ...e projector Remote Control Code Sets the remote control code for this projector between 1 8 When multiple adjacent projectors are in operation at the same time switching the codes can prevent interference from other remote controls After the remote control code is set switch to the same ID for the remote control to control this projector To switch the code for the remote control press ID set and t...

Page 61: ...d mode in the IMAGE menu Resolution Shows the native resolution of the input source Color System Shows input system format IP address only for PX728 4K PX748 4K Shows the IP address of your projector MAC address only for PX728 4K PX748 4K Shows the MAC Address of your projector Firmware Version Shows the current firmware version Ultra Fast Input Shows whether the function is activated or not S N S...

Page 62: ...Native 3840 x 2160 Power Adapter1 Input Voltage AC 100 240V 50 60 Hz auto switch Operating conditions Temperature 0 C to 40 C 32 F to 104 F Humidity 0 to 90 non condensing Altitude 0 to 1 499 m at 5 C to 35 C 1 500 to 3 000 m at 5 C to 25 C Storage conditions Temperature 20 C to 60 C non condensing Humidity 0 to 90 non condensing Altitude 0 to 1 219 m at 20 C to 30 C Dimensions Physical W x H x D ...

Page 63: ...008 43 269 36 720 x 400 720 x 400_70 70 087 31 469 28 3221 800 x 600 SVGA_60 60 317 37 879 40 SVGA_72 72 188 48 077 50 SVGA_75 75 46 875 49 5 SVGA_85 85 061 53 674 56 25 SVGA_120 Reduce Blanking 119 854 77 425 83 1024 x 768 XGA_60 60 004 48 363 65 XGA_70 70 069 56 476 75 XGA_75 75 029 60 023 78 75 XGA_85 84 997 68 667 94 5 XGA_120 119 804 98 958 137 750 1152 x 864 1152 x 864_75 75 67 5 108 1280 x ...

Page 64: ... 1200 UXGA 60 75 162 1680 x 1050 1680 x 1050_60 59 883 64 674 119 000 1680 x 1050_60 59 954 65 29 146 25 1920 x 1200 1920 x 1200_60 Reduce Blanking 59 950 74 038 154 000 640 x 480 67Hz MAC13 66 667 35 30 24 1024 x 768 75Hz MAC19 75 020 60 241 80 3840 x 2160 3840 x 2160_30 30 67 5 297 HDMI Video Video mode Resolution Horizontal frequency KHz Vertical frequency Hz Dot Clock frequency MHz 480i 720 14...

Page 65: ...KHz Vertical frequency Hz Dot Clock frequency MHz 1080 60P 1920 x 1080 67 5 60 148 5 2160 24P 3840 x 2160 54 24 297 2160 25P 3840 x 2160 56 25 25 297 2160 30P 3840 x 2160 67 5 30 297 2160 50P 3840 x 2160 112 5 50 594 2160 60P 3840 x 2160 135 60 594 ...

Page 66: ... picture Ensure the video source cable is connected properly and that the video source is turned on If the input source is not selected automatically select the correct source with the Source key on either the projector or the remote control The image is blurred Adjusting the Focus Ring will help correctly focus the projection lens Ensure the projector and screen are aligned properly If necessary ...

Page 67: ...ual fan speed is outside the desired speed Off Red Orange Fan 4 error actual fan speed is outside the desired speed Red Flashing Red Off Fan 5 error actual fan speed is outside the desired speed Red Flashing Red Flashing Off Fan 6 error actual fan speed is outside the desired speed Red Red Red Thermal sensor 1 open error the remote diode has an open circuit condition Red Red Green Thermal sensor 2...

Page 68: ...ft lint free dry cloth to remove dirt or dust If the case is still not clean apply a small amount of non ammonia non alcohol based mild non abrasive detergent onto a clean soft lint free cloth then wipe the surface CAUTION Never use wax alcohol benzene thinner or other chemical detergents Storing the Projector If you intend to store the Projector for an extended period of time Ensure the temperatu...

Page 69: ...co mode reduces system noise power consumption and extends the light sources operational life Light Source Mode Description Normal Provides full light source brightness Eco Reduces light source power consumption by 30 and lowers brightness and decreases fan noise Dynamic Eco Reduces light source power consumption by up to 65 depending on the content s brightness level SuperEco Reduces light source...

Page 70: ...sult your dealer CAUTION An old light source may cause a malfunction in the projector and in some instances the light source may explode Replacing the Light Source It is recommended to turn the power off and disconnect the projector from the power outlet and contact a qualified service personnel for light source replacement ...

Page 71: ...with the instructions may cause harmful interference to radio communications However there is no guarantee that interference will not occur in a particular installation If this equipment does cause harmful interference to radio or television reception which can be determined by turning the equipment off and on the user is encouraged to try to correct the interference by one or more of the followin...

Page 72: ...ice complies with Industry Canada license exempt RSS standard s Operation is subject to the following two conditions 1 this device may not cause interference and 2 this device must accept any interference including interference that may cause undesired operation of the device Le présent appareil est conforme aux CNR d Industrie Canada applicables aux appareils radio exempts de licence L exploitati...

Page 73: ...ance entre la source de rayonnement et votre corps les dispositifs fonctionnant dans la bande 5150 5825 MHz sont réservés uniquement pour une utilisation à l intérieur afin de réduire les risques de brouillage préjudiciable aux systèmes de satellites mobiles utilisant les mêmes canaux CE Conformity for European Countries The device complies with the EMC Directive 2014 30 EU and Low Voltage Directi...

Page 74: ...IBP 0 1 0 1 Certain components of products as stated above are exempted under the Annex III of the RoHS2 Directives as noted below Examples of exempted components are Mercury in cold cathode fluorescent lamps and external electrode fluorescent lamps CCFL and EEFL for special purposes not exceeding per lamp Short length 500 mm maximum 3 5 mg per lamp Medium length 500 mm and 1 500 mm maximum 5 mg p...

Page 75: ...in an explosion or the leakage of flammable liquid or gas Indian Restriction of Hazardous Substances Restriction on Hazardous Substances statement India This product complies with the India E waste Rule 2011 and prohibits use of lead mercury hexavalent chromium polybrominated biphenyls or polybrominated diphenyl ethers in concentrations exceeding 0 1 weight and 0 01 weight for cadmium except for t...

Page 76: ...ection Agency EPA As an ENERGY STAR partner ViewSonic Corporation has determined that this product meets the ENERGY STAR guidelines for energy efficiency Disclaimer ViewSonic Corporation shall not be liable for technical or editorial errors or omissions contained herein nor for incidental or consequential damages resulting from furnishing this material or the performance or use of this product In ...

Page 77: ...nic com my Middle East www viewsonic com me Myanmar www viewsonic com mm Nepal www viewsonic com np New Zealand www viewsonic com nz Pakistan www viewsonic com pk Philippines www viewsonic com ph Singapore www viewsonic com sg 臺灣 Taiwan www viewsonic com tw ประเทศไทย www viewsonic com th Việt Nam www viewsonic com vn South Africa Mauritius www viewsonic com za Americas United States www viewsonic ...

Page 78: ...ation Limited One 1 year Heavy Usage Warranty Under heavy usage settings where a projector s use includes more than fourteen 14 hours average daily usage North and South America One 1 year warranty for all parts excluding the lamp one 1 year for labor and ninety 90 days for the original lamp from the date of the first consumer purchase Europe One 1 year warranty for all parts excluding the lamp on...

Page 79: ...val installation and set up service charges How to get service 1 For information about receiving service under warranty contact ViewSonic Customer Support Please refer to the Customer Support page You will need to provide your product s serial number 2 To obtain warranted service you will be required to provide a the original dated sales slip b your name c your address d a description of the probl...

Page 80: ...ific legal rights and you may also have other rights which vary from local authority Some local governments do not allow limitations on implied warranties and or do not allow the exclusion of incidental or consequential damages so the above limitations and exclusions may not apply to you Sales outside the U S A and Canada For warranty information and service on ViewSonic products sold outside of t...

Page 81: ...chased separately are warranted for 90 days Who the warranty protects This warranty is valid only for the first consumer purchaser What the warranty excludes and does not cover 1 Any product on which the serial number has been defaced modified or removed 2 Damage deterioration or malfunction resulting from Accident misuse neglect fire water lightning or other acts of nature unauthorized product mo...

Page 82: ...ner packaging to an authorized ViewSonic service center 3 Round trip transportation costs for in warranty products will be paid by ViewSonic Limitation of implied warranties There are no warranties express or implied which extend beyond the description contained herein including the implied warranty of merchantability and fitness for a particular purpose Exclusion of damages ViewSonic s liability ...

Page 83: ...136954 E Mail Cefeo soluglobales com Cuernavaca Compusupport de Cuernavaca SA de CV Francisco Leyva 178 Col Miguel Hidalgo C P 62040 Cuernavaca Morelos Tel 01 777 3180579 01 777 3124014 E Mail aquevedo compusupportcva com Distrito Federal QPLUS S A de C V Av Coyoacán 931 Col Del Valle 03100 México D F Tel 01 52 55 50 00 27 35 E Mail gacosta qplus com mx Guadalajara Jal SERVICRECE S A de C V Av Niñ...

Page 84: ...C0 M91 Y72 K24 Process Color C0 M0 Y0 K100 Process Color C0 M91 Y72 K24 Process Color Pantone Black C Spot Color Pantone 187 C Spot Color ...

Reviews: