background image

7

Optiquest 

V75

Operation

E
N

G

L

I

S
H

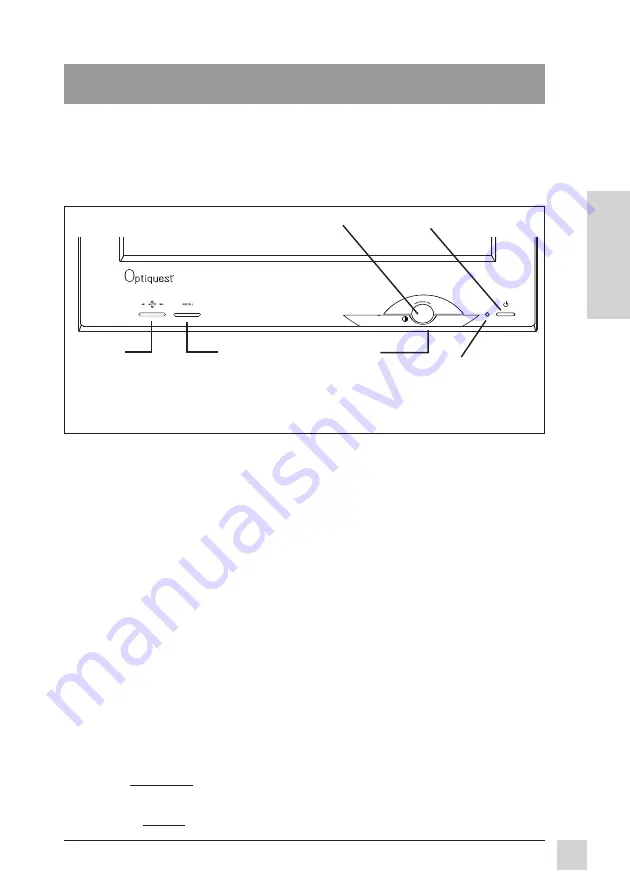
Adjust your 

Optiquest 

V75


monitor using the buttons on the front control

panel as shown below. The buttons scroll down the OnView

®

 Main Menu

(page 8) and adjust each control (pages 8 through 12).

Front Control Panel

To adjust the monitor, follow the numbered steps in sequence as shown below:

1

To display the OnView Main Menu, push the 

OSD 

button.

2

To select the control you want to adjust, turn the 

Control Wheel


(located

under the 

OSD 

button).  Clockwise scrolls down the Main Menu; counter-

clockwise scrolls up.  

NOTE:

 For some controls you must first select

another menu from the Main Menu (see page 8).

3

With your selection highlighted, push the 

OSD 

button again. The control

adjustment screen displays.

4

To adjust the control you selected, turn the 

Control Wheel

. The number

on the side of the adjustment screen changes accordingly.

5

When finished making adjustments, press the 

OSD 

button to save your

changes and return to the Main Menu.

6

To exit the Main Menu, turn the 

Control Wheel

 until EXIT is highlighted,

and press the 

OSD 

button.  

Shortcut: 

Press and hold the 

OSD 

button.

Power light:

Green    =  On
Orange  =   power
(Flashing)  saving

  mode

ONE TOUCH
OSD Button

Power* On/Off
Button

Control Wheel
(under OSD button)

RECALL
Button

AUTO
Button
(automatically sizes
screen image)

Operation

* The  monitor automatically 

degausses each time you turn it on, removing the buildup of magnetic

fields that can affect color purity and convergence. To prevent possible damage, if you turn the
monitor off, wait 20 minutes before turning it on again. 

Do not turn the monitor on and off

repeatedly. 

To manually degauss the monitor, see the instructions on page 10.

Summary of Contents for Optiquest V75

Page 1: ...ug Play User s Guide Guide de l utilisateur Bedienungsanleitung Latin American Spanish Italian Brazilian Portuguese Swedish Russian Japanese Traditional Chinese Taiwan Simplified Chinese China Korean...

Page 2: ...a registered trademark of the Video Electronics Standards Association DPMS and DDC are trademarks of VESA ENERGY STAR is a registered trademark of the U S Environmental Protection Agency EPA Disclaime...

Page 3: ...er IF THE FITTED MOULDED PLUG IS UNSUITABLE FORTHE SOCKET OUTLET IN YOUR HOME THEN THE FUSE SHOULD BE REMOVED AND THE PLUG CUT OFF AND DISPOSED OF SAFELY THERE IS A DANGER OF SEVERE ELECTRICAL SHOCK I...

Page 4: ...outlet on a circuit different from that to which the receiver is connected Consult your dealer or an experienced radio TV technician for help FCC Warning To assure continued FCC compliance the user mu...

Page 5: ...s Menu 9 Color Matching Menu 10 Miscellaneous Controls Menu 11 ViewMeter Screen 12 Other Information Specifications 13 Troubleshooting 14 Cleaning the Monitor 15 Limited Warranty 16 Customer Support b...

Page 6: ...G THE SCREEN WITH YOUR FINGERS Oils from the skin are difficult to remove NEVER REMOVE THE REAR COVER The monitor contains high voltage parts You may suffer serious injury if you touch these parts Avo...

Page 7: ...6 Getting Started OptiquestV75 E N G L I S H...

Page 8: ...ys 4 To adjust the control you selected turn the Control Wheel The number on the side of the adjustment screen changes accordingly 5 When finished making adjustments press the OSD button to save your...

Page 9: ...rd sagging or outward bowing appearance of screen image s vertical sides CW to bend sides outward C CW to bend sides inward Pin Balance curves screen s vertical edges to right or left CW to curve to r...

Page 10: ...E PINCUSHION CENTER and SIDE PINCUSHION S CURVE see below SPin Centr Side Pincushion Center smooths all curves shaped like an archery bow along the sides of the screen image until they apppear straigh...

Page 11: ...el to adjust the color The adjustment level changes accordingly 2 Repeat this process for other colors you wish to adjust When finished press and hold the OSD button to exit continued NOTE For all con...

Page 12: ...lect either English French German Italian or Spanish Save User To save the current adjustments for all controls size position color etc turn the Control Wheel to highlight an empty position number or...

Page 13: ...izontally CW to move right C CW to move left OSD VPos repositions all OnView OSD screens vertically CW to move up C CW to move down To exit an OnView menu or screen and save changes press and hold the...

Page 14: ...on Altitude To 10 000 feet 3 000m Storage Temperature 40 F to 140 F 40 C to 60 C Conditions Humidity 5 to 95 no condensation Altitude To 40 000 feet 12 000m Dimensions Physical 408mm W x 421mm H x 435...

Page 15: ...wMeter to verify refresh rate vertical frequency is 75 Hz or higher See Specifications on page 13 Make sure graphics card in your computer can use non interlaced mode at desired frequencies To enable...

Page 16: ...r onto a clean soft lint free cloth and wipe the screen To clean the case 1 Use a soft dry cloth 2 If still not clean apply a small amount of a non ammonia non alcohol based mild non abrasive detergen...

Page 17: ...09 869 7976 from Europe 44 1293 643 900 from Asian Pacific Rim countries 886 2 248 4072 Optiquest Technical Support techhelp optiquest com Optiquest Product Information prodinfo optiquest com WorldWid...

Page 18: ...a 909 869 7976 From Europe 44 1293 643 900 FromAsian Pacific Rim countries 886 2 248 4072 OptiquestTechnical Support techhelp optiquest com Optiquest Product Information prodinfo optiquest com World W...

Reviews: