background image

8

4

Press

INPUT

, then press

/

to select

Component

.

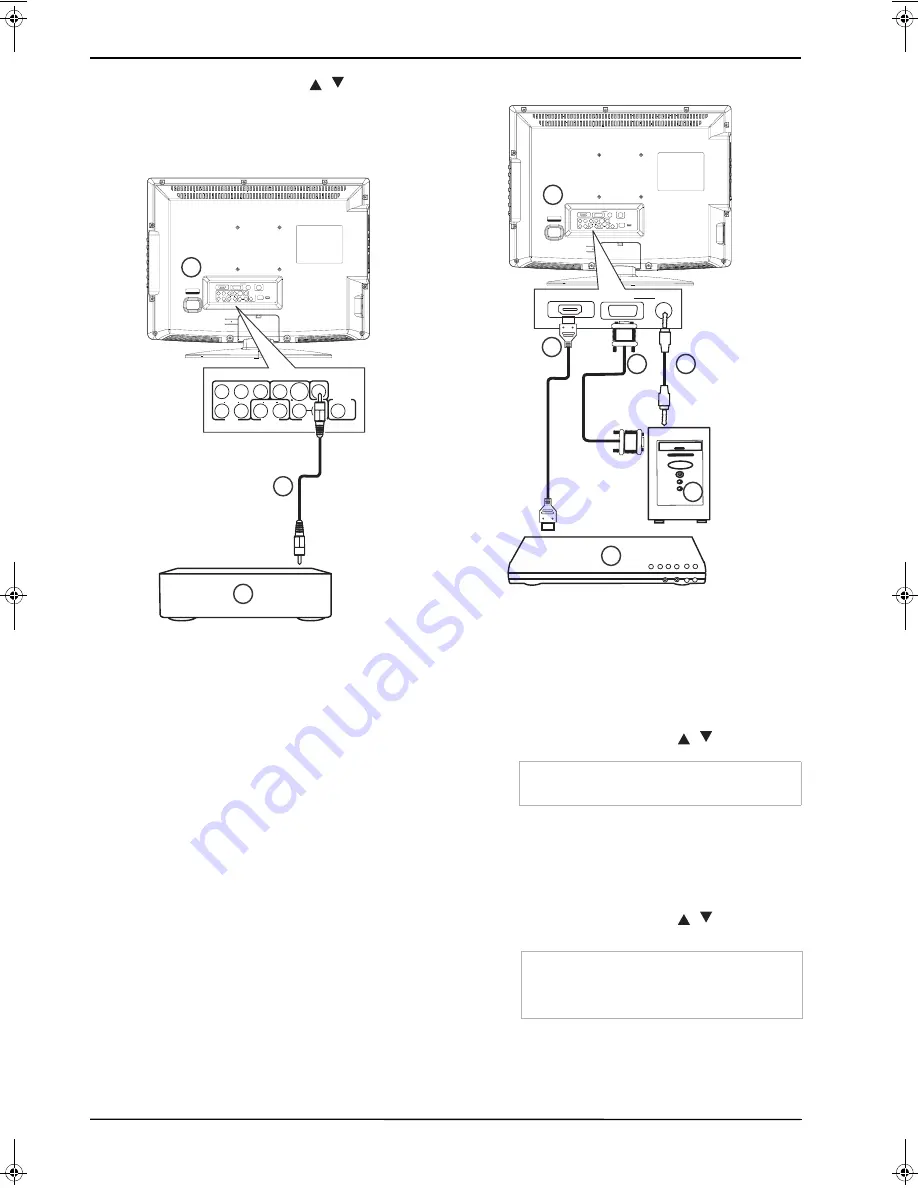
Connecting a digital audio input

You can connect your TV audio out to a digital
amplifier.

To connect to an amplifier equipped with a
digital audio input:

Plug a coaxial cable (2) into the amplifier (3)
and into the

COAXIAL OUTPUT

jack on the

back of your TV (1).

Connecting a computer

To connect a computer using VGA:

1

Plug a VGA cable (3) into the VGA port on
the computer (5) and into the

VGA INPUT

port on the back of your TV (1).

2

Plug an audio cable (4) into the audio jack on
the computer (5) and into the

AUDIO VGA

INPUT

port on the back of your TV (1).

3

Turn on your TV.

4

Press

INPUT

, then press

/

to select

PC

.

To connect to a computer or other HDMI
device using the HDMI jack:

1

Plug an HDMI cable (2) into the HDMI port on
the HDMI device (6) and into the

HDMI

INPUT

port on the back of your TV (1).

2

Turn on your TV.

3

Press

INPUT

, then press

/

to select

HDMI

.

Caution

The TV will automatically turn off after one minute
if there is no signal in PC mode.

Note

When the computer goes into standby mode, your
TV turns off. If your TV does not turn on when you
“wake” your computer, press the

POWER

button

on your TV or remote control.

ViewSonic N2201w

Contact ViewSonic service team at: http://www.ViewSonic.com or call our service team: United States 1-800-688-6688, Canada 1-866-463-4775

1

A C   I N P U T

~ 100-240V   50/60Hz

AUDIO

VGA INPUT

HDMI INPUT

FOR 

SERVICE 

ONLY

ANT. INPUT

CB /P B

Y

CR/PR

COAXIAL

L

R

AUDIO

INPUT

OUTPUT

L

R

AUDIO

L

R

AUDIO

VIDEO

S-VIDEO

INPUT

DVD

VIDEO

OUTPUT

3

CB /P B

Y

CR/PR

COAXIAL

L

R

AUDIO

INPUT

OUTPUT

L

R

AUDIO

L

R

AUDIO

VIDEO

S-VIDEO

INPUT

DVD

VIDEO

OUTPUT

2

6

5

1

A C   I N P U T

~ 100-240V   50/60Hz

AUDIO

VGA INPUT

HDMI INPUT

FOR 

SERVICE 

ONLY

ANT. INPUT

CB /P B

Y

CR/PR

COAXIAL

L

R

AUDIO

INPUT

OUTPUT

L

R

AUDIO

L

R

AUDIO

VIDEO

S-VIDEO

INPUT

DVD

VIDEO

OUTPUT

2

3

4

AUDIO

VGA INPUT

HDMI INPUT

Summary of Contents for N2201w - 22" LCD TV

Page 1: ...your product for future service Warranty information contained in this User Guide will describe your limited coverage from ViewSonic Corportion which is also found on our web site at http www viewsonic com in English or in specific languages using the Regional selection box in the upper right corner of our website Antes de operar su equipo lea cuidadosamente las instrucciones en este manual ViewSo...

Page 2: ...sal at end of product life ViewSonic is concerned about the preservation of our environment Please dispose of this product properly at the end of its useful life Your local waste disposal company may provide information about proper disposal The lamp in this product contains mercury Please dispose of properly in accordance with environmental laws of your location Customer Support For technical sup...

Page 3: ...avaca SA de CV Francisco Leyva 178 Col Miguel Hidalgo C P 62040 Cuernavaca Morelos Tel 01 777 3180579 01 777 3124014 E Mail aquevedo compusupportcva com Distrito Federal QPLUS S A de C V Av Coyoacán 931 Col Del Valle 03100 México D F Tel 01 52 55 50 00 27 35 E Mail gacosta qplus com mx Guadalajara Jal SERVICRECE S A de C V Av Niños Héroes 2281 Col Arcos Sur Sector Juárez 44170 Guadalajara Jalisco ...

Page 4: ...s product meets the ENERGY STAR guidelines for energy efficiency Disclaimer ViewSonic Corporation shall not be liable for technical or editorial errors or omissions contained herein nor for incidental or consequential damages resulting from furnishing this material or the performance or use of this product In the interest of continuing product improvement ViewSonic Corporation reserves the right t...

Page 5: ...evision reception which can be determined by turning the equipment off and on the user is encouraged to try to correct the interference by one or more of the following measures Reorient or relocate the receiving antenna Increase the separation between the equipment and receiver Connect the equipment into an outlet on a circuit different from that to which the receiver is connected Consult the deal...

Page 6: ...n components of products as stated above are exempted under the Annex of the RoHS Directives as noted below Examples of exempted components are 1 Mercury in compact fluorescent lamps not exceeding 5 mg per lamp and in other lamps not specifically mentioned in the Annex of RoHS Directive 2 Lead in glass of cathode ray tubes electronic components fluorescent tubes and electronic ceramic parts e g pi...

Page 7: ...l chart Changing your computer s video resolution Using the DVD player Playing a DVD Playing an audio CD Using DVD repeat play Using CD repeat play Using a DVD title menu Using a DVD menu Searching for a DVD title or chapter Searching for a specified time on a DVD Searching for a specified time on a CD track Changing the DVD audio language Turning DVD subtitle on and off Selecting the subtitle lan...

Page 8: ... Use only with a cart stand tripod bracket or table recommended by the manufacturer or sold with your TV If you mount your TV to the wall follow the manufacturer s instructions and use a mounting accessory recommended by the manufacturer Your TV and cart combination should be moved with care Quick stops excessive force and uneven surfaces may cause your TV and cart combination to overturn Warning ...

Page 9: ...check After completing any service or repair to this TV ask the service technician to perform routine safety checks to determine that your TV is in correct operating condition Power source Operate your TV only from the type of power source indicated on the marking label If you are not sure of the type of power supplied to your home consult your TV dealer or local power company Screen protection Yo...

Page 10: ... Press to select the video signal inputs You can select TV AV S Video Component DVD HDMI or PC 12 Volume buttons button Press to adjust the volume 13 CH buttons Press to change the channel 14 POWER button Press to turn your TV combo on or off or press to leave standby mode Description 1 AC input 2 HDMI INPUT 3 INPUT Y Cr Pr Cb Pb AUDIO L and AUDIO R 4 AUDIO OUTPUT 5 VGA PC INPUT 6 S VIDEO VIDEO an...

Page 11: ...r track 16 STOP Press to stop DVD or CD playback 17 DVD TITLE Press to open the DVD title menu 18 DVD MENU Press to open the DVD menu 19 REPEAT Press to repeat a section of a DVD or CD 20 AUDIO Press to change the DVD audio language 21 Open Press to eject the disc from the disc slot 22 INPUT Press to open the source input menu 23 ZOOM Press to change the zoom mode 24 CH Press to change the channel...

Page 12: ...an the battery compartment with a cloth If chemicals touch your skin wash immediately If the remote control is not going to be used for an extended period of time remove the batteries Caution Do not expose the remote control to liquids direct sunlight or shock Do not mix batteries of different types Notes Objects between the remote control and the remote control sensor may block the remote control...

Page 13: ...2 into the progressive scan or HDTV video device 3 and into the Y Pb Pr jacks on the back of your TV 1 2 Plug the RCA audio cables 4 into the audio out jacks on progressive scan or HDTV video device and into the lower AUDIO L and AUDIO R jacks on the back of your TV 1 3 Turn on your TV ViewSonic N2201w Contact ViewSonic service team at http www ViewSonic com or call our service team United States ...

Page 14: ...ack of your TV 1 2 Turn on your TV 3 Press INPUT then press to select HDMI Caution The TV will automatically turn off after one minute if there is no signal in PC mode Note When the computer goes into standby mode your TV turns off If your TV does not turn on when you wake your computer press the POWER button on your TV or remote control ViewSonic N2201w Contact ViewSonic service team at http www ...

Page 15: ... enter a channel number directly Press the number buttons on the remote control In digital TV mode a main major channel can have one or more sub minor channels Press the number buttons to enter the main channel press the button to the left of the 0 button then press the number button for the sub channel For example if you want to watch channel 5 2 press 5 press the button then press 2 To go to the...

Page 16: ...want to hide then press ENTER The checkmark next to the channel disappears and the screen turns black 6 Press ENTER again to show the channel The checkmark appears and the screen shows the channel Viewing channel information To view channel information 1 In digital TV mode select a channel you want to watch 2 Press DISPLAY once to display information about the channel 3 Press DISPLAY again to disp...

Page 17: ...e settings To adjust picture settings 1 Press TV MENU on the remote control then press to highlight the PICTURE icon The PICTURE menu opens 2 Press to enter the PICTURE menu 3 Press to select one of the following settings then press to change the setting You can select Picture Mode Standard Dynamic Soft or Personal Contrast Brightness Sharpness Tint Color Color Mode Normal Warm or Cool Advanced Wh...

Page 18: ...re times to close the menu Using the Electronic Program Guide Your TV has an Electronic Program Guide EPG that supplies information such as program lists and start and end times for programs In addition detailed information about the program is often available in the EPG The availability and the amount of program details will vary depending on the broadcaster To use the EPG 1 In digital TV mode se...

Page 19: ...ect Channel Label then press to enter the Channel Label sub menu 4 Press to move the cursor then press one or more times to select each character of the new name for the channel 5 Press TV MENU one or more times to close the menu Adjusting time settings To adjust time settings 1 Press TV MENU on the remote control then press to highlight the TIME icon The TIME menu opens 2 Press to enter the TIME ...

Page 20: ...tion mode To set the closed caption mode 1 Press TV MENU on the remote control then press to highlight the OPTION icon The OPTION menu opens 2 Press to enter the OPTION menu 3 Press to highlight Closed Caption then press to enter the Closed Caption sub menu The Closed Caption sub menu opens 4 Press to select one of the following settings then press to change the setting You can select CC Mode CC O...

Page 21: ... Size Default Normal Large or Small Font Edge Style Default None Raised Depressed Uniform Left Shadow or Right Shadow Font Edge Color Default Black White Red Green Blue Yellow Magenta or Cyan FG Color Default White Black Red Green Blue Yellow Magenta or Cyan BG Color Default Black White Red Green Blue Yellow Magenta or Cyan FG Opacity Default Solid Flashing Translucent or Transparent BG Opacity De...

Page 22: ...Changing the password To change the password 1 Press TV MENU on the remote control then press to highlight the LOCK icon The Enter Password screen opens 2 Press to enter the Enter Password screen 3 Enter the password with the number buttons on the remote control the default password is 0000 The LOCK menu opens 4 Press to highlight Change Password then press to open the Change Password sub menu 5 P...

Page 23: ...ock Unblock the input source 6 Press TV MENU one or more times to close the menu Setting the parental control level US TV ratings To set US TV parental control levels 1 Press TV MENU on the remote control then press to highlight the LOCK icon The Enter Password screen opens 2 Press to enter the Enter Password screen 3 Enter the password with the number buttons on the remote control the default pas...

Page 24: ...screen opens 2 Press to enter the Enter Password screen 3 Enter the password with the number buttons on the remote control the default password is 0000 The LOCK menu opens 4 Press to highlight US then press to open the US ratings sub menu The US ratings sub menu opens Rating Description TV Y All children TV Y7 Children over seven years of age TV G General audiences TV PG Parental guidance suggeste...

Page 25: ... 4 Press to highlight Canada then press to open the Canada ratings sub menu The Canada ratings sub menu opens 5 Press to select Canada Eng English or Canada Fre French then press to open the Canada ratings sub menu The Canada ratings sub menu opens Rating Description G General audiences PG Parental guidance suggested Some material may not be suitable for children PG 13 Parental guidance strongly s...

Page 26: ...T rating levels 1 Press TV MENU on the remote control then press to highlight the LOCK icon The Enter Password screen opens 2 Press to enter the Enter Password screen 3 Enter the password with the number buttons on the remote control the default password is 0000 The LOCK menu opens 4 Press to highlight RRT Setting then press to open the RRT ratings sub menu The RRT ratings sub menu opens Rating De...

Page 27: ...ution setting to a supported resolution the ideal resolution for your TV is 1680 1050 4 Click OK then click Yes to save your changes Using the DVD player Playing a DVD To play a DVD 1 Press POWER to turn on your TV 2 Press INPUT press to select DVD then press ENTER You can also press DVD on the remote control to select the DVD mode The DVD startup screen appears on the screen 3 Insert a DVD into t...

Page 28: ... repeat play To use repeat play 1 While the CD is playing press REPEAT to select what you want to repeat You can select ALL repeats the current CD TRACK repeats the current track 2 To stop repeat playback do one of the following Press REPEAT until ALL disappears from the screen Press STOP twice Eject the CD Using a DVD title menu If a DVD has two or more titles and the DVD has a title menu you can...

Page 29: ...1 Press AUDIO The on screen display OSD shows the current audio language 2 If multiple audio languages are available press AUDIO to cycle through the available languages Turning DVD subtitle on and off To turn subtitles on and off 1 While your TV is in DVD mode press SETUP The General Setup icon is highlighted 2 Press ENTER The General Setup Page opens 3 Press to highlight CAPTIONS then press ENTE...

Page 30: ...omatically cut off the sides NORMAL LB Widescreen images are shown on the screen with black bars on the top and bottom of the screen WIDE Widescreen images fill the entire screen 5 Press one or more times to go back to the previous menu 6 To close the menu press to highlight the Exit icon then press ENTER Note Changing the subtitle language using this method only affects the DVD currently being pl...

Page 31: ...to highlight the Exit icon then press ENTER Using DVD last memory Your TV can remember where a DVD stopped playing when your TV is turned off When your DVD combo is turned on and you start DVD playback playback resumes at the point where it stopped To use last memory 1 While your TV is in DVD mode press SETUP The General Setup icon is highlighted GENERAL SETUP PAGE LAST MEMORY TV DISPLAY TV OUTPUT...

Page 32: ... mode press SETUP The Setup Menu opens 2 Press to select the Audio icon then press ENTER The Audio Setup Page opens 2 Press ENTER The General Setup Page opens 3 Press to highlight LAST MEMORY then press ENTER 4 Press to highlight ON or OFF then press ENTER 5 Press one or more times to go back to the previous menu 6 To close the menu press to highlight the Exit icon then press ENTER Setting up DVD ...

Page 33: ... D R C then press ENTER 5 Press to highlight STEREO LEFT MONO RIGHT MONO or MIXED MONO then press ENTER DUAL MONO This is the output mode for the left and right signals of the selected audio output If it is set to MIXED MONO the function only works when the DVD uses 5 1 channel sound D R C Select to adjust the linear compression rate to obtain different compression results for the signals 6 Press ...

Page 34: ... press ENTER Setting a DVD parental password To set or change a password 1 While your TV is in DVD mode press SETUP The Setup Menu opens 2 Press to select the Audio icon then press ENTER The Audio Setup Page opens 3 Press to highlight 3D PROCESSING then press ENTER The 3D Processing Page opens 4 Press to select one of the following options then press ENTER V SURR Turns virtual surround sound on an...

Page 35: ...for the item you have chosen then press ENTER 5 Press one or more times to go back to the previous menu 6 To close the menu press to highlight the Exit icon then press ENTER 2 Press to select the Password Setup icon then press ENTER The Password Setup Page opens 3 Press to select one of the following options then press ENTER PW MODE Select ON to turn on the password feature PARENTAL is dim and can...

Page 36: ...ates 1 800 688 6688 Canada 1 866 463 4775 Maintaining your TV Cleaning the cabinet Wipe the front panel and other exterior surfaces of your TV with a soft cloth lightly dampened with lukewarm water Never use a solvent or alcohol to clean your TV Do not spray insecticide near your TV Such chemicals may cause damage and discoloration to the exposed surfaces Care and handling of discs Handling discs ...

Page 37: ... 60 Hz 720 x 400 70 Hz Speaker Output 3W x 2 THD 10 Audio Output 1 Headphone jack Video Output 1 DVD video output 1 COAXIAL 1 stereo RCA jack Power Voltage 100 240V AC 50 60 Hz auto switch Display area Full Scan 473 76mm H x 296 1mm V 18 6 H x 11 7 V Operating conditions Temperature Humanity Altitude 32 F to 104 F 0 C to 40 C 20 to 65 no condensation To 10 000 feet 3 000m Storage conditions Temper...

Page 38: ...e wall To attach the wall mount bracket to LCD TV safely please use the following guidelines Disconnect the power and any other cables that might hinder moving the LCD TV Set the LCD TV on a table or work surface placing the screen face down on a towel or woolen blanket to protect the screen surface from damage while installing plate Through the matching screw holes in the bracket there are 4 scre...

Page 39: ...hat longer than the standard dimension as they may cause damage to the inside of the TV set Caution Please use the following ViewSonic TVs only with the following wall mount kit ViewSonic TV Model No N2201w ViewSonic Wall Mount kit model WMK 10 Use with other Wall Mount kit may cause instability and possibly result in injury To find the perfect mount for N2201w please browse www viewsonic com or c...

Page 40: ...ty contact ViewSonic Customer Support You will need to provide your product s serial number 2 To obtain warranted service you will be required to provide a the original dated sales slip b your name c your address d a description of the problem and e the serial number of the product 3 Take or ship the product freight prepaid in the original container to an authorized ViewSonic service center or Vie...

Page 41: ...ranty contact ViewSonic Customer Support Please refer to the attached Customer Support page You will need to provide your product s serial number so please record the product information in the space provided below on your purchase for your future use Please retain your receipt of proof of purchase to support your warranty claim For Your Records Product Name Document Number Purchase Date Model Num...

Page 42: ...ViewSonic ...

Reviews: