background image

Wireless Headphone

8

INTRODUCTION


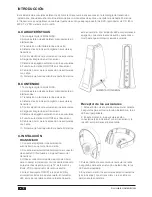
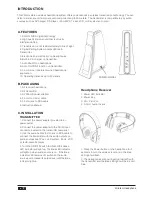
A. FEATURES

  1. 2.4GHz FHSS Digital technology.
  2. High quality stereo sound that is virtually   
  interference-free.
  3. Transmission is not restricted solely to line of sight
  4. Digital Pairing System on Headphone &    
  Transmitter.
  5. Electronic Volume Control on Headphones.
  6. Built-in Pin-charger on transmitter. 
  7. Auto Shut-off on headphone.
  8. Auto On/Off RF function on transmitter.
  9. 3.5mm Line in feature for wired headphone  
  application. 
  10. Operating distance up to 50 meters.

B. PACKAGING

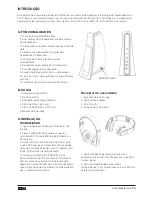
  1. RF receiver headphone
  2. RF transmitter
  3. 6V 300mA power adapter
  4. 3.5mm to 3.5mm cable 
  5. 3.5mm jack to RCA cable
  6. Instruction Manual

C. INSTALLATION

  TRANSMITTER

  1. Connect the power adapter provided to an  
  power outlet.
  2. Connect the power adapter to the DC IN input  
  connector located on the transmitter rear panel.
  3. Use the audio cable 3.5mm jack to RCA cable to  
  connect the transmitter with the audio outputs on  
  audio sources like TV set, Hi-Fi system, iPods, VCR  
  or radio-cassette player.      
  4. Turn the ON/OFF switch to ON and the Green  
  LED indicator will light up. The Blue LED indicator  
  will light up when audio source is on.  If the Blue  
  indicator LED remains off, switch on the audio  
  source and increase its output level until the Blue  
  indicator light up.

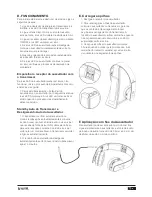
POWER/SIGNAL

  Headphone Receiver

  1. Power LED Indicator
  2. Power Key
  3. Vol+, Pair, Vol-
  4. 3.5mm Audio In Jack

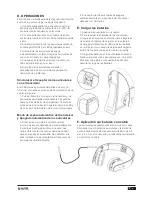
This 2.4GHz stereo wireless headphone system offers you advances in wireless transmission technology. You can 
listen to stereo sound from your audio components up to 50 meters.  The transmitter is compatible to any audio 
sources such as DVD player, CD player, i-Pod, MP3, TV set, VCR, Hi-Fi system and radio.

  1. Press the Power button on the headphone for 3  
  seconds to turn the wireless function on ,the Blue  
  LED light will flash.
  2. The headphones are now linked up (paired*) with  
  the transmitter and the Blue LED light will be in solid  
  blue.

Summary of Contents for VHP-WT400BK

Page 1: ...e read the user manual first before using the product keep well for future referring Por favor leia o manual de utilizador antes de utilizar o produto e mantenha o para futura referência VHP WT400BK Manual de usuario Auriculares inalámbricos User Manual Wireless Headphone Manual de utilizador Auscultadores sem fios ...

Page 2: ......

Page 3: ...empo de vida depende de la frecuencia de uso 11 Fallos menores o variaciones en la calidad del producto que no afecten a su valor o el propósito para el cual fue creado 12 Negligencia 13 Accesorios Estuches y piezas de los enchufes Cables de conexión Diademas Kits de los extremos de los auriculares almohadillas para las orejas Acabados decorativos 14 Cualquier incidencia detectada al recibir la me...

Page 4: ...r de entrada CC IN situado en el panel trasero del transmisor 3 Utilice el conector del cable de audio de 3 5mm para conectar el transmisor con las salidas de audio en las fuentes de audio como la TV sistema Hi Fi iPods VCR o reproductor de radio cassette 4 Gire el interruptor ON OFF a la posición ON y el indicador LED verde se encenderá El indicador LED azul se encenderá cuando la fuente de audio...

Page 5: ...color azul se iluminarán de forma ininterrumpida Modo de espera automático del transmisor y Apagado automático de los auriculares 1 El transmisor cambiará automáticamente al modo de espera después de aproximadamente 4 minutos sin señal de audio o si la señal que recibe de la fuente de audio es demasiado débil para una recepción adecuada No obstante si la señal alcanza un nivel aceptable el transmi...

Page 6: ...men es correcto Es posible que los auriculares estén demasiado lejos del transmisor Acérquelos El nivel de entrada de la señal de audio es demasiado bajo Suba el volumen de la fuente de audio del Hi Fi CD o TV etc ADVERTENCIAS Batería No utilice otro tipo de baterías o baterías no recargables para reemplazar las baterías recargables Si los auriculares no están en uso desconecte los auriculares par...

Page 7: ......

Page 8: ...3 5mm jack to RCA cable to connect the transmitter with the audio outputs on audio sources like TV set Hi Fi system iPods VCR or radio cassette player 4 Turn the ON OFF switch to ON and the Green LED indicator will light up The Blue LED indicator will light up when audio source is on If the Blue indicator LED remains off switch on the audio source and increase its output level until the Blue indic...

Page 9: ...iring process is finished Transmitter Auto Stand by and Headphone Auto Shut off 1 The transmitter will automatically turn to stand by mode after approximately 4 minutes if there is no audio signal or the signal that it receives from the audio source is too weak for proper reception If however the signal returns to an acceptable level the transmitter will automatically switch back on 2 The headphon...

Page 10: ... far away from the transmitter Move closer to it The audio signal input level is too low Increase the volume from the audio source of Hi Fi CD or TV etc WARNINGS Battery Never use another type of battery or non rechargeable batteries to replace the rechargeable batteries When the headphones are not in use switch OFF the headphones to avoid damaging the batteries The batteries must be fully charged...

Page 11: ...ltantes de uso e desgaste 10 Baterias recarregáveis e ou descartáveis o tempo de vida depende da frequência de uso 11 Falhas menores ou diferenças na qualidade do produto que não afetem o seu valor ou o propósito da sua utilização 12 Negligencia 13 Acessórios Kits e peças das tomadas Cabos de ligação Auscultadores Kits dos extremos dos auscultadores e almofadas de auscultadores Acabamentos decorat...

Page 12: ... 3 Utilize a ficha do cabo de áudio de 3 5mm para o cabo RCA ligar se ao transmissor com as saídas de áudio em fontes de áudio como TV sistema Hi Fi iPods VCR ou leitor de rádio cassete 4 Carregue no botão ON de ON OFF e a luz Verde indicadora de LED vai acender O indicador LED Azul acende quando a fonte de áudio está ligada Se o indicador LED Azul continuar desligado ligue a fonte de áudio e aume...

Page 13: ...cluído Standby Auto do Transmissor e Desligamento Auto do Auscultador 1 O transmissor vai ficar automaticamente no modo standby após aproximadamente 4 minutos se não houver nenhum sinal de áudio ou se o sinal que recebe da fonte de áudio for demasiado fraco para uma recepção correcta Contudo se o sinal voltar a ter um nível aceitável o transmissor vai voltar a ligar se automaticamente 2 O receptor...

Page 14: ...xime o do transmissor O nível de entrada de entrada de áudio é muito baixo Aumente o volume da fonte de áudio do Hi Fi CD ou TV etc AVISOS Bateria Nunca utilize outro tipo de bateria ou pilhas não recarregáveis para substituir as pilhas recarregáveis Quando os auscultadores não estão a ser utilizados desligue os auscultadores para evitar o dano das pilhas As pilhas devem estar completamente recarr...

Page 15: ...www vieta es ...

Page 16: ...Bitte lesen Sie die Bedienungsanleitung vor der Benutzung des Produkts durch und heben Sie sie sorgfältig für später auf VHP WT400BK Bedienungsanleitung Kabelloser Kopfhörer ...

Page 17: ...äufigkeit der Benutzung ab 11 Kleinere Fehler oder Veränderungen der Qualität des Produktes die den Wert bzw den Zwecke für den es geschaffen wurde nicht beeinflussen 12 Fahrlässigkeit 13 Zubehörteile Etuis und Teile der Stecker Verbindungskabel Diademe Kits für die Kopfhörerstecker Bezüge für die Ohrstecker Dekorationen 14 Jeder Schaden der bei Erhalt der Ware entdeckt wird muss dem Kundendienst ...

Page 18: ...age iPods Video Recorder oder Radio Kassetten Player anzuschließen 4 Den EIN AUS Knopf auf ON stellen und die grüne LED Lampe leuchtet auf Die blaue LED Anzeige leuchtet auf wenn die Audioquelle eingeschaltet ist Wenn die blaue LED Anzeige ausgeschaltet bleibt die Audioquelle einschalten und die Lautstärke erhöhen bis die blaue LED Anzeige aufleuchtet EIN AUS SIGNAL Kopfhörer Empfänger 1 LED Anzei...

Page 19: ...auerleuchten über wenn der Abgleichprozess beendet ist Automatische Bereitschaft Auto Stand by des Senders und Automatische Abschaltung Auto Shut off des Kopfhörers 1 Der Sender geht automatisch in den Bereitschafts Modus über wenn ca 4 Minuten lang kein Audiosignal anliegt oder wenn das von der Audioquelle kommende Signal für den richtigen Empfang zu schwach ist Wenn das Signal jedoch auf ein akz...

Page 20: ...s ist zu schwach WARNUNG Batterie Benutzen Sie niemals Akkus eines anderen Typs oder nicht wieder aufladbare Akkus um die wieder aufladbaren Akkus zu ersetzen Wenn die Kopfhörer nicht benutzt werden stellen Sie diese auf OFF um eine Schädigung der Akkus zu vermeiden Die Akkus müssen vollständig aufgeladen sein wenn Sie diese das erste Mal benutzen Eine anfängliche Ladezeit von 5 Stunden ist erford...

Page 21: ...www vieta es ...

Reviews: