


15
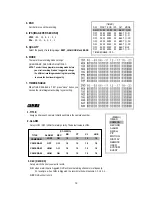
5. AREA
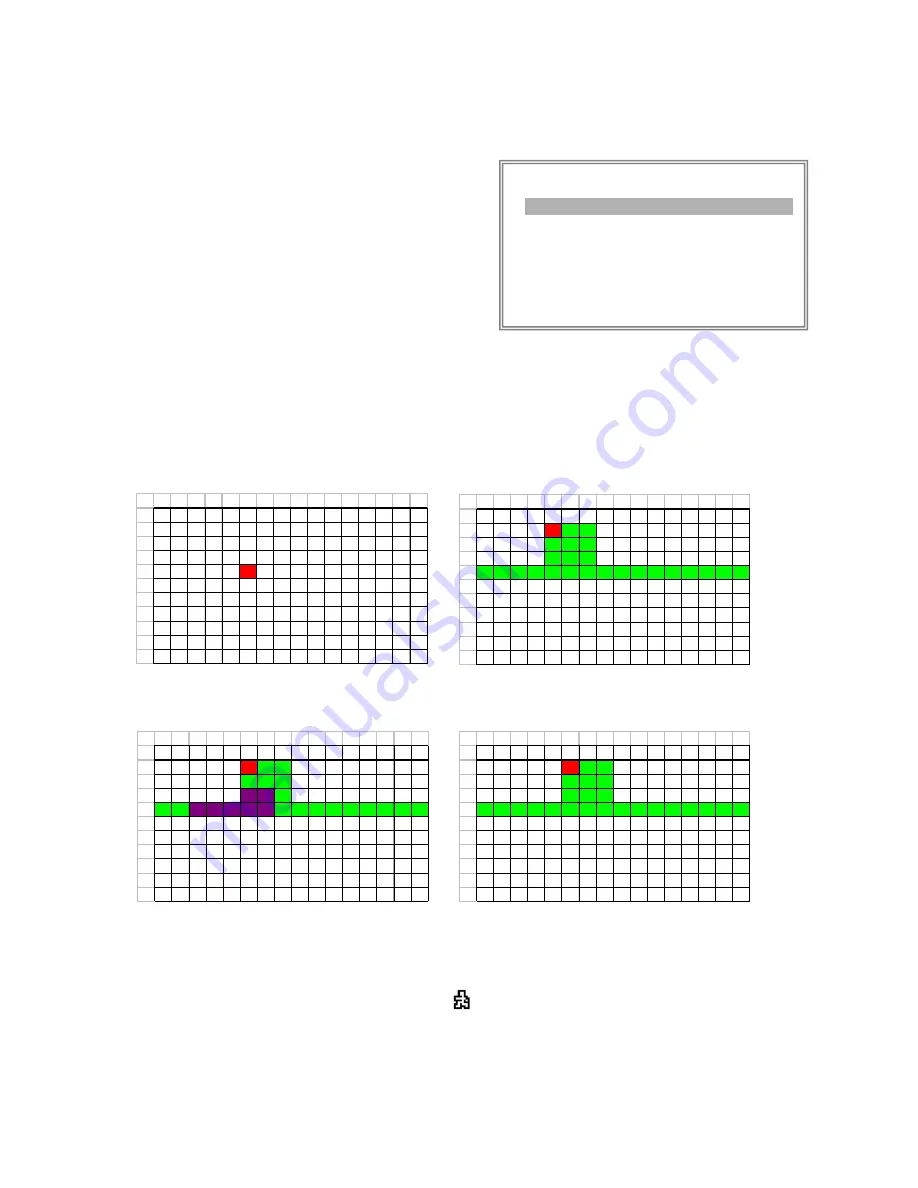
Press the ENTER button on this option to set the Pixel-based
Motion Detection Area for each channel. Red targets represent
where the target is (Figure 1-1). Green targets represent the
Motion Detection Area(Figure 1-2), and Purple targets represent
motion currently taking place (Figure 1-3). After stop detecting,
the color of target will be green (Figure 1- 4).
To modify the Motion Detection Area, use the following controls:
ZOOM: turn the selected target ON/OFF.
▲▼◄►
: navigates between targets
- : turns all targets on the screen
ON/OFF
+ : turn all targets in the selected row ON/OFF
Note: When the “DET” (DETECTION) setting is “ON”, you must set the motion detection AREA or it won’t be
triggered.
(MOTION)
SEN MD-N
U
M RE DET
CAM1 70 03 64 ON AREA
CAM2 70 03 64 OFF AREA
CAM3 70 03 64 ON AREA
CAM4 70 03 64 ON AREA
MOTION RECORD : ON
DAY START END
DAILY 00 : 00 00 : 00
Figure 1-2
MOTION DETECTION SETTING — ROW SETUP
Figure 1-1
MOTION DETECTION SETUP
1
2
3
4
5
6
7
8
9
10
11
12
13
14
15
16
1
2
3
4
5
6
7
8
9
11
12
1
2
3
4
5
6
7
8
9
10
11
12
13
14
15
16
1
2
3
4
5
6
7
8
9
11
12
Figure 1-3
MOTION DETECTION TRIGGERED-TURN INTO PURPLE
Figure 1-4
BACK TO MOTION DETECTION SETTING
1
2
3
4
5
6
7
8
9
10
11
12
13
14
15
16
1
2
3
4
5
6
7
8
9
11
12
1
2
3
4
5
6
7
8
9
10
11
12
13
14
15
16
1
2
3
4
5
6
7
8
9
11
12
6. MOTION RECORD
When the DET setting is “ON”, you can set up the MOTION RECORD function,
1. Select “ON” to set up the motion trigger recording: It can automatically switch to Record Mode. The motion
detection will change the scanning sequence and show
on the monitor.


