background image

8

9

Before Cleaning 

1.

  Turn off and unplug humidifier. Never clean the humidifier when it is running.

2.

  Remove Wicking Filter and any other accessories from humidifier.

3.

  Empty water from Water Tank.

Instructions for Scale Removal

Follow steps 1-3 under Before Cleaning, then follow the additional steps below. Filter must be 
removed from humidifier before scale removal; do not clean filter with vinegar.
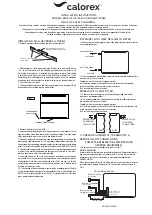
1.

  Pour 2 cups of undiluted distilled white vinegar in Water Tank. Replace Tank Cap and secure 

tightly by turning clockwise (to right). Swish vinegar around in Tank to wet entire inside of Tank.

2.

  Place Tank on Base. Vinegar solution will drain into Water Reservoir and loosen mineral buildup 

(scale) in Base, Reservoir and bottom of Water Tank. Soak for 20 minutes.

3.

  After soaking, empty vinegar from Water Tank. With vinegar in the base, clean all interior 

surfaces with a soft cloth or brush to help remove scale.

4.

  Rinse Water Tank, Base and Reservoir with water until the smell of vinegar is gone.

NOTE:

  Consider using a Protec Cleaning Cartridge (PC-1, PC-2 and PC-1C) to keep your humidifier 

cleaner longer. Protec Cleaning Cartridge continuously cleans and protects against bacteria 
and mold. It also helps prevent the buildup of slime in the water and on humidifier surfaces. 
The Protec Cartridge will keep your humidifier cleaner longer between cleanings. However, 
your humidifier still needs to be cleaned regularly. 

 Step 1

V

2C

 Step 1

 Step 1

 Step 2

MINUTES

 Step 2

MINUTES

 Step 2

 Step 3

 Step 3

 Step 4

 Step 3

Follow steps 1-3 under Before Cleaning, then follow the additional steps below. Filter must be  
removed from humidifier before disinfecting; do not clean filter with bleach solution.

1.

   Mix ½ gallon (1.9L) of water with ½ teaspoon of bleach. Pour bleach solution into Water Tank. 

Replace Tank Cap and secure tightly by turning clockwise (to right). Swish bleach solution 
around in Tank to wet entire inside of Tank.

 NOTE:

  Using more than ½ teaspoon of bleach to ½ gallon of water may result in  

damage to humidifier. 

2.

   Place Tank on Base. Bleach solution will drain into Reservoir. Soak for 15-20 minutes.

3.

   Empty bleach solution from Tank and Base. Rinse with water until the smell of  

bleach is gone.

End of Season Care and Storage 

Follow cleaning instructions above when the humidifier will not be used for at least one week, or it is 
the end of the season. Remove any accessories, including the Wicking Filter, and allow the humidifier 
to dry completely before storing.

DO NOT

 store humidifier with water inside the Base, Water Reservoir or Water Tank.

At end of season, remove and throw away filter. Do not store humidifier with a used filter.

Consumer Relations

For questions, technical support or to order replacement parts contact Consumer Relations.  
Be sure to specify model number VEV320.

Kaz USA, Inc.  

Consumer Relations Department 
250 Turnpike Road  
Southborough, MA 01772 
1-800-VAPOR-1-2 

[email protected] 
www.vickshumidifiers.com

Instructions for Disinfecting

To keep your humidifier running efficiently, clean it regularly. Weekly cleaning is recommended.
All maintenance should be done in the kitchen or bathroom on a water resistant surface  
near a faucet. 

Do not

 wash any components of this humidifier in a dishwasher.

To properly clean your humidifier we recommend the separate processes of Scale 
Removal and Disinfecting. These two processes must be done separately.

Caring For Your Humidifier

Summary of Contents for VEV320 Series

Page 1: ...d Cool Moisture Humidifier call our toll free Consumer Relations line at 1 800 VAPOR 1 2 or e mail us at Consumerrelations kaz com FilteredCoolMoisture Humidifier IMPORTANT READ AND SAVE THESE INSTRUCTIONS Replacement filter Protec PWF2 PWF2 CAN Filters impurities from the water Self regulating evaporative system adjusts output for maximum comfort Multiple output settings Quiet operation ...

Page 2: ... use 14 Do not attempt to repair or adjust any electrical or mechanical functions on this humidifier Doing so will void your warranty 15 For residential use only Invisible moisture This Vicks Filtered Cool Moisture Humidifier is an evaporative humidifier Evaporative humidification means you will NOT see the moisture output With evaporative humidification a fan pulls dry air from the room through t...

Page 3: ...ank Step 2 Step 2 Step 3 Step 3 Step 1 Step 1 A Wicking Filter is required for this unit to operate The Wicking Filter will capture minerals from your water and will prevent white dust If you have hard water you will need to replace your filter more frequently See Filter Care section for tips on prolonging the life of your Wicking Filter 1 Remove the Water Tank and carry to sink or tub Turn Tank u...

Page 4: ...to the air Low will provide less moisture output The fan will run quieter and the Water Tank will not have to be filled as frequently since less moisture is going into the air 3 When the Tank is empty turn off the humidifier and refill it NOTE if the humidifier will not be used for more than a few days empty the water from the Water Tank and Reservoir and dry out the filter to prevent growth of ba...

Page 5: ...st be removed from humidifier before disinfecting do not clean filter with bleach solution 1 Mix gallon 1 9L of water with teaspoon of bleach Pour bleach solution into Water Tank Replace Tank Cap and secure tightly by turning clockwise to right Swish bleach solution around in Tank to wet entire inside of Tank NOTE Using more than teaspoon of bleach to gallon of water may result in damage to humidi...

Page 6: ...nd line up threads properly turn clockwise to right to tighten Possible damage to Tank Check Tank for cracks or damage Tank and Base are slimy Need to clean See Caring for Your Humidifier Fan is running but water level is not going down Filter is clogged with mineral deposits See instructions for Filter Care Relative humidity level in room is too high If running humidifier in closed room open door...

Page 7: ...sumerrelations kaz com or write to Kaz Consumer Relations Department 250 Turnpike Rd Southborough MA 01772 explaining just how the product is operating Specify model number Our Consumer Service Representative will advise you how to correct the problem yourself or will ask you to return the product for repair or replacement You must prepay shipping charges We suggest having tracking or delivery con...

Page 8: ...d éviter que l appareil renverse 3 Avant d utiliser l humidificateur dérouler le cordon d alimentation et l examiner pour déceler tout signe de dégradation Ne pas se servir de l appareil si le cordon est abîmé 4 Par mesure de sécurité l humidificateur est muni d une fiche polarisée une branche est plus large que l autre Cette fiche ne s enfonce dans les prises polarisées que dans un sens Si la fic...

Page 9: ...r un choc électrique ne pas brancher l humidificateur avec les mains mouillées Étape 1 Étape 2 Étape 3 Étape 2 Étape 1 Étape 5 Étape 4 Étape 3 Les accessoires suivants conviennent parfaitement à votre humidificateur Accessoires de série VEV320 Vicks VapoPads Procure des vapeurs apaisantes de menthol VSP 19 VSP19FP VSP 19 CAN VSP19VPC ou de lavande romarin VBR 5 uniquement aux États Unis Un échanti...

Page 10: ...d eucalyptus huile de romarin camphre lavande 40 42 et autres 2 Tourner le bouton de mise en marche au réglage Haut ou Bas Le réglage Haut procurera plus rapidement un débit d humidité Le ventilateur poussera plus d humidité par le filtre mèche dans l air Le niveau d eau baissera plus rapidement qu au réglage Bas puisqu une plus grande quantité d humidité est pulsée dans l air Le réglage Bas procu...

Page 11: ...eur 3 Vider l eau du réservoir Instructions de détartrage Suivre les étapes 1 à 3 sous Avant l entretien puis suivre les étapes additionnelles ci dessous Retirer le filtre de l humidificateur avant le détartrage ne pas nettoyer le filtre avec du vinaigre 1 Verser 2 tasses de vinaigre blanc distillé non dilué dans le réservoir d eau Replacer le bouchon du réservoir et fermer hermétiquement en le to...

Page 12: ...s aiguilles d une montre vers la droite pour le serrer Dommages possibles à la réservoir Examiner le réservoir pour voir s il n est pas fêlé ou abîmé Le réservoir et la base sont visqueux Nettoyage nécessaire Voir la section Entretien de l humidificateur Le ventilateur fonctionne mais le niveau d eau ne baisse pas Le filtre est bouché par des dépôts de minéraux Voir la section Entretien du filtre ...

Page 13: ...rie VEV320 est garanti contre défaut de matériaux ou de main d œuvre pendant une période de trois 3 ans à partir de la date d achat Toute pièce défectueuse sera à la discrétion de Kaz USA Inc réparée ou remplacée sans frais si l appareil n a pas été touché et a été utilisé conformément aux instructions écrites Le reçu du détaillant est nécessaire pour prouver la garantie Cette garantie vous confèr...

Page 14: ...una posición estable y el cable esté alejado de superficies calientes y fuera del paso para evitar que el humidificador sea derribado 3 Antes de usar el humidificador extienda el cable e inspeccione para detectar alguna señal de daño No use la unidad si el cable ha sido dañado 4 El humidificador tiene un enchufe polarizado una clavija es más ancha que la otra como medida de seguridad Este enchufe ...

Page 15: ...r en un tomacorriente polarizado de 120V Paso 1 Paso 2 Paso 3 Paso 2 Paso 1 Paso 5 Paso 4 Paso 3 Los siguientes accesorios funcionan de maravilla con su humidificador Accesorios de las Series VEV320 VapoPads de Vicks Proporciona relajantes vapores de mentol VSP 19 VSP19FP VSP 19 CAN VSP19VPC o lavanda romero sólo en EUA VBR 5 Una Almohadilla Aromática de Mentol Incluida Requerido Filtro Protec de ...

Page 16: ...cador en un tomacorriente con las manos mojadas 2 Gire la Perilla de Encendido al ajuste alto o bajo El ajuste alto le proporcionará salida de humedad más rápida El ventilador expulsará más humedad del Filtro de Mecha y hacia el aire El nivel de agua disminuirá con mayor rapidez que en el ajuste bajo ya que más humedad será liberada en el aire El ajuste bajo le proporcionará una salida de humedad ...

Page 17: ...idificador 3 Vacíe el agua del Tanque del Agua Instrucciones para la Eliminación del Sarro Siga los pasos 1 3 bajo Antes de la Limpieza luego siga los siguientes pasos adicionales El Filtro debe retirarse del humidificador antes de la eliminación del sarro no limpie el filtro con vinagre 1 Vierta 2 tazas de vinagre blanco sin diluir en el Tanque de Agua Vuelva a colocar la Tapa del Tanque y cierre...

Page 18: ... manecillas del reloj hacia la derecha para apretar Posible daño en el Tanque Revise el Tanque en busca de grietas o daños El Tanque y la Base están viscosos Necesita limpieza Consulte Cuidado Para Su Humidificador El Ventilador está funcionando pero el nivel de agua no está disminuyendo El Filtro está obstruido con depósitos minerales Consulte las instrucciones en Cuidado Para Su Filtro El nivel ...

Page 19: ...o de venta para probar la garantía Esta garantía le otorga derechos legales específicos así como otros derechos que varían de estado a estado SI experimenta una operación insatisfactoria consulte primero la sección de Solución de Problemas Si eso no ayuda llame al 1 800 VAPOR 1 2 o envíe un correo electrónico a consumerrelations kaz com o escriba a Kaz Consumer Relations Department 250 Turnpike Rd...

Reviews: