background image

English

   - 85 -

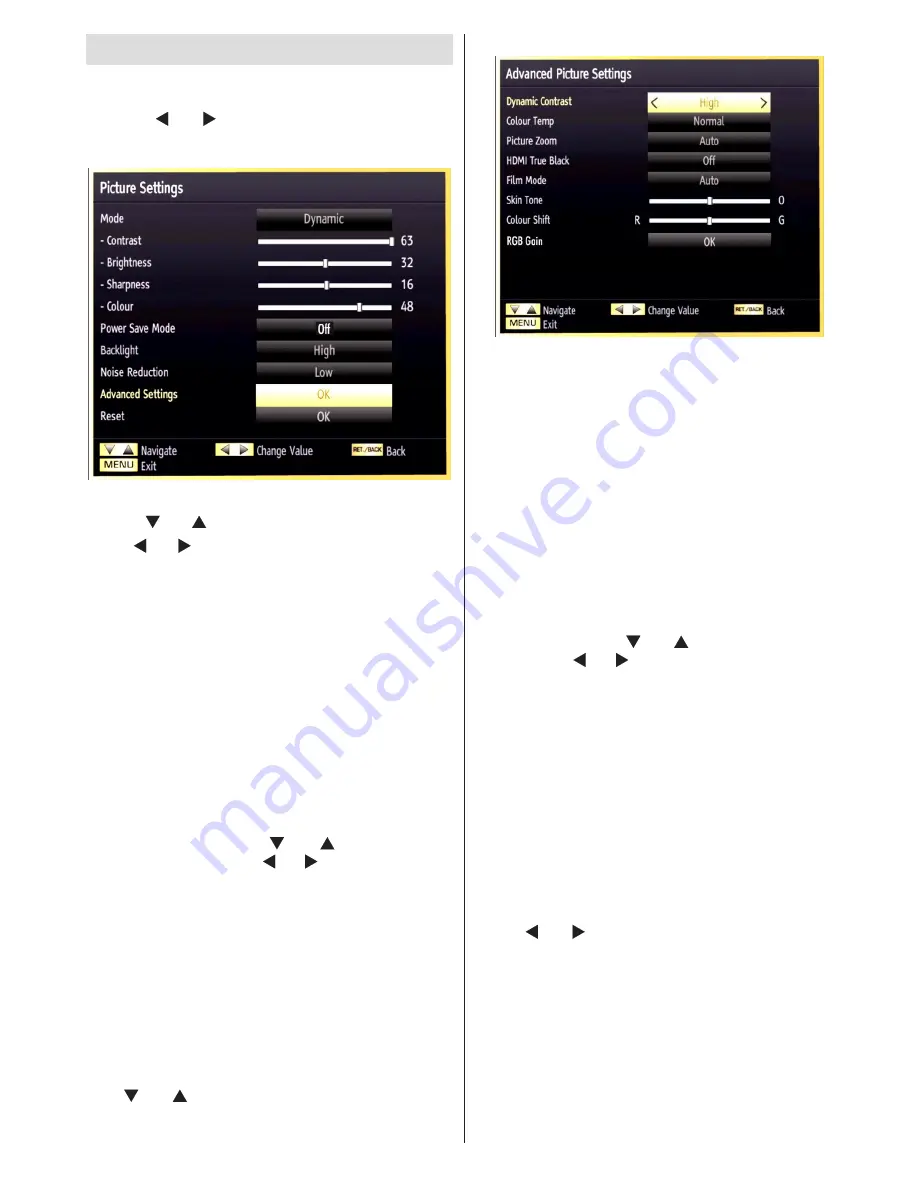
Configuring Picture Settings

You can use different picture settings in detail.

Press 

“MENU”

  button  and  select  the  Picture  icon 

by using “ ” or “ ” button. Press 

OK

 button to view 

Picture Settings menu.

Operating Picture Settings Menu Items

Press “

• 

” or “ ” button to highlight a menu item.

Use “

• 

” or “ ” button to set an item.

Press 

• 

“MENU”

 button to exit.

Picture Settings Menu Items

Mode

:  For  your  viewing  requirements,  you  can  set 

the related mode option. Picture mode can be set to 

one of these options: 

Cinema

Game

Dynamic

 and 

Natural

.

Contrast

: Sets the lightness and darkness values of 

the screen.

Brightness

: Sets the brightness value for the screen.

Sharpness

: Sets the sharpness value for the objects 

displayed on the screen.

Colour

: Sets the colour value, adjusting the colors.

Power Save Mode

:


Use “ ” or “ ” button to select 

Power Save Mode. Press “ ” or “ ” button to set Power 

Save Mode as Eco, Picture Off and Disabled. See the 

section, “Environmental Information” in this manual for 

further information on Power Save Mode.

Backlight

: This setting controls the backlight level and 

it can be set to 

Low

Medium

High 

and 

Auto

.

Noise Reduction

: If the broadcast signal is weak and 

the picture is noisy, use 

Noise Reduction

 setting to 

reduce the noise amount. Noise Reduction can be set to 

one of these options: 

Low

Medium

High

 or 

Off

.

Advanced Settings

Use “ ” or “ ” button to select advenced settins. 

Dynamic Contrast

: You can change contrast rate by 

using dynamic contrast function. Dynamic contrast can 

be set to one of these options: 

Low

Medium

High


or 

Off.

Colour Temp

: Sets the desired colour tone.

Picture  Zoom

:Sets  the  picture  size  to Auto,16:9, 

Subtitle,14:9, 14:9 Zoom, 4:3 or Cinema.

HDMI True Black (optional)

: While watching from HDMI 

source, this feature will be visible in the Picture Settings 

menu. You can use this feature to enhance blackness in 

the picture. You can set this feature as “On” for activating 

HDMI True Black mode.

Film mode (optional)

: Films are recorded at a different 

number  of  frames  per  second  to  normal  television 

programmes. Press “ ” or “ ” button to select Film 

Mode. Press “ ” or “ ”button to set this feature On or 

Off. Turn this feature on when you are watching films 

to see the fast motion scenes clearly.

Skin tone

: Adjust the desired skin tone

Colour Shift

: Adjust the desired colour tone.

Reset

: Resets the picture settings to factory default 

settings.

While in VGA (PC) mode, some items in Picture menu 

will be unavailable. Instead, VGA mode settings will be 

added to the Picture Settings while in PC mode.

PC Picture Settings

For adjusting PC picture items, do the following:
Press “ ” or “ ” button to select Picture icon. Picture 

menu appears on the screen.

Contrast,  Brightness,  Colour,  Colour  Temp  and 

Picture Zoom and other 

settings in this menu are 

identical to settings defined in TV picture menu under 

“Main Menu System”.

Sound, Settings

 and 

Source

 settings are identical to 

the settings explained in main menu system.

PC Position

: Select this to display PC position menu 

items.

Summary of Contents for 65VF7018

Page 1: ...ar Pazarlama A Zorlu Plaza Avc lar 34310 stanbul T RK YE Tel 0212 456 22 00 Faks 0212 422 02 03 Cihaz n z n G mr k ve Ticaret Bakanl veya Bakanl k a tespit ve ilan edilen kullan m mr cihaz n fonksiyon...

Page 2: ...nal Y netimi Kanal Listesi 23 Kanal Listesinin letilmesi 23 Kanal Silme 23 Kanal Ad n De i tirme 23 Kanal Kilitleme 24 Kanal Y netimi S k Kullan lanlar 24 Tu Fonksiyonlar 24 Kanal Y netimi Kanal Liste...

Page 3: ...matlar n da mutlaka birlikte verin Bu r n se ti iniz i in te ekk r ederiz Bu k lavuz TV nizi do ru al t rmak i in sizi y nlendirecektir TV yi al t rmadan nce l tfen bu k lavuzu tamamen okuyunuz L tfen...

Page 4: ...mektedir Y ld r m F rt na ve y ld r m halinde veya tatile karken g kablosunu prizden kar n z Yedek Par alar Yedek par a gerekti inde servis teknisyeninin retici taraf ndan belirtilen veya asl yla ayn...

Page 5: ...haz bekleme konumunda iken de elektrik t ketir Cihaz n ebeke elektri i ba lant s n tamamen kesmek i in fi i prizden ekilmelidir Herhangi bir acil durumda fi inin derhal ekilebilmesi i in cihaz cihaz i...

Page 6: ...ine dikkat ediniz E er g tasarruf Modunu G r nt kapal olarak ayarlarsan z ekranda bir mesaj g r nt lenecek ve arka k saniye i inde kapanacakt r G r nt y tekrar etkinle tirmek i in uzaktan kumandadaki...

Page 7: ...ilgiler Reveal TXT modunda 26 Ses 27 Sessiz 28 nceki program EPG modu 29 Say sal d meler 30 AV Kaynak 31 Tu um 2 kullan m Bu tu un ana fonksiyonu DVB T DVB C ve DVB S yay nlar aras ndage i yapmakt r A...

Page 8: ...T rk e 7 Uzaktan Kumanda Tu lar 1 Bekleme A k 2 Sesi azalt artt r 3 Kaynak se imi 4 Bilgi 5 Sessiz 6 Program yukar a a 7 Resim boyutu 8 Mono Stereo Dual I II Ses Altyaz dili...

Page 9: ...harici bir ayg t ba lanm sa TV otomatik olarak AV moduna ge ecektir Bile en G r nt Giri leri YPbPr 3 bile en g r nt ba lant s yapmak i in kullan l r Bile en videosunu ve ses soketlerini bile en k olan...

Page 10: ...iri i nternet ba lant s ve hizmeti i in 12 Ba lant lar Yan Konekt rler CI Yuvas CI kart n yerle tirmek i in kullan l r CI kart abone oldu unuz b t n 1 kanallar g rmenizi sa lar Daha fazla bilgi i in K...

Page 11: ...saklanan b t n verileri kaybedece inizi ve disk format n n FAT32 ye d n ece ini unutmay n z USB Disk Ba lant s USB cihaz n TV nin USB giri ine tak n z Not TV kapal yken USB diskini tak n z veya fi in...

Page 12: ...TV ses giri leri Televizyon PC giri i PC ses k lar PC monit r k S re de i imi USB cihaz yazma h z na g re durdurulabilir USB cihaz h z video yay n bit oran i in yeterli de ilse s re de i imi durdurul...

Page 13: ...art Kablosu tedarik edilmemi tir HDMI Kablosu HDMI SCART tedarik edilmemi tir Yan AV Konekt rlere Ba lama TV nin yan konekt rlerini kullanarak LED TV nize bir dizi opsiyonel ekipman ba layabilirsiniz...

Page 14: ...i LAN a n za ekleyebilirsiniz Payla lan dosyalara eri im i in Ortam Taray c s n se melisiniz MENU tu una bas n z ve Sol veya Sa tu unu kullanarak Ortam Taray c s n se iniz Devam etmek i in OK tu una b...

Page 15: ...bi di er cihazlar aras nda daha h zl dosya payla m i in LAN ba lant s n kullan n Frekans ve kanal b lgeye g re de i ebilir Aktar m h zlar aktar m yapan r nlerin say s na ve bu r nler aras ndaki mesafe...

Page 16: ...bas n son se ilen kanal numaras ndan a lacakt r Her iki y ntem ile de TV a lacakt r Televizyonu kapatmak i in tu unu g sterildi i gibi 2 pozisyonuna getiriniz b ylece TV kapanacakt r Televizyonu tama...

Page 17: ...mek i in P CH tu una bas n z Ana Men G r nt leme Ana men y g r nt lemek i in veya tu lar na ayn anda bas n z Ana men de AV tu unu kullanarak alt men y se iniz ve veya tu lar n kullanarak alt men ye gi...

Page 18: ...llan n TeleteksDilise ene iniayarlad ktansonra tu una bas n z ifreli Tarama se ene i i aretlenecektir ifreli kanallar taramak istiyorsan z ifreli Tarama se ene ini Evet olarak se ebilirsiniz L tfen uz...

Page 19: ...na bas n z Kanal listesinden kmak ve TV yi seyretmek i in OK tu una bas n z Uydu Kurulumu Arama Tipi ekran ndan Uydu se ene ini se erseniz bir uydu ayarlay p uydu kanallar n izleyebilirsiniz Uydu Se e...

Page 20: ...an za yard mc olacakt r Uzaktan kumanda zerindeki MENU tu una bas n z ve veya tu unu kullanarak Installation Kurulum simgesini se iniz OK tu una bas n z a a daki men g r nt lenecektir Otomatik Kanal T...

Page 21: ...iz se enekleri ayarlayabilir ve aramay ba latmak i in OK d mesine basabilirsiniz Uydu Man el Arama Uydu man el taramas nda frekans polarizasyon sembol oran a kanal tarama ve uydu se eneklerini girebil...

Page 22: ...u una bas n TV nin haf zas silinecek kurulum i lemi ba lat lacakt r Servis listesini silme Bu ayar lke se ene i Danimarka sve Norve ya da Finlandiya olarak ayarland nda g r nt lenebilir Kaydedilmi kan...

Page 23: ...a Rehber Arama men s n g r nt ler SUBT T r Se men s n g r nt lemek i in tu una bas n z Bu zelli i kullanarak program rehberi veri taban nda se ilen t rle ilgili arama yapabilirsiniz Program rehberinde...

Page 24: ...irmek i in P P tu lar n kullan n z Filtreleme se eneklerini g rmek i in MAV tu una bas n z kmak i in MENU tu una bas n z Not Listelenen kanallar kanal listesinde kar t r l r Kanal tipleri yanlar ndaki...

Page 25: ...S k Kullan lanlar se ene ini se mek i in ve OK tu lar n kullan n z e itli kanallar favori kanallar n z olarak belirleyebilir b ylece yaln zca bu kanallar aras nda gezinebilirsiniz veya tu lar n kulla...

Page 26: ...bir USB cihaz tak ld nda ortam taray c ekran otomatik olarak g r nt lenecektir Ba l bir USB bellekten m zik resim ve video dosyalar n oynatabilirsiniz Video Resim M zik veya Ayarlar se mek i in veya...

Page 27: ...geri d ner Yard m ekran n g sterir USB zerinden M zik alma Ana se eneklerden M zik se ti inizde mevcut ses dosyalar bu ekranda listelenecektir Oynatma tu u Se ili olandan ba layarak t m ortam dosyala...

Page 28: ...z Yava ileri oynatma Kaydedilen program izlerken tu una basarsan z yava ileri oynatma zelli i uygun olur Yava ileri oynat m i in tu una bas n z tu una basarak yava ileri oynatma h z n de i tirebilirsi...

Page 29: ...zi a mal s n z Aksi takdirde kay t zelli i etkin olmayacakt r Bir program izlerken ani bir durum kayd na ba lamak i in KAYIT tu una bas n z Ekranda a a daki OSD belirir Daha sonra OSD kayd k sa bir s...

Page 30: ...and ndan ba lant lar n ve a ayarlar n n yap ld ndan emin olun daha fazla bilgi i in bkz A Ayarlar Kablosuz Ba lant NEML Kablosuz a zelli ini kullanabilmek i in Veezy 100 USB dongle gerekir TV nizi kab...

Page 31: ...sonra l tfen PC yi yeniden ba lat n Cep Telefonunuzla WiFi arac l yla Ba lant Kurmak Opsiyonel E er cep telefonunuz WiFi zelli ine sahipse bir router ile WiFi ba lant s n kullanarak cep telefonunuz il...

Page 32: ...boyutunda g rmek i in kullan n z Sinema Geni resmi 16 9 g r n m oran tam ekran yapar G r nt Ayarlar n Yap land rma Farkl g r nt ayarlar kullanabilirsiniz MENU tu una bas n z ve veya tu unu kullanarak...

Page 33: ...r ndan farkl say da saniye ba na d en kare miktar na sahiptir veya tu una basarak Film Konumu ayar n se iniz Bu zelli i a mak veya kapatmak i in veya tu una bas n z Bu zelli i h zl hareketleri net bir...

Page 34: ...Kulakl k ses seviyesini ayarlar Sound Mode Ses Modu Se ilen kanal n o modu desteklemesi halinde Mono Stereo Dual I veya Dual II modlar n se ebilirsiniz AVL Otomatik Ses S n rlama AVL i levi programlar...

Page 35: ...ay z mod l saptanmam t r eklinde bir mesaj g r nt lenir Ayarlarla ilgili ayr nt lar i in mod l talimatlar k lavuzuna ba vurunuz Ko ullu Eri im Men s n G r nt leme Bu men ayarlar servis sa lay c s na b...

Page 36: ...ka PIN numaras 0000 d r Do ru PIN numaras girildikten sonra ebeveyn ayarlar men s g r nt lenecektir Ebeveyn Ayarlar Men letimi veya tu una basarak bir e se iniz Bir e ayarlamak i in veya tu unu kullan...

Page 37: ...iniz Biti Rakamsal tu lar kullanarak bir bitirme zaman giriniz S re Ba latma ve bitirme aras ndaki s reyi g r nt ler Tekrar Bir kez G nl k veya Haftal k olarak tekrarlanan bir zamanlay c ayarlar Bir s...

Page 38: ...r analog yay nlar ve TV nin di er giri lerinden al nan video sinyalleri hi bir ekilde kaydedilemez Tarih Saat Ayarlar n Yap land rma Tarih Saat ayarlar n yap land rmak i in Ayarlar men s nde Tarih Saa...

Page 39: ...yarlar n kontrol edin ve gerekli de i iklikleri ger ekle tirin E er anten ayarlar d zg n bir ekilde yap lmazsa Sinyal Yok eklinde bir mesaj g r nt lenebilir A Ayarlar n Yap land rma Not TV nizinA Ayar...

Page 40: ...sol sa tu lar n kullanarak gezinebilirsiniz Diyalogun alt k sm ndaki yard m ubu u kullanmak isteyebilece iniz zellikleri g sterir nternet ba lant h z n z kontrol etmek i in MAV tu a bas n Sinyal g c n...

Page 41: ...e ula ld nda ve TV belirtilen s re boyunca kullan lmad nda TV kapanacakt r Bekleme Modunda Arama opsiyonel Bekleme Modunda Arama ayar n se ebilmek i in ya da tu lar n kullan n z ve A k On ya da Kapal...

Page 42: ...s yla sonraki veya nceki sayfay getirecektir pu lar Ekran Bak m Ekran yumu ak bir bezle temizleyiniz TV ekran n n kaplama tabakas na zarar verebilece inden a nd r c z c ler kullanmay n z G venli iniz...

Page 43: ...neyiniz Hala ayn mesaj al yorsan z USB diskinizin h z gerekliliklerini kar lamad olas bir ihtimaldir Ba ka bir USB diski ba lamay deneyiniz nternet Ba lant s Yok DLNA Modu al m yor E er bilgisayar n z...

Page 44: ...AV ve HDMI Sinyal Uyumlulu u Giri Sinyal Tipleri Kaynak Desteklenen Sinyaller Mevcut EXT 1 SCART 1 PAL 50 60 O NTSC 60 O RGB 50 O RGB 60 O EXT 2 SCART 2 PAL 50 60 O NTSC 60 O RGB 50 X RGB 60 X FAV SI...

Page 45: ...mpeg MPEG1 2 MPEG1 Layer 1 2 3 MAX 1920x1080 30P 20Mbit sec dat MPEG1 MPEG1 Layer 1 2 vob MPEG1 2 AC 3 MPEG1 Layer 1 2 DVD LPCM mkv H 264 MPEG2 4 VC 1 MPEG1 Layer 1 2 3 AAC EAC 3 AC 3 mp4 m4v MPEG4 H...

Page 46: ...ma varsa TV 03 00 de a l r ve yeni yaz l m y kseltmeleri i in yay n kanallar n arar E er yeni bir yazl m bulunur ve ba ar yla y klenirse TV bir sonraki a l nda yeni yaz l m versiyonuyla al r Yeniden b...

Page 47: ...etiketli d meye t klay n Nero MediaHome kurulum sihirbaz g r nt lenir Gerekirse devam etmeden nce dil se im men s nden kurulum dilini de i tirin Next ileri d mesine t klay n 3 Entegre seri g sterilir...

Page 48: ...eady to Start Installation Process Kurulum lemini ba latmaya Haz r ekran g sterilir kurulum otomatik olarak ba lat l r ve bitirilir Bir ilerleme ubu u kurulum i leminin ilerleyi i hakk nda bilgi verir...

Page 49: ...az l m n al t r n A da payla mak istedi iniz klas r eklemek i in LOCAL FOLDERS yerel klas rler konumundan ADD ekle simgesine t klay n Payla mak istedi iniz klas r se in ve START SERVER sunucuyu ba lat...

Page 50: ...bas n z Ard ndan g r nt y tam ekran yapmak i in tekrar OK tu una bas n z Bir nceki ekrana ula mak i in tekrar OK tu una bas n z Bu i lemlerin d nda kumandan z n renkli tu lar i in tan mlanm k sayol z...

Page 51: ...eviye 4 1 MPEG 2 MP HL video z c HD oklu format g sterme yetene ine sahiptir 1080i 720p 576p CVBS Analog k HD kanallar nda bu mevcut olmayacakt r III SES MPEG 1 layer I II MPEG 2 layer II AAC HEAAC AC...

Page 52: ...s recinde de kar la labilinir Alt piksel hatalar 2 ana e ittir Tip 1 S rekli yanan alt piksel k rm z ye il veya mavi olabilir Tip 2 S rekli s n k alt piksel siyah bir ekilde g r n r ISO 13406 2 standa...

Page 53: ...an uydu al c s DVD player ya da kablolu kanal yay nlar nda beklenen performans al namayabilir ve bu yay nlarda resimde mozaiklenme veya resim netlik ve keskinli i az g r nt de ekranda baz efektler olu...

Page 54: ...s 75 Managing Stations Channel List 75 Channel List Types 75 Operating the Channel List 76 Moving a Channel 76 Deleting a Channel 76 Renaming a Channel 76 Locking a Channel 76 Managing Stations Favour...

Page 55: ...give these directions for use Thank you for choosing this product This manual will guide you for the proper operation of your TV Before operating the TV please read this manual thoroughly Please do ke...

Page 56: ...facturer or have the same specifications as the original one Unauthorized substitutions may result in fire electrical shock or other hazards Servicing Please refer all servicing to qualified personnel...

Page 57: ...emergency the mains plug can be pulled immediately To exclude the danger of fire the power cord should principally be separated from the mains socket prior to a longer period of non usage i e during...

Page 58: ...f you set power save mode as Picture off a message will appear on the screen and backlight will be off within three seconds Press any button on the remote controller to activate the picture again When...

Page 59: ...e up down 27 Mute 28 Previous programme Now in EPG mode 29 Numeric buttons 30 AV Source 31 Using My Button 2 This button s main function is to switch between DVB T DVB C and DVB S broadcasts However i...

Page 60: ...English 59 Remote Control Buttons 1 Standby On 2 Volume up down 3 Source selection 4 Info 5 Mute 6 Programme up down 7 Image size 8 Mono Stereo Dual I II Audio Subtitle language...

Page 61: ...ART socket the TV will automatically switch to AV mode Component Video Inputs YPbPr 3 are used for connecting component video You can connect the component video and audio sockets with a device that h...

Page 62: ...nnections Side Connectors CI Slot is used for inserting a CI card A CI card allows you to view all the channels 1 that you subscribe to For more information see Conditional Access section USB Inputs 2...

Page 63: ...converted to FAT32 in such a case USB Disk Connection Plug your USB device to the USB input of the TV Note Plug or unplug your USB disk while the TV is switched off Note If you are going to connect a...

Page 64: ...is recommended to use USB hard disk drives for recording HD programmes Do not plug out the USB HDD during the recording This may harm the connected USB HDD Multipartiton support is available Maximum...

Page 65: ...s DVD Player Scart Cable not supplied HDMI Cable not supplied HDMI SCART Using Side AV Connectors You can connect a range of optional equipment to your LED TV using side connectors of the TV For conne...

Page 66: ...ctor as illustrated below To access and play shared files you must Select Media Browser Press Menu button and select Media Browser by using Left or Right button Press OK to continue Select the desired...

Page 67: ...ke computers The frequency and channel differ depending on the area The transmission speed differs depending on the distance and number of obstructions between the transmission products the con gurati...

Page 68: ...n the TV By either method the TV will switch on To Switch the TV Off Switch the button to position 2 as illustrated so the TV will switch OFF To power down the TV completely unplug the power cord from...

Page 69: ...ontoselectthenextprogrammeor P CH button to select the previous programme Viewing Main Menu Press the or button at the same time to view main menu In the Main menu select the sub menu using AV button...

Page 70: ...xt Language Use or to select the desired Teletext Language Press button after setting Teletext Language option Scan Encrypted will be then highlighted You can set Scan Encrypted as Yes if you want to...

Page 71: ...than press OK Press OK button to quit channel list and watch TV Satellite Installation If you select Satellite option from the Search Type screen you can set a satellite and watch satellite channels S...

Page 72: ...une the TV set in order to store new services or stations Press MENU button on the remote control and select Installation by using or button Press OK button and the following menu screen will be displ...

Page 73: ...the multiplex or frequency are entered manually and only that multiplex or frequency are searched for the channels After selecting search type as Digital Aerial you can enter the multiplex or frequenc...

Page 74: ...extended gap between Start and Stop frequency rate automatic search duration will take a longer time Analog Fine Tune Select Analog Fine Tune from the Installation menu by using or and OK buttons Ana...

Page 75: ...the programmes in detail Rec Stop the TV will start to record the selected progamme You can press again to stop the recording Timeline schedule Red button Prev Day Displays the programmes of previous...

Page 76: ...l an already set reminder highlight that programme and press the OK button Then select Delete Timer option The timer will be cancelled Note It is not possible to record or set timer for two or more in...

Page 77: ...annel You can press GREEN button to tag untag all channels YELLOW button to tag untag channel Select the channel that you want to delete and select Delete option Press OK button to continue A warning...

Page 78: ...ive Channel List from the Channel list menu by using or button Press OK button to continue You can choose an active channel list from the list by using and OK buttons Broadcast Type When you set the d...

Page 79: ...les from the connected USB memory stick Use or button to select Videos Photos Music or Settings You can connect two USB devices to your TV If both USB devices include music picture or video files USB...

Page 80: ...splays help screen Playing Music via USB When you select Music from the main options available audio files will be filtered and listed on this screen Play button Plays all media files starting with th...

Page 81: ...ay from offset Specifies a playing point Note Viewing main menu and menu items will not be available during the playback Press STOP button to stop a playback and return to return to Recordings Library...

Page 82: ...a programme you should first connect a USB disk to your TV while the TV is switched off You should then switch on the TV to enable recording feature Otherwise recording feature will not be available...

Page 83: ...aration of media server connections and network settings are completed properly See the chapter Network Settings for more information Wireless Connection IMPORTANT Veezy 100 USB dongle is required to...

Page 84: ...rick mode and jump are not supported with DLNA function CAUTION There may be some PC s which may not be able to utilize the DLNA function due to administrator and security settings such as business PC...

Page 85: ...sources 16 9 This uniformly stretches the left and right sides of a normal picture 4 3 aspect ratio to fill the wide TV screen For 16 9 aspect ratio pictures that have been squeezed into a normal pict...

Page 86: ...Contrast You can change contrast rate by using dynamic contrast function Dynamic contrast can be set to one of these options Low Medium High or Off Colour Temp Sets the desired colour tone Picture Zoo...

Page 87: ...tings Menu Items Press or button to highlight a menu item Use or button to set an item Press MENU button to exit Sound Settings Menu Items Volume Adjusts volume level Equalizer Press OK button to view...

Page 88: ...TV is SWITCHED OFF In order to watch certain digital channels a conditional access module CAM can be necessary This module must be inserted in the CI slot of your TV Obtain the Conditional Access Mod...

Page 89: ...only the broadcaster supports Otherwise settings will not be available to be changed Audio Changes the audio language for the current channel Subtitle Sets the subtitle language for the current channe...

Page 90: ...are able to switch the TV into Standby mode with the Standby On button To switch the TV on again you need the remote control Hence if one of those buttons is pressed Child Lock Is On will be displaye...

Page 91: ...ingly depending on the broadcast received When the Max Timeshift time is reached auto play will proceed Format Disk IMPORTANT Note that ALL the data stored on the USB disk will be lost and then the di...

Page 92: ...t To view available satellite list please select Satellite list option from satellite settings menu If you want to add new satellite information please press YELLOW button If you want to change satell...

Page 93: ...own on the screen Afterwards check your antenna settings and make changes if necessary An error message stating No Signal may be displayed if antenna settings are not configured properly Configuring N...

Page 94: ...ivate sharing software on your cell phone Then select files that you would like to share with your TV If the connection is established correctly you should now access the shared files of your cell pho...

Page 95: ...able sound Mute indicator will be displayed in the upper side of the screen To cancel mute there are two alternatives the first one is pressing the button and the second one is increasing the volume l...

Page 96: ...tion for more information on the process If the Net TV does not function check the modem router first If the router does not have a problem check the internet connection of your modem Try searching fo...

Page 97: ...Signal Compatibility Input Signal Types Source Supported Signals Available EXT 1 SCART 1 PAL 50 60 O NTSC 60 O RGB 50 O RGB 60 O EXT 2 SCART 2 PAL 50 60 O NTSC 60 O RGB 50 X RGB 60 X FAV SIDE AV PAL...

Page 98: ...2 MPEG1 Layer 1 2 3 max 1920x1080 30P 20Mbit sec dat MPEG1 MPEG1 Layer 1 2 vob MPEG1 2 AC 3 MPEG1 Layer 1 2 DVD LPCM mkv H 264 MPEG2 4 VC 1 MPEG1 Layer 1 2 3 AAC EAC 3 AC 3 mp4 m4v MPEG4 H 264 H 263 A...

Page 99: ...ches broadcast channels for new software upgrade If new software is found and downloaded successfully with next power up TV opens with new software version Note on reboot operation Reboot is the last...

Page 100: ...t the installation process The Nero MediaHome installation wizard is displayed If necessary change installation language from the language selection menu before continuing Click the Next button 3 The...

Page 101: ...the Next button 9 The Ready to Start Installation Process screen is displayed installation begins and finishes automatically A progress bar informs you of the progress of the installation process Inst...

Page 102: ...you to view the music video clip or web content with defined shortcuts Whether you can view this content without interruption depends on the connection speed provided by your internet service provide...

Page 103: ...the yellow button on your remote Green button Suggestions You can access the suggestions provided for you by pressing the green button on your remote Blue button Settings You can access the settings...

Page 104: ...coder HD display multi format capable 1080i 720p 576p CVBS analogue output In HD channels this will not be available III AUDIO MPEG 1 layer I II MPEG 2 layer II AAC HEAAC AC3 E AC3 Sampling frequencie...

Page 105: ...els may cause sub pixel errors by way of lighting continuously or remaining dim continuously Please consider the following explanation about a possible sub pixel error This problem can be encountered...

Page 106: ...upported by other sources in terms of high definition DVD players or cable television and in these broadcasts mosaic images may occur sharpness and resolution of the image may be low some effects may...

Page 107: ...retici firma Vestel Elektronik Sanayi ve Ticaret A Adres Organize Sanayi B lgesi 45030 Manisa Tel 0236 233 01 31 Fax 0236 233 25 85...

Reviews: