background image

Installing the Boiler        15

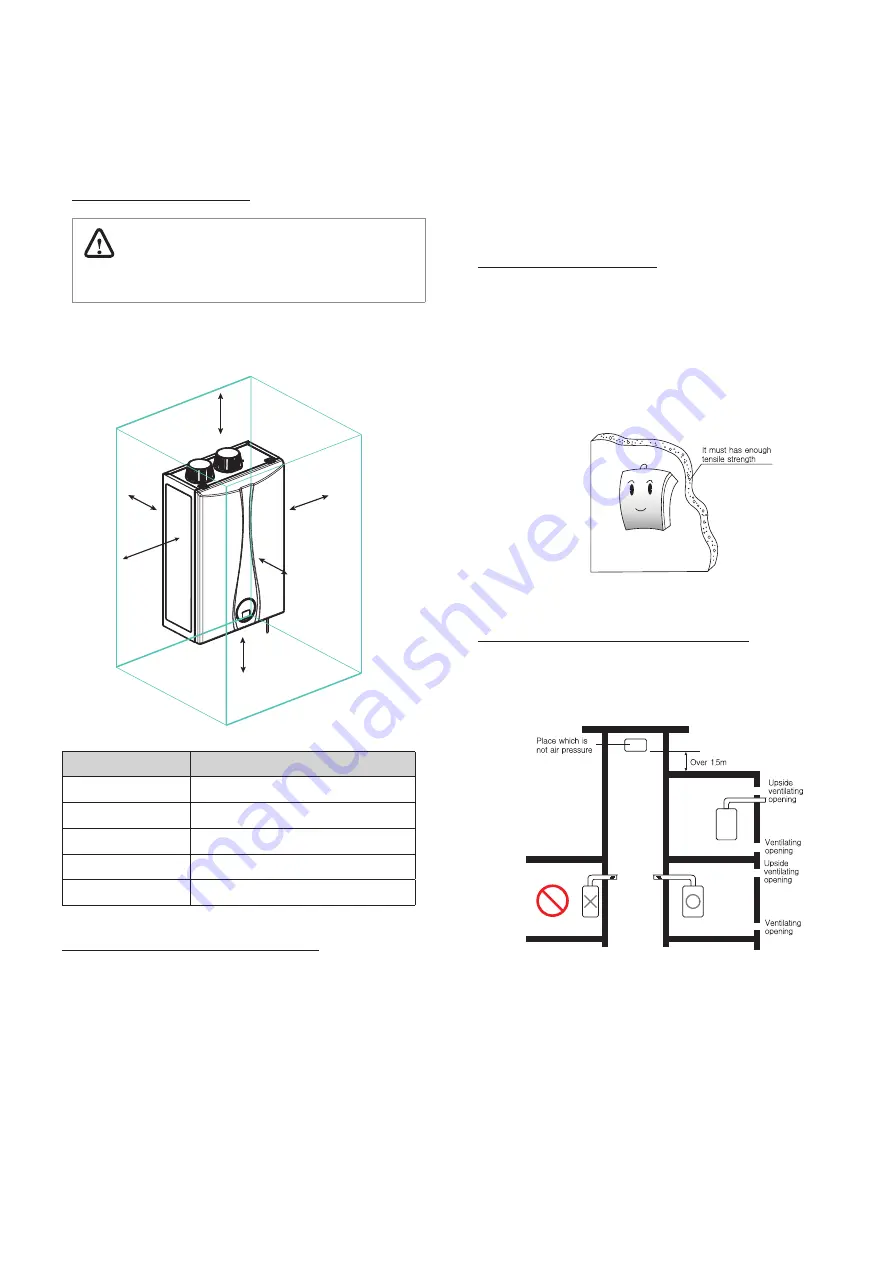
Clearance from

:

Indoor Installation

Top

9 in 229 mm minimum

(

)

Back

0 5 in 13 mm minimum

.

(

)

Front

4 in 100 mm minimum

(

)

Sides

3 in 76 mm minimum

(

)

Bottom

12 in 300 mm minimum

(

)

Clean  debris and chemical free combustion air

,

-

Do not install the boiler in areas where dust and debris may
accumulate or where hair sprays spray detergents chlorine or

,

,

,

similar chemicals are used

.

Do not install the boiler in areas where gasoline or other
flammables are used or stored

.

Ensure that combustible materials are stored away from the
boiler and that hanging laundry or similar items do not obstruct
access to the boiler or its venting

.

Adequate installation clearances

CAUTION

Do not install the boiler on carpeting

.

Install the boiler in an area that allows for service and maintenance
access to utility connections piping filters and traps Based on

,

,

,

.

the installation location  ensure that the following clearances are

,

maintained

:

Top

Back

Side

Bottom

Front

Side

2 2

.

How to install

Please install on a durable wall.

When install the product, about 66 lb(31kg) is added in a wall.
So if it is not installed on solid wall, it may cause damages,

If there is not enough strength to preserve the product, please do

The weight of the product is marked on 8page of this manual.

Make sure the unit is mounted on a non-combustible material.

submersion, gas leak and a fire by falling the product

reinforcement work.

Please don

t install on a froup exhaust port wall.

It may cause mounting screw corrosion and result in failure.

It may cause damages, submersion, gas leak and a fire from
unit falling.

Summary of Contents for VC 100 (LP) COMBI

Page 1: ... supplier call the fire department Installation and service must be performed by a qualified installer service agency or the gas supplier The installation must conform with local codes or in the absence of local codes the National Fuel Gas Code ANSI Z223 1 NFPA 54 and or CSA B149 1 Natural Gas and Propane Installation Code When applicable the installation must conform with the Manufactured Home Co...

Page 2: ...r to secure the services of qualified licensed professionals for the installation of hard wired carbon monoxide detectors a In the event that the side wall horizontally vented gas fueled equipment is installed in a crawl space or an attic the hard wired carbon monoxide detector with alarm and battery back up may be installed on the next adjacent floor level b In the event that the requirements of ...

Page 3: ...y 21 4 1 Gas Pipe Sizing Tables 21 4 2 Measuring the Inlet Gas Pressure 23 5 Venting the Boiler 24 5 1 Selecting a Vent Type 24 5 2 Selecting Vent Pipe Materials 28 5 3 Vent Terminal Installation Precautions 28 6 Setting the DIP Switches 32 7 Connecting the Power Supply 33 8 Installation Check list 34 9 Operating the Boiler 37 9 1 Turning the Boiler On or Off 37 9 2 Adjusting the CH Space Heating ...

Page 4: ... to repair it call a qualified service technician Force or attempted repair may result in a fire or explosion Do not use this appliance if any part has been under water Immediately call a qualified service technician to inspect the appliance and to replace any part of the control system and any gas control which has been under water Safety Information The cautions issued by this installation manua...

Page 5: ... clothes line that could obstruct the air flow in or out of the boiler This boiler has been approved for use in the USA and Canada only Using the boiler in any other country will void the manufacturer s warranty WARNING Do not store or use gasoline or other flammable liquids near this boiler Doing so may result in fire or explosion Do not place combustibles such as newspapers or laundry near the b...

Page 6: ...cond 130 55 10 seconds 120 49 10 minutes 100 37 very low scald risk DANGER HOT BURN To prevent burns Use the lowest operating temperature setting necessary to provide comfortably hot water If your household has children or elderly or disabled residents consider using a lower temperature setting Read all the instructions in this manual carefully before changing the temperature setting Feel the wate...

Page 7: ...el VC 100 LP COMB I VC 120 LP COMB I VC 140 LP COMB I Installation Manual User s Manual Wall Mounting Bracket 1 About the Boiler installing the boiler Pressure Relief Valve Heating 1 2 Accessories The following optional accessories are available for the boiler Plumb Easy Valve Set Tapping screws anchors WARNIN G If the informatio n in these instructio ns is not followed exactly a fire or explosion...

Page 8: ... Btu h 180 000 Btu h 30 000 Btu h 190 000 Btu h Gas Supply Pressure N G 3 5 10 5 W C L P 8 0 13 5 W C Power Supply Main Supply 120Volts 60Hz Use less than 5 Amp Power Combution 145W 190W 210W Ignition System Electric Ignition Gas Valve System Combination Modulating Water Pressure 30 psi Connection Gas NPT 3 4 NPT 3 4 NPT 3 4 Space Heating NPT 3 4 NPT 3 4 NPT 3 4 Domestic Hot Water NPT 1 2 NPT 3 4 ...

Page 9: ... diagram shows the key components of the boiler Component assembly diagrams and particular parts lists are included in the Appendixes Intake Air Front Panel Exhaust Ignitor Flame Rod Condensate Trap Power Switch About the Boiler 9 ...

Page 10: ...ating return connection Domestic hot water inlet connection Gas inlet connection DHW Heat Exchanger Domestic hot water outlet connection Heating supply connection PCB 10 About the Boiler Gas Pipe Latent Heat Exchanger SensibleHeat Exchanger Ignition Transformer ...

Page 11: ...1 5 Dimensions VC 100 COMBI About the Boiler 11 ...

Page 12: ...VC 120 140 COMBI 12 About the Boiler ...

Page 13: ...OUR VOTRE S ÉCURITÉ Do not store or use gasoline or other flammable vapors and liquids in the vicinity of this or any other gas appliances Ne rangez pas et n utilisez pas d essence ou d autres liquides ou vapeurs inflammables pr ès de cet appareil ou de tout autre appareilélectroménager PRODUCT NUMBER NUMÉRO DE PRODUIT SERIRAL NUMBER NUMÉRO DE SÉRIE Rating Plate Plaque Signalétique Combination Boi...

Page 14: ...er to n page 20 3 3 Condensate Discharge o The boiler must be located in an area where leakage of the unit or connections will not result in damage to the area adjacent to the appliance or to lower floors of the structure When such locations cannot be found installation of an adequately drained drain pan under the boiler is highly recommended When installing the drain pan ensure that the installat...

Page 15: ...tall the boiler on carpeting Install the boiler in an area that allows for service and maintenance access to utility connections piping filters and traps Based on the installation location ensure that the following clearances are maintained Top Back Side Bottom Front Side 2 2 How to install Please install on a durable wall When install the product about 66 lb 31kg is added in a wall So if it is no...

Page 16: ...ough a series of tubes secondary heat exchanger and finned tubes primary heat exchanger designed to maximize the heat transfer area To maintain the efficient and reliable operation of the heat exchangers and to avoid heat exchanger failure it is critical to ensure the rules and guidelines in this section are followed CAUTION Failure to follow the instructions provided in this section will void the...

Page 17: ... ball valves are required for the boiler system Failure to use full port ball valves could result in a restricted flow rate through the boiler Check valves are recommended for installation Failure to install check valves could result in a reverse flow condition during pump s off cycle Unions are recommended for unit serviceability Pressure Relief Valve To complete the space heating system installa...

Page 18: ... DHW flow of approximately 0 7 GPM or greater Once the flow sensor detects the flow the boiler immediately goes into DHW mode regardless of the status of the space heating system Read and follow the guidelines listed below to ensure safe and proper installation of a boiler heating system Scald Hazard Hotter water increases the risk of scald injury There is a hot water scald potential if the DHW te...

Page 19: ...ration for a typical DHW piping example for the boiler When installing the DHW system follow these guidelines Use only pipes fittings valves and other components such as solder that are approved for use in potable water systems Tighten the connection valves with care to avoid damage VESTA recommends using unions and manual shut off valves on the cold water inlet and DHW outlet Keep the hot water p...

Page 20: ...ating System Zone control of VC unit Zone control of the VC unit is performed by a zero voltage or X X contact from a relay or zone control panel closing when unit operation is required You will find one brown wire looped to the upper Molex connector of the main PC board This wire can be cut and extended with 18 gauge thermostat wire and only connected to dry contacts from your zone control panel ...

Page 21: ...ed to the gas supply line Gas meter s capacity Total gas capacity of connected appliances Gas Supply Line To connect the gas supply 1 Determine the gas type and pressure for the boiler by referring to the rating plate 2 Perform a pressure test on the main gas supply line 3 Purge the gas line of any debris 4 Determine the proper size and type for the gas line Refer to the tables that follow 5 Insta...

Page 22: ...e The minimum and maximum inlet gas pressure are and will settle on the floor Natural Gas Min 3 5 WC Max 10 5 WC Propane Gas Min 8 0 WC Max 13 0 WC Gas pressure below this specified range for the VC models and or insufficient gas volume will abversely affent performance Inlet gas pressure must not exceed the above maximum values gas pressure above the specified range will cause dangerous operating...

Page 23: ...ening the 2 Phillips head screws securing it to the case CAUTION Ensure that no cables are in the way before folding down the PCB assembly If the assembly is stuck do not force it Doing so may damage the cables and result in serious malfunctions Check again to ensure that no cables or any other parts are in the way before you proceed Opened Closed WARNING The boiler cannot function without suffici...

Page 24: ... of elbows and distances to air intake restrictions are observed Do not store hazardous or flammable substances near the vent termination If this boiler will be installed in areas where snow is known to accumulate protect the vent termination from blockage Provide a minimum of 1 foot clearance from the bottom of the exhaust above the expected snow accumulation level Snow removal may be necessary t...

Page 25: ...vent outlet 3 ft 91 cm J Clearance to nonmechanical air supply inlet to building or the combustion air inlet to any other appliance 36 in 91 cm 12 in 30 cm K Clearance to a mechanical air supply inlet 6 ft 1 83 m 3 ft 91 cm above if within 10 ft 3 m horizontally L Clearance above paved sidewalk or paved driveway located on public property 7 ft 2 13 m M Clearance under veranda porch deck or balcony...

Page 26: ...e heat exchanger should not be in danger of freezing Because the cause of back drafting is not considered a manufacturing problem any freezing damage which occurs from back drafting will not be covered by the VESTA warranty If there is any question about the possibility of back drafting in the installation location use a direct venting system for the boiler When using non direct venting maintain n...

Page 27: ...lator vent outlet 36 in 91 cm J Clearance to non mechanical air supply inlet to building or the combustion air inlet to any other appliance 36 in 91 cm 48 in 120 cm below or to side of opening 12 in 30 cm above opening K Clearance to a mechanical air supply inlet 6 ft 1 83 m 36 in 91 cm above if within 10 ft 3 m horizontally L Clearance above paved sidewalk or paved driveway located on public prop...

Page 28: ...d primers and glues of the certified vent system must be from a single system manufacturer and must not be intermixed with another system manufacturer s parts The supplied vent connector and vent termination are certified as part of the boiler CAUTION This boiler has a built in control to limit the exhaust temperature to 149 F 65 C As a result the boiler can be vented with Schedule 40 PVC In high ...

Page 29: ...h Maximum Vent Length See table below Sloping 1 in 10 1 in 12 PVC pipe extension is recommended to prevent cross contamination Min 18 Must be sealed with PVC glue high temp silicon Vent Termination Installation Procedure 3 PVC 1 Drill 2 holes Air intake hole and flue gas outlet hole 2 The length Z is as following Model VC Z 115mm 4 53 inch 3 Insert the air intake and flue gas outlet PVC pipe The l...

Page 30: ... as all applicable local building codes and regulations When using PVC elbows or fittings please make sure to use silicon gel or PVC glue around the connecting area to prevent the exhaust gas or condensate leakage Other Venting Design Single pipe venting VC 3 Schedule 40 PVC Maximum Three 90 Elbows Maximum Vent Length 50ft Sloping 1 in 10 1 in 12 Each 90 elbow is equivalent to 5ft linear vent pipe...

Page 31: ... bottom of intake to roof line ㆍStandard Venting rules apply ㆍAttach Flue and Intake pipes to unit with PVC Cement approved for this type of application ㆍAttach Vent Termination to Flue Pipe and caulk around joint to ensure seal 3 PVC Max Flue Length Model Vent Size 50 feet Equivalent Length Minimum 12 from each flue pipe VC 6 for 120 160 Other Venting Design Side Wall VC 3 Schedule 40 PVC Maximum...

Page 32: ...onnected to common venting system properly vents when tested as outlined return doors windows exhaust fans fireplace dampers and any other gas burning boiler to their previous condition of use 7 Any improper operation of the common venting system should be corrected so the installation conforms to the National Fuel Gas Code ANSI Z223 1 When resizing any portion of the common venting system the com...

Page 33: ... installed plug Install a power switch between the breaker and the boiler to facilitate end user maintenance and servicing Connect the boiler to a 110 120V AC at 60 Hz with a maximum of 2A The boiler must be electrically grounded If using the power plug ensure that the electrical outlet you connect the boiler to is properly grounded If wiring the boiler directly to a power supply do not attach the...

Page 34: ...vapors Is the boiler and vent piping clear of combustible materials including clothing cleaning materials and rags Connecting the Gas Supply Yes No Does the gas supply match the type specified on the boiler s rating plate Is the gas line at least 1 2 or 3 4 in ID Inner Diameter Is the gas supply line sufficient in length and diameter to deliver the required BTUs Have you measured the pressure of t...

Page 35: ... to within 6 12 in 150 300 mm of the floor Connecting the Condensate Drain Yes No Have you installed a condensate drain line from the boiler to a drain or laundry tub Venting the boiler Yes No Have you vented the boiler with 3 in PVC CPVC Polypropylene Type BH Special Gas Vent ULC S636 for Category IV boilers Canada or in accordance with all local codes and the guidelines in this manual Have you e...

Page 36: ... connection have you installed a power switch to facilitate end user maintenance Have you checked the polarity of the electrical connection Operating the boiler Yes No Have you shown the owner how to clean the inlet water filter Have you given the Installation Manual and User s Manual to the owner for future reference Have you shown the owner how to shut off the gas in case of an emergency ...

Page 37: ...erarure If the boiler is not operating for 30 seconds A6 Error will appear I on the Front panel 9 2 Adjusting the CH Space Heating 9 2 1 Adjusting the Space Heating Temperature To adjust the heating temperature 1 Press the Mode button once The space heating display 9 Operating the Boiler Temperature is blink for 5 seconds and appear the space Heating outlet temperature If don t press the Up or Dow...

Page 38: ...p or Down buttons appear the setting temperature value after blank for 5 seconds 9 3 Setting DHW Outlet Temperature mode 1 This mode is to see the DHW outlet temperature 2 Press the button for 5 seconds The DHW outlet temperature is blink 3 Pressing the button once more changed th mode 4 And DHW outlet temperature appearon the dispaly 9 4 Setting FAN revolutions per minute RPM 1 This mode is to se...

Page 39: ...dixes 39 10 1 Wiring Diagram 10 Appendixes Zone Control Thermal fuse Thermal fuse WHITE WHITE WHITE If any of the original wire as supplied the boiler must be replaced they must be replaced their equivalent ...

Page 40: ...10 2 Component Assembly Diagrams and Parts Lists VC 100 COMBI 10 2 1 Case Assembly 40 Appendixes ...

Page 41: ...Appendixes 41 10 2 2 Burner Assembly 204 220 221 ...

Page 42: ...10 2 3 Waterway Assembly 303 345 306 307 308 340 342 341 343 344 345 343 341 305 42 Appendixes ...

Page 43: ...89 Gas valve connection Nipple 205 3100051 206 2100262 207 2080830S Combustion Fan 208 3011107 209 210 2020360 211 2020362 Flame sensing Rod Burner assembly 212 2020358 213 3080150 214 3020071 Manifolder sealing packing 215 3080159 Gas Valve packing 216 3080160 O ring 22A 217 3080164 Gas apator O ring 218 2030278 Gas valve UP34 42 RC Assy 114 Surround assembly 2020359 3011567 Thermal fuse bracket ...

Page 44: ...ixing Clip 321 3120030 Pump Fixing Clip 322 2060239 RW CW Block Body 2060277 Return Block Airvent Assy 2130038 Duct Assembly 2130441 Latent Heat Exchanger Nipple Assembly Assembly 2080621 Pressure Gauge Connection Pipe 325 326 2060185A Plate to plate Heat Exchanger 327 VC 100 2060186A Plate to plate Heat Exchanger VC 120 140 2060245 SW HW Block Body 328 336 2060228 Water Supplementation Device 335...

Page 45: ...10 3 Component Assembly Diagrams and Parts Lists VC 120 140 COMBI 10 3 1 Case Assembly Appendixes 45 ...

Page 46: ...10 3 2 urner Assembly B 46 Appendixes ...

Page 47: ...Appendixes 47 10 3 3 Assembly Water Line 347 348 349 353 350 351 338 319 347 348 349 353 35 35 3 3 ...

Page 48: ... 2020356 Burner assembly 203 2010377 Combustion Chamber Front 204 3100051 4X10 tapping screw 205 3100033 4X8 tapping screw 206 3011107 Spark plug bracket 207 2020359 Spark plug 208 2020361 Flames sensing rod 209 210 3080150 Manifolder sealing packing 211 2020355 Manifolder assembly LNG 2020357 Manifolder assembly LPG 212 3100108 M4 X 12 Screw 213 2030278 Gas Valve UP34 42 214 3050092 Gas connectio...

Page 49: ...t pipe 319 3080104 O ring 16 Ø 320 2060146A Pump detection switch 321 2050136 Pump 322 3090120 Packing 1 4 323 3080016 O ring pump 324 3010829 Fixing clip 325 3080112 O ring P15 8 2080390 Overheat thermostat 2070469 Sensible heat exchanger 343 2080621 Preesure gauge 344 2060274 Pressure relief valve 2130052 Duct assembly 2130 Latent heat exchanger assembly 3080144 Backup Ring P18 8 assembly connec...

Page 50: ...t Contact the technician or professional who installed your boiler Contact a licensed professional for the affected system for example a plumber or electrician When you contact Technical Support please have the following information at hand Model number Serial number Date purchased Installation location and type Error code if any appears on the front panel display Condensing Combi Boiler Installat...

Reviews: