background image

17

c.  Any  conversion  required  must  be  performed  by  your  dealer  or  a  qualified 

licensed technician or gas service company. Please provide the service person 

with this manual before work is started on the range. (Gas conversions are the 

responsibility of the dealer or end user.)

d.  This range can be used with NATURAL or LP/PROPANE gas. It is shipped from 

the factory adjusted for use with NATURAL gas.

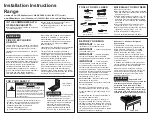
e.  Manifold pressure should be checked with a manometer and by operating as 

below detailed:

• 

Remove the injector from the rear left (or rear right) burner and mount the 

proper  test  point  adapter  which  is  available  from  the After-Sales  Service 

(see side figure and the “OPERATIONS TO BE PERFORMED WHEN 

SUBSTITUTING  THE  INJECTORS  OF  THE  COOKTOP  BURNERS” 

chapter).

• 

Turn the rear left (or rear right) burner control knob to the maximum position.

• 

Press the knob and keeping it pressed check the manifold pressure with a 

manometer; NATURAL gas requires 4.0” W.C.P. and LP/PROPANE requires 

11.0” W.C.P.

• 

Incoming  line  pressure  upstream  from  the  regulator  must  be  1”  W.C.P. 

higher than the manifold pressure in order to check the regulator.

• 

The regulator used on this range can withstand a maximum input pressure 

of 1/2 PSI (14.0” W.C.P). If the line pressure is in excess of that amount, a 

stepdown regulator will be required.

f.  The  appliance,  its  individual  shut-off  valve,  and  pressure  regulator  must  be 

disconnected from the gas supply piping system during any pressure testing of 

that system at pressures in excess of 1/2 PSI (3.5 kPa).

g.  The appliance must be isolated from the gas supply piping system by closing its 

individual manual shut-off valve during any pressure testing of the gas supply 

piping system at test pressure equal to or less than 1/2 PSI (3.5 kPa).

3. Flexible Connections:

If local codes permit, CSA or UL design-certified, flexible metal appliance connector is 

recommended for connecting this range to the gas supply line. Do Not kink or damage 

the flexible connector when moving the range. The pressure regulator has 1/2” NPT 

female pipe threads.You will need to determine the fittings required, depending on the 

size of your gas supply line, flexible metal connector and shutoff valve.

4. Rigid Pipe Connections:

If rigid pipe is used as a gas supply line, a combination of pipe fittings must be used to 

obtain an in-line connection to the range. All strains must be removed from the supply 

and fuel lines so range will be level and in line.
• 

Use  joint  compounds  and  gaskets  that  are  resistant  to  action  of  natural  or 

propane gas on all male pipe threads.

• 

Do  not  over  tighten  gas  fitting  when  attaching  to  pressure  regulator.  Over 

tightening may crack regulator.

5. Leak Testing:

IMPORTANT: Leak testing of the appliance shall be conducted as follows:
• 

After  final  gas  connection  is  made,  turn  on  manual  gas  valve  and  test  all 

connections in gas supply piping and appliance for gas leaks with a soapy water 

solution. During this test all appliance gas valves have to be closed.

• 

In order to avoid property damage or serious personal injury, never use a Iighted 

match. If a leak is present, tighten joint or unscrew, apply more joint compound, 

tighten again and retest connection for leak.

Fig. 2.7

TEST POINT ADAPTER

The  Test  Point  adapter  is  available  from  the 

After-Sales Service.

2

Summary of Contents for VDFSGE365 Series

Page 1: ...N MANUFACTURED MOBILE HOME The installation must conform with the Manufactured Home Construction and Safety Standard Title 24 CFR Part 3280 formerly the Federal Standard for Mobile Home Construction and Safety Title 24 HUD Part 280 or when such standard is not applicable the Standard for Manufactured Home Installations ANSI NCSBCS A225 1 or with local codes where applicable INSTALLATION IN RECREAT...

Page 2: ... followed exactly a fire or explosion may result causing property damage personal injury or death WARNING WARNING Slide range back so bolt head on the adjustable bracket assembly is under anti tip bracket Look for the anti tip bracket securely attached to floor or wall See installation instructions for details Look for the adjustable bracket assembly securely attached to the back of the range Slid...

Page 3: ...commercial or communal environment CONVERSION LABEL DATA PLATE The product data plate is attached below the bottom drawer To check the label it is necessary to remove the drawer see Setting the pressure regulator for instructions on drawer removal WARNING This product can expose you to chemicals including formaldehyde which is known to the State of California to cause cancer and lead which is know...

Page 4: ...H THE APPLIANCE IMPORTANT The use of suitable protective clothing gloves is recommended when handling or installing this appliance WARNING THIS APPLIANCE MUST BE INSTALLED BY A QUALIFIED INSTALLER Installation must conform with local codes Improper installation adjustment alteration services or maintenance can cause injury or property damage Consult a qualified installer service agente or the gas ...

Page 5: ...state or other codes or in the absence of such codes with the Standard for Recreational Park Trailers ANSI A119 5 4 To eliminate risk of burns or fire by reaching over heated surface units cabinet storage located above the surface units should be avoided 5 Air curtain or other overhead range hoods which operate by blowing a downward air flow on to a range shall not be used in conjunction with gas ...

Page 6: ...mum 36 914 mm it has to be centered with the range Side wall cabinets above the range must be a minimum of 18 457 mm above the countertop 4 Air curtain or other overhead range hoods which operate by blowing a downward air flow on to a range shall not be used in conjunction with gas ranges other than when the hood and range have been designed tested and listed by an independent test laboratory for ...

Page 7: ...e kit If replacing the island trim with the 3 backguard assemble it by using the same screws spacers used for fixing the island trim figs 1 3a 1 3b GAS AND ELECTRIC CONNECTION Fig 1 2 Dotted line showing the position of the range when installed Area for ELECTRICAL connection Area for GAS connection A A B D C Ref inch mm A 1 4 6 B 23 9 16 599 C 8 1 8 10 1 8 207 257 D 11 13 16 300 Depending on feet ...

Page 8: ...0 minimum 500 minimum H 0 0 A C A B G E D F A A B G E D F C H H Maximum height of cabinetry immediately adjacent to the range from floor to countertop Depending on the height of the feet adjustment The cooking surface must sit flush or above countertop level See also Additional information about minimum clearance from cooking surface to overhead cabinet or ventilation hood at page no 6 ...

Page 9: ...1 6 Fig 1 6 LEVELLING THE COOKER The cooker may be levelled by screwing the lower ends of the feet IN or OUT fig 1 7 It is important to observe the directions of figure 1 7 1 31 32 50 mm 0 mm 0 Fig 1 7 MOVING THE COOKER WARNING When raising cooker to upright position always ensure two people carry out this manoeuvre to prevent damage to the adjustable feet fig 1 8a WARNING Be careful do not lift t...

Page 10: ...ip bracket and ensure they are properly fitted together to prevent the range from tipping To fit the anti tip bracket 1 Thread the bolt through the adjustable bracket and fix in place using the two supplied nuts Ensure the nuts are well tightened 2 Fix the adjustable bracket to the back of the range centered on the lower edge using the two supplied screws and washers 1 2 3 Fig 1 9 ...

Page 11: ... two nuts are well tightened after any adjustments IMPORTANT Use the proper screws to fix the stability bracket in place according to the type of material on the floor and or wall Before drilling and holes or inserting any screws into the floor or wall check that you will not damage any wiring or pipes WARNING Slide range back so bolt head on the adjustable bracket assembly is under anti tip brack...

Page 12: ...ont guard as shown in figure 1 12 1 Remove the backguard A 2 Remove the pan supports the burner caps and the flame spreaders 3 Unscrew cooktop fixing screws B and C in figure below 4 Remove the cooktop keep attention not to damage the gaskets fitted above the burner cups below the cooktop 5 Install the front guard D by inserting the wire terminals into the proper holes above the control panel E in...

Page 13: ... so can result in death explosion or fire Fig 2 1 All gas connections must be made according to national and local codes This gas supply service line must be the same size or greater than the inlet line of the appliance Sealant on all pipe joints must be resistant to the action of LP Propane gas The range is equipped for the use with NATURAL gas It is design certified by CSA International for NATU...

Page 14: ...o the extension pipe interposing the gasket supplied The regulator cover must be oriented toward the front side of the range IMPORTANT use two wrenches to tighten the connection Insert the extension pipe into the supplied support bracket B as shown bend in the metal tab 90 degrees to allow the pipe to be fitted into the bracket detail 1 bend the metal tab back into its original position to secure ...

Page 15: ...e front side of the range IMPORTANT use two spanners to tighten the connection STEP 4 Fix the extension pipe support bracket onto the back of the range using the two supplied screws Take care to ensure the bracket is fitted the right way up with the opening at the top The regulator cover must be ordiented toward the front side of the range Fig 2 4 Fig 2 5 B B Gasket ...

Page 16: ...ting Gasket Range manifold Manifold male pipe fitting 1 2 G cylindrical ISO 228 1 male E x t e n s i o n p i p e f e m a l e p i p e f i t t i n g 1 2 G cylindrical ISO 228 1 female Gasket Extension pipe Extension pipe female pipe fitting Arrow WARNING check the right positioning of the gas regulator The arrow on the gas regulator must be oriented toward the connector To mains connection To range ...

Page 17: ...t be isolated from the gas supply piping system by closing its individual manual shut off valve during any pressure testing of the gas supply piping system at test pressure equal to or less than 1 2 PSI 3 5 kPa 3 Flexible Connections If local codes permit CSA or UL design certified flexible metal appliance connector is recommended for connecting this range to the gas supply line Do Not kink or dam...

Page 18: ...ding to the injectors TABLE The nozzle diameters expressed in hundredths of a millimetre are marked on the body of each injector CAUTION Save the injectors removed from the appliance for future use SETTING THE PRESSURE REGULATOR The pressure regulator is accessible by removing the storage drawer the pressure regulator is positioned on the rear right side of the range fig 2 9 To remove the storage ...

Page 19: ...y the safety catches will automatically hook into place Fig 2 10 Pressure regulator REGULATOR COVER NATURAL GAS REGULATION LP PROPANE REGULATION Fig 2 9 To set the pressure regulator fig 2 9 1 Unscrew the regulator cover 2 Unscrew the A component reverse and screw it according to the LP PROPANE or NATURAL GAS regulation 2 ...

Page 20: ... as not to require the regulation of the primary air 2 INJECTORS TABLE NOMINAL POWER REDUCED POWER LP PROPANE 11 W C P NATURAL GAS 4 W C P BURNERS BTU hr BTU hr Ø injector 1 100 mm Ø injector 1 100 mm Semirapid SR 8000 1500 85 139 Triple ring TR 12000 5000 102 170 Dual D Inner crown 2800 1 1100 1 50 3 80 3 Outer crown 17000 2 6500 2 80 x2 4 139 x2 4 1 Power calculated only with inner crown operati...

Page 21: ... and maximum rate of inner crown Remove the knob With a thin screwdriver turn the regulation screw R3 until adjustment is correct For LP PROPANE gas tighten the adjustment screws completely R1 Regulation screw Triple ring and semirapid burner R2 Regulation screw Inner crown of dual burner R3 Regulation screw Outer crown of dual burner After regulation repeat the operations indicated in paragraph 2...

Page 22: ...es Recreational vehicles or In an area where local codes prohibit grounding through neutral use a 4 conductor cord or conduit The range must be connected to the proper electrical voltage and frequency as specified on the rating plate The range can be connected directly to the fused disconnect or circuit breaker box through flexible armoured or non metallic sheathed copper cable with grounding wire...

Page 23: ...staller Show the owner the location of the circuit breaker Mark it for easy reference 4 Wire Installation fig 3 2 1 Loosen the L1 L2 and neutral screws 2 Mount the conduit fitting to the 7 8 22mm hole in the strain relief bracket 3 Secure the neutral power lead to the center terminal and tighten the screw 4 Secure the L1 and the L2 power leads to the terminals immediately to the left L1 and right ...

Page 24: ...volt 60Hz AC only electrical supply is available a 30 amp maximum circuit protection is required fused on both sides of the line A time delay fuse or circuit breaker is recommended This range is equipped with a Certified Power Cord intended to be plugged into a standard 14 50R wall receptacle Be sure the wall receptacle is within reach of range s final location Do not use an extension cord In the ...

Page 25: ...nt supérieur G Broil element Élément chauffant de gril CIR Circular element Élément chauffant circulaire S1 Oven temperature indicator light Voyant de la température du four S2 Oven power on indicator light Voyant de fonctionnement du four V Oven fan Ventilateur du four LF Oven lamps Lampes du four PR Electronic programmer Programmateur électronique OTHERS AUTRES CF Cooling fan Ventilateur de réfr...

Page 26: ...26 ...

Page 27: ...27 ...

Page 28: ...ranscription errors in the present booklet The manufacturer reserves the right to make all modifications to its products deemed necessary for manufacture or commercial reasons at any moment and without prior notice without jeopardising the essential functional and safety characteristics of the appliances ...

Reviews: