20303735
23
VWDV70 Series Gas Fireplace
4. Horizontal runs of flexible vent shall be supported
at maximum 2 foot intervals; vertical runs, five feet
intervals. Metal strapping, properly secured, is an
acceptable means to support the flexible vent.
5. Flexible vent spacers are to be installed at inter-
vals prescribed by the flexible vent manufacturer;
and in such a way as to maintain concentric inner
and outer vent spacing.
D. Attaching flexible venting to vertical termination
assemblies.
1. When using Duravent pipe, an Vermont Castings
Group flex-to-pipe adapter (FPA) and/or rigid pipe
section(s) is required to connect the flexible vent
assembly to the vertical termination by using
three self-penetrating screws.
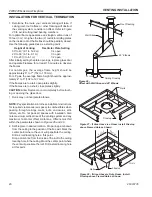
2. Review
Figure 33
and corresponding instruc-
tions for proper overlap, clamp and screw place-
ment.
3. Three each self-penetrating screws are drilled
opposite one another and below the gear
clamp.
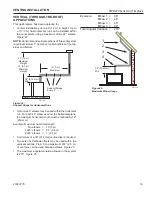
4. Use only listed and approved terminations and
accessories, installed per the installation instruc-
tions and
Figure 32
.
FLex Vent InstaLLatIon
Termination
Cap
Storm Collar
Roof Support
Flashing
Rigid Pipe
Length
Flex to Pipe
Adapter
Firestop
UL1777 Flex
PIpe
DVFF8A/8
Adapter
Figure 32 -
Typical Vertical Flex Vent Installation
FP1975
pipe connection
Screws
(3 Places
equidistant
just above
gear clamp)
Rigid Pipe Length
Flex to Pipe Adapter
Gear Clamp
1
C\v
" Flexible Pipe and Adapter
Outer Collar Overlap
UL1777 Flex Vent
Figure 33 -
Typical Pipe Connection
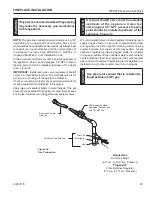
Gear Clamp
FP1976
horizontal flex
Screws
(3 Places equidistant just
above gear clamp)
Gear Clamp
UL1777 Flex Vent
1
C\v
" Flexible Pipe and
Collar Overlap
Vermont Castings
Group Horizontal
Vent Termination
Figure 34 -
Typical Horizontal Flex Vent Installation
FP1974
E. Installing flexible venting to horizontal termination
assemblies.
1. Connect the 5" flexible vent to the horizontal
termination as in
Figure 34
.
2. Connect the 8" flexible vent to the termination
ring as in
Figure 34
.
3. Review
Figure 34
for proper overlap and clamp
placement.
4. Three each self-penetrating screws are drilled
opposite one another and below the gear
clamp.
5. Use only listed an approved terminations and
accessories, installed per the termination instruc-
tions and
Figure 34
.

