background image

SSI30 Wood Insert

63D4004

7

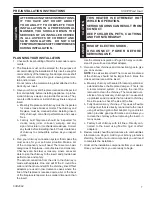
pRE-INSTAllATION INSTRuCTIONS

CA

u

TION

AFTER REAdINg ThESE INSTRuCTIONS, 

IF  YOu  hAvE  ANY  dOubT  AbOuT 

YOuR  AbIlITY  TO  COMplETE  YOuR 

INSTAllATION  IN  A  pROFESSIONAl 

MANNER,  YOu  ShOuld  ObTAIN  ThE 

SERvICES  OF AN  INSTAllER  vERSEd 

IN  All  ASpECTS  OF  CORRECT  ANd 

SAFE  INSTAllATION.    dO  NOT  uSE 

TEMpORARY, MAkEShIFT COMpROMISES 

duRINg INSTAllATION.

CA

u

TION

ThIS  hEATER  IS  EXTREMElY  hOT 

WhIlE IN OpERATION. 
SERIOuS buRNS CAN RESulT FROM 

CONTACT.
kEEp  ChIldREN,  pETS,  ClOThINg 

ANd FuRNITuRE AWAY

d

AN

g

ER

RISk OF ElECTRIC ShOCk. 
dISCONNECT  pOWER  bEFORE 

SERvICINg uNIT.

plANNINg YOuR INSTAllATION

1.  Check with local building official for local code require-

ments.

2.  The fireplace must not be altered for the purpose of 

accommodating the installation of this insert, except for 

removal of any of the following: flue damper, smoke shelf 

or baffle, ember catches, fire grate, viewing screen/cur-

tain and/or doors.

  Do not remove the metal warning label attached to the 

back of your insert.

3.  Have your chimney and fireplace cleaned and inspected 

for serviceability before installing appliance. A profes-

sional chimney sweep can provide this service. They 

can also offer advice or install chimney liners and your 

insert.
a.  Masonry fireplaces and chimney must be inspected 

for cracks, loose bricks or mortar. The chimney and 

fireplace  must  be  cleaned  before  installing  insert. 

Dirty chimneys can affect performance and cause 

fires.

b.  Factory  built  fireplaces  should  be  inspected  for 

cracks,  leaky  joints,  corrosion,  warping,  and  any 

sign of structural or mechanical weakness. Correct 

any faults before installing insert. Check clearances 

of chimney to combustible surface as you inspect 

joints.

4.  Plan your chimney connection system that makes the 

most  sense  for  your  particular  situation.  Make  a  list 

of the component you will need. There are two basic 

categories of fireplaces—manufactured and masonry. 

Chimneys can be steel or masonry. Liners are avail-

able to size the chimney to the insert and provide best 

performance and safety.

  The actual connection from the unit to the chimney is 

made with adapters. One end will fit the 6” round flue 

collar and the other end will fit the chimney liner. Offset 

adapters are used in low clearance cases where the 

flue of the fireplace is recessed quite a bit, or the back 

of the fireplace is tapered to a smaller dimension than 

the insert. 

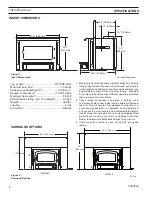
  Use the dimensions guide on 

Page 6

 to help you under-

stand if you will need an offset adapter.

5.  Here are a few chimneys and connection types to give 

you an overview:


NOTE:

 Flue size is important! The cross sectional area 

of the chimney should not be larger than 3 times the 

cross sectional area of the insert.
a.  Masonry chimney with sealed throat and partial liner 

extended above the fireplace damper—This is not 

a  recommended  system.  It  requires  the  insert  be 

removed to clean the chimney. The mass and over-

all size of many masonry chimneys can cause start 

up problems and creosote that can lead to chimney 

fires. Be sure to check the size of the flue.

b.  Fully lined masonry chimney—This uses a flexible 

or ridge liner that is directly connected to the insert 

using a flexible, rigid or offset adapter.  A good instal-

lation provides good performance and allows you 

to clean the chimney without removing the insert, in 

many cases.

c.  Factory built chimney with full liner—Directly con-

nected  to  the  insert  using  flexible,  rigid  or  offset 

adapters.

6.  Review mantel, hearth and clearance to combustibles 

information on 

Page 8

. Add to your list any protective 

shielding, hearth or surround components you will need 

to complete the installation.

7.  Order all the installation components from your dealer. 

Once you have them, you are ready to begin.

Summary of Contents for Savannah SSI30

Page 1: ...ur appliance If not properly installed a house fire may result To reduce the risk of fire follow the installation instructions Failure to follow instructions may result in property damage bodily injury or even death Contact local building fire officials or authorities having jurisdiction about permits restrictions and installation inspection requirements in your area 203061 VSI30 cover ...

Page 2: ... a question about your insert or its performance We have built your insert with the utmost care With normal use and proper care it will provide you with many years of service This manual contains valuable instructions on the installation and operation of your Vermont Castings insert You will also find useful information on assembly and maintenance procedures We urge you to read the manual thorough...

Page 3: ...use cancer birth defects and other reproductive harm California Health and Safety Code Sec 25249 6 WARNING HOT GLASS WILL CAUSE BURNS DO NOT TOUCH GLASS UNTIL COOLED NEVER ALLOW CHILDREN TO TOUCH GLASS Need to ask questions Require Parts Information First contact the Vermont Castings Dealer from whom you purchased your insert for parts and service Have the following information ready Date of purch...

Page 4: ...nstalling the insert This insert and chimney system must be vented out doors Do not obstruct or modify air inlets outlets in any manner Burn only solid wood fuel The insert is intended for operation only with the door fully closed SAFETY INFORMATION BEFORE INSTALLATION OF YOUR APPLI ANCE 1 Check with the building inspector s office for compliance with local codes a permit may be required 2 This ap...

Page 5: ... With the door closed the rate of burning is regulated by the amount of air allowed to enter the unit through the air control With experience you will be able to set the control for heat and burning time desired Avoid Damaging the Glass Door Panel Do not abuse the glass by slamming the door or striking the glass with a log Never operate your insert if it has damaged or broken glass If you need to ...

Page 6: ...ctors Maximum burn times are achieved under different operating conditions than are maximum heat outputs 2 These values are based on operation in building code conforming homes under typical winter climate conditions in the U S If your home is of nonstandard construction e g unusually well insulated not insulated built underground or if you live in a more severe and more temperate climate these fi...

Page 7: ... your particular situation Make a list of the component you will need There are two basic categories of fireplaces manufactured and masonry Chimneys can be steel or masonry Liners are avail able to size the chimney to the insert and provide best performance and safety The actual connection from the unit to the chimney is made with adapters One end will fit the 6 round flue collar and the other end...

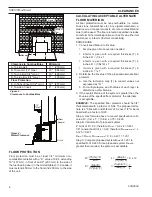
Page 8: ...e R value of the proposed alternate floor protector a Use the formula in step 1 to convert values not expressed as R b For multiple layers add R values of each layer to dtetermine overal R value 3 If the overall R value of the system is greater than the R value of the specified floor protector the alternate is acceptable Example The specified floor protector should be 3 4 thick material with a k f...

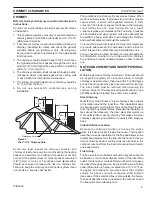
Page 9: ... chimney and overheat adjacent combustible material To reduce the amount of creosote that may form remember to provide adequate air for combustion and to strive for small intense fires rather than large smoldering ones You can never be too safe Contact your local fire authority for information on what to do in the event of a chimney fire and have a clearly understood plan on how to handle one Note...

Page 10: ...the insert outlet Pipe and Chimney Layout Every bend in the flue will act as a brake on the exhaust as it flows from the firebox to the chimney cap The ideal pipe and chimney layout is straight up from the insert through completely straight chimney Use this layout if at all possible as it will promote optimum insert performance and simplify maintenance If the insertpipe must elbow to enter a chimn...

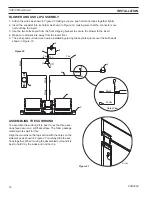
Page 11: ...be adjusted you can slide the rear wheel off the pallet and loosen the two 2 bolts 1 2 wrench Figure 9 ST1069 leg leveller Leg Leveller Rear Wheel ST1069 Figure 8 ST1070 rear leveller Loosen Bolts to Level Shipping Pallet ST1070 Figure 9 The VCI30 is shipped with the power cord for the blower on the right side If you want to move it to the left side now is the best time as you can access it under ...

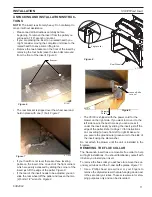
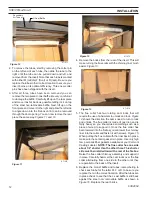
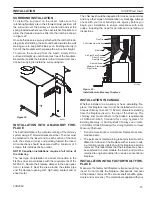
Page 12: ...ke turning the flue collar with the chimney liner much easier Figure 13 ST1074 rear firebrick ST1074 Figure 13 5 The flue collar has two rotating cam locks that will require the use of a hammer to unlock and lock Figure 14 shows the direction the cams need to turn to lock and unlock The flue collar is made of cast iron and is fairly heavy so you should use something such as a piece of wood to supp...

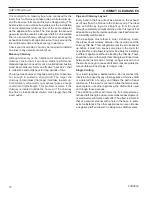
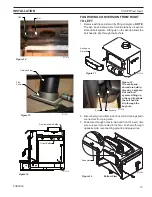
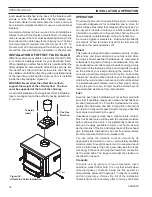
Page 13: ... ash lip allows the bolt head to slip through the keyhole ST1078 remove ashlip shroud Ashlip and Shroud ST1078 Figure 17 ST1079 bolt and keyhole Bolt Keyhole ST1079 Figure 18 The ashlip and shroud are held in place by a keyhole slot and bolt system Lifting up n the ash lip allows the bolt head to slip through the key hole 2 Disconnect ground from side of insert and unplug spade connectors from plu...

Page 14: ...an now be installed by placing the keyhole cutouts over the bolt heads shown in Figure 18 White Black White White Tan White Black Green Green Black Black Tan 1 2 3 4 5 6 7 8 8 Detail View 9 On Off Tan Tan ST1081 SSI30 WIRING Figure 20 Assembling the Surround To assemble the surround it is best to lay the three sec tions face down on a soft flat surface The foam package material works well for this...

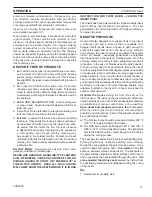
Page 15: ...pe and the damper opening with high temp sealant and or sheet metal The chimney should be inspected for cracks loose mortar and any other signs of deterioration or blockage Always check with your local building code agency before you begin your installation to ensure compliance with local codes including the need for permits and any follow up inspections ST1084 masonry install Flue Tile Full Liste...

Page 16: ...irebrick When the insert is used for the first time the solvents in the paint will smoke off Wood This heater is designed to burn natural wood only Higher efficiencies and lower emissions generally result when burning air dried seasoned hardwoods as compared to softwoods or to green or freshly cut hardwoods Only use dry seasoned wood Green wood besides burning at only 60 percent of the fuel value ...

Page 17: ...N USE INSTRUCTION FOR FIRST BURN CURING THE Insert PAINT Your insert has been painted with the highest quality insert paint and has special break in procedures The heat generated by the normal operation of the insert will serve to harden the paint Negative Pressure Good draft also depends on a supply of air to the insert a chimney can t pull in more air than is available to it Sluggish draft resul...

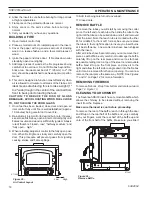
Page 18: ...n posi tion When fire brightens slowly and carefully open the door This procedure will prevent gases from igniting causing smoke and flame spillage ST1087 remove baffle ST1087 Figure 26 Remove Baffle 10 Add fuel being careful not to overload 11 Close doors REMOVE BAFFLE To remove the tubes you will start by removing the cotter pin on the left end of each tube then slide the tube to the right until...

Page 19: ...combustible floor or on the ground well away from all combustible materials pending final disposal If the ashes are disposed of by burial in soil or otherwise locally dispersed they should be retained in the closed container until all cinders have thoroughly cooled Other waste should not be placed in the ash container WARNING Things to remember in case of chimney fire 1 Close draft control 2 Call ...

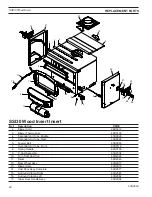
Page 20: ...y Air Tube Front 63D0112 8 Spring Handle 63D0185 9 C Cast Assembly 63D2004 10 Turn Tight Cast Iron 63D4023 11 Slider 63D2040 12 Rear Wheel Assy 63D2072 13 Blower Assy 63D2075 14 Cast Door Assy Complete 63D2077 15 Surround Clamp Right 63D2081 16 Surround Clamp Left 63D2082 17 Glass Door Handle Assy 63D2084 13 3 18 17 14 25 24 8 12 2 16 21 20 27 19 15 11 1 26 28 10 23 22 6 9 5 4 7 203061 VSI30 parts...

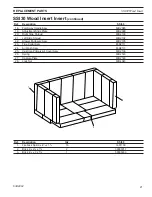
Page 21: ...D2105 23 Flue Collar Assy 63D2111 24 Air Wash Assy 63D2113 25 Cast Iron Primary Air Cover Assy 63D2130 26 Spring 63D2145 27 Capture Plate 63D2146 28 Lock Nut 63D4040 Ref Description SSI30 SSI30 Wood Insert Insert continued 1 2 3 634004 SSI30 brick layout 2011 Ref Description Qty SSI30 1 Firebrick Split 9 x 4Z x x 1Z v 16 1601103 2 Brick 9 x 2Z v x 1Z v 2 30005317 3 Brick 4Z x x 3 x 1Z v 1 30005333...

Page 22: ...icient space in the firebox Adjust the air control setting to desired setting i Note The lower the air control setting the longer the burn time of your firewood 2 What type of wood is best to use as firewood Dry seasoned hardwood should be used Avoid green unseasoned wood Green wood besides burning at only 60 percent of the fuel value of dry seasoned wood will deposit creosote on the inside of you...

Page 23: ... or not there is sufficient air in your home for your insert curtail from using those appliances known to consume the air where possible or open a window or door to allow air to enter the home b Environmental Conditions High trees low lying house location such as in a valley tall buildings or structures surrounding your house and windy conditions can cause poor draft or down drafting c Cold Chimne...

Page 24: ...ance is not operated and maintained according to the operating instructions supplied with the appliance and does not extend to 1 firebox burner assembly damage by over firing over loading accident neglect misuse abuse alteration negligence of others including the installation thereof by unqualified installers 2 the costs of removal reinstallation or transportation of defective parts on the applian...

Reviews: