


3
Defiant
®
1610CE Non-Catalytic Woodburning Stove
30003846
3. Determine the correct length of the appropriate-sized
gasket by laying it out in the channel. Allow an extra
5-51 mm (1-”), and mark the spot to be cut.
4. Remove the gasket from the channel, place it on a
wood cutting surface, and cut it at the marked spot with
a utility knife.
Twist the ends slightly to keep the gasket from unravel-
ing.
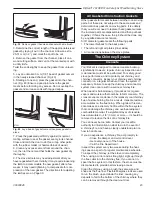
5. Lay an unbroken 3 mm (1/8”) bead of gasket cement
in the newly-cleaned channel. (Fig. 40)
6. Starting at one end, press the gasket into the chan-
nel. (Fig. 48) Ensure a good joint where the gasket
meets before trimming any excess. Do not overlap the
gasket ends or leave ends with ragged edges.
ST559
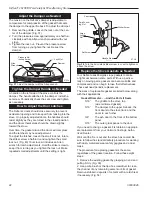
Remove
gasket
11/30/00 djt
Fig. 39
Remove gasket then clean channel with wire brush.
ST560
ST559
Remove
gasket
11/30/00 djt
Cement
Stove Gasket
ST561
Fig. 40
Lay a bead of gasket cement then press gasket in
place.
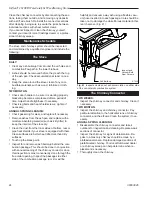
7. Press the gasketed part firmly against its normal
mating surface to seat the gasket evenly in its channel.
Close and latch the door to do this, or tap other parts
with the rubber mallet (or hammer/block of wood).
8. Clean any excess cement from around the chan-
nel, then let the cement that holds the new gasket dry
thoroughly.
9. The stove’s doors may need adjustment after you
have regasketed them. Initially, it may require loosening
the latch to accommodate the new gasket; after a few
weeks, it may need tightening to compensate for com-
pression of the new gasket. The directions for adjusting
the latches are on Page 30.
all gasketed construction gaskets
Other gaskets form seals between all other non-moving
parts, but these are not subject to the same wear and
deterioration as gaskets on moving parts. It is unlikely
that you will ever need to replace these gaskets unless
the involved parts are disassembled and then put back
together. If this is the case, the job should be done only
by a qualified service technician.
5/16” diameter gasket seals the following parts:
•
The lower fireback to the back panel
•
The left and right air plates (inner sides)
•
All connections between the stove plates.
The chimney System
creosote
Your Defiant is designed to reduce creosote build-up
significantly. However, regular chimney inspection and
maintenance must still be performed. For safety, good
stove performance, and to protect your chimney and
chimney connector, inspect your chimney and chimney
connector on a regular schedule. Clean the system if
necessary. Failure to keep the chimney and connector
system clean can result in a serious chimney fire.
When wood is burned slowly, it produces tar, organic
vapors and moisture that combine to form creosote. The
creosote vapors condense in the relatively cool chimney
flue of a slow-burning fire. As a result, creosote residue
accumulates on the flue lining. When ignited, this creo-
sote makes an extremely hot fire within the flue system
that can damage the chimney and overheat adjacent
combustible material. If a significant layer of creosote
has accumulated —1/8” (3 mm) or more — it should be
removed to reduce the risk of a chimney fire.
You can never be too safe. Contact your local fire
authority for information on what to do in the event of
a chimney fire, and have a clearly understood plan on
how to handle one.
If you do experience a chimney fire, act promptly to:
• Close the damper and air control lever.
• Get everyone out of the house.
• Call the Fire Department.
Inspect the system every two weeks during the heat-
ing season as part of a regular maintenance schedule.
To inspect the chimney, let the stove cool completely.
Then, using a mirror and a strong light, sight up through
the flue collar into the chimney flue. If you cannot in-
spect the flue system in this fashion, the stove must be
disconnected to provide better viewing access.
Clean the chimney using a brush the same size and
shape as the flue liner. Flexible fiberglass rods are used
to run the brush up and down the liner, causing any
deposits to fall to the bottom of the chimney where they
can be removed through the clean-out door.


