


17
Defiant
®
1610CE Non-Catalytic Woodburning Stove
30003846
ST263
starting a fire
12/99
ST63
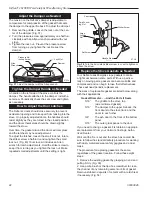
Fig. 31
Start the fire with newspaper and dry kindling.
ST264
good fire
12/99
ST64
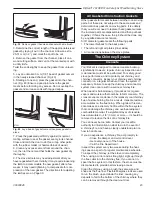
Fig. 32
Add larger pieces of wood as the fire begins to burn
well.
1. Open the stove bypass damper, and open the prima-
ry air control fully.
. Place several sheets of crumpled newspaper in the
stove. Place six or eight pieces of dry kindling split to a
finger-width size on the paper. On the kindling, lay two
or three larger sticks of split dry wood approximately
5-51 mm (1-”) in diameter. (Fig. 31)
3. Light the newspaper and close the door. Gradu-
ally build up the fire by adding a few 76-17 mm (3-5”)
diameter pieces of split firewood.
if this is one of the
first few “break-in” fires, let the fire burn brightly,
and then let it die out.
During the break-in fires, do not let the stove get hot-
ter than 60° C (500° F) as measured on an optional
stove-top thermometer. Adjust the air control lever as
necessary to control the fire.
Some odor from the stove’s hot metal and the paint is
normal for the first few fires.
NoTe:
Some chimneys must be “primed,” or warmed
up, before they will draw sufficiently to start a fire. To
correct this situation, roll up a couple pieces of news-
paper, place them on top of the kindling and toward
the back of the stove, light them, and close the doors.
This will encourage the smoke to rise rapidly, making it
easier to establish a good draft.
Once the draft is established, open the front door and
light the rest of the fuel from the bottom. Do not light
the main bed of fuel until the chimney begins drawing,
and repeat the procedure as often as necessary if the
initial attempt is unsuccessful.
4.
if your Defiant has been broken-in previously
us-
ing Steps 1-3, continue to build the fire gradually. Add
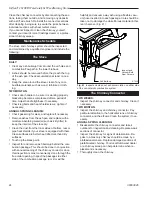
larger wood with a diameter of 76-10 mm (3-4”). Con-
tinue adding split logs of this size to the briskly-burning
fire until there is a glowing ember bed 51-76 mm (-3”)
deep. (Fig. 3) A good ember bed is necessary for
proper functioning of the non-catalytic system and may
take an hour or more to establish.
5.
Close the damper when the griddle temperature
reaches 30° C (450° F).
6.
Adjust the air control for your desired heat output.
NoTe:
Stove installations vary widely, and the operat-
ing guidance given here is only a starting point . The
draft management information on Page 7 will explain
in detail how the features of your installation may help
or hinder good draft, and how you may need to vary
your firing technique if your installation doesn’t encour-
age a good draft.
ST264a
add wood fire
11/00
ST64a
Fig. 33
Add full size logs after the ember bed is 3” (75mm)
deep.
Refuel while the embers are Still hot
When reloading, best results will be achieved if you first
de-ash the stove by stirring the fuel bed to allow ash to
fall through the grate into the ash pan.
Do not break the charcoal into very small pieces or
pound or compress the charcoal bed.
It is important that air can circulate through the charcoal
bed during the burn. Larger pieces of charcoal allow
more air to circulate under the wood, resulting in the
fire reviving more quickly.
For best results when refueling, wear long-cuffed stove
gloves to protect your hands and forearms, add fuel
while the stove still has plenty of glowing embers to
re-kindle the fire, and include some smaller pieces of
wood in the new fuel load to help the stove regain its


