background image

North America:

 +1-888-747-6246

| CALA:

 +1-303-254-7005

Email: 

[email protected]

EMEA:

 +44 (0) 845-843-7333 

|

Mobile Support

:

 +49 (0) 4321-269 81 36

Email: 

[email protected]|


[email protected]

APAC:

 Hong Kong: +852 2797 5678 

|

 Singapore: +65-68266099 

Email:

 [email protected]

© 2010 Verint Video Intelligence Solutions. All Rights Reserved Worldwide. All other trademarks and product names are the property of their respective 

owners. Part Number: 23-500-0075 rev A0

1

Documentation

To minimize our carbon footprint, we are removing the supporting product 

documentation CD that was shipped with our Nextiva Intelligent Edge 

Device products. To obtain the latest version of the manuals, please visit: 

www.verint.com/manuals

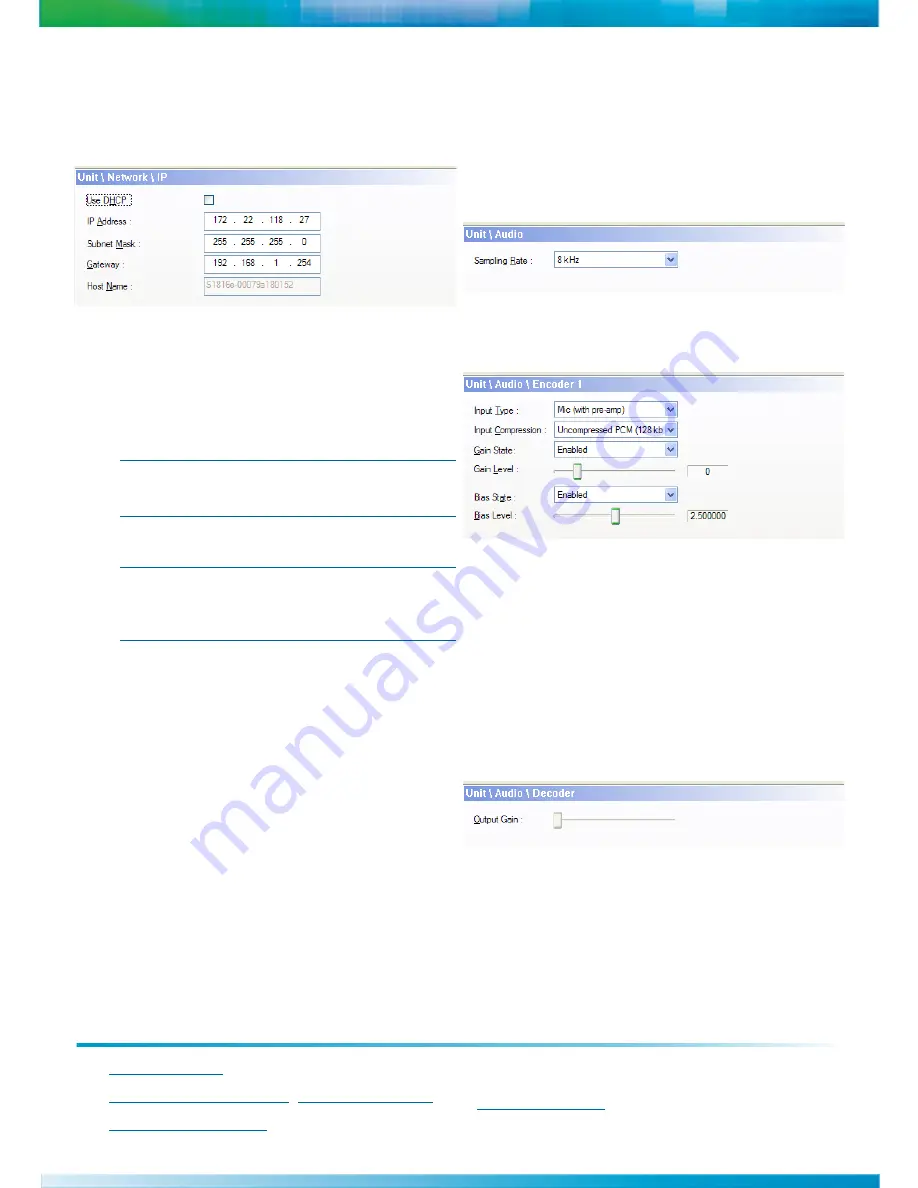
To set the IP address of the device 

manually:

1. Select the device in the Units box and click 

Configure.

2. In the Unit Name box, type a name for the device.
3. In the tree view, expand the Network node and 

click IP.

4. In the IP Address box, type an IP address for the 

device.

5. In the Subnet Mask box, type the address 

specifying in which subnet the IP address of the 

device belongs.

6. In the Gateway box, type the IP address of the 

server that acts as an access point to another 

network.

NOTE: 

You do not need to use a gateway if the 
device communicates with other devices on 
the same subnet.

7. Click OK.
8. Click Exit to close SConfigurator.

NOTE: 

Any configuration changes made to the 
device using Nextiva VMS will override the 
changes made using SConfigurator or the 
Web Interface.

Configuring Audio

Use SConfigurator to set the audio settings.

To configure the audio:

1. Double-click 

SConfigurator.exe

 to start 

SConfigurator.

2. Select the Units tab, then click Discover.
3. Select the device and click Configure.
4. In the tree view, click the Audio node.

5. From the Sampling Rate list, select from 8 kHz, 

16kHz, or 24 kHz.

6. Expand the Audio node.
7. Select Encoder to configure.

8. Set the value for the following settings:

Input Type: Select Line-in or Mic (with pre-

amp).

Input Compression: Select Uncompressed PCM 

(128 kbps).

Gain State: Select Enabled or Disabled.

Gain Level: Move the slider to the left or right.

Bias State: Select Enabled or Disabled.

Bias Level: Move the slider to the left or right.

9. Click OK.

For the S1801e-R and S1801e-R-HD decoders:

a. Select Decoder.

b. Move the Output Gain slider to the left or right.
c. Click OK.

10.Click Exit to close SConfigurator.

Summary of Contents for S1801e

Page 1: ...ENERGY STAR qualified power supply for Nextiva S1800e series single and dual port devices except the S1801e POE Optional Accessories VRM8 19 inch rack mount panel for eight Nextiva S1800e series single and dual port devices PSPOE 802 3af compliant Power over Ethernet injector Hardware Overview The Nextiva S1800e series single dual port devices are available in five models S1801e S1801e POE S1801e ...

Page 2: ...ace as well as the surrounding area 2 Place the device on the flat surface 3 Ensure that you have access to both the front and rear of the device To install the Nextiva S1800e series device on a rack 1 Remove the two screws from the Nextiva S1800e series device 12V GND RLY In1 GND In2 RLY RX R RTS T TX T CTS R GND GND 12V In Out LAN 10 100 12V 12V GND GND GND GND RLY RLY In1 In2 RX R CTS R RTS T T...

Page 3: ...This section explains how to connect the video network and power cables to the Nextiva S1800e series device CAUTION Do not connect the Nextiva S1800e series devices to any cabling BNC PoE or otherwise that runs outdoor To connect the wiring for power 1 Remove the terminal block plug from the rear of the device 2 Verify the polarity of each wire from the power supply according to the attached label...

Page 4: ...a PWR port of a POE injector If you use a PoE injector make sure the Data port of the injector is properly connected to the ethernet switch To connect the cables for video and network on the encoders 1 Connect the video cables from the analog cameras to the BNC connectors on the rear of the device 2 Plug an ethernet cable into the LAN 10 100 RJ 45 network connector on the back of the device NOTE F...

Page 5: ...y double clicking SConfigurator exe on the desktop 4 In the General tab click Program Options 5 Check Detect All Units on LAN 6 Ensure that the VSIP Port is 5510 otherwise click Default 7 Ensure that the Discovery IP Address is 255 255 255 255 otherwise click Reset to Broadcast 8 Click OK 9 Select the Units tab then click Discover The information displayed for the Nextiva S1800e series device will...

Page 6: ...the device belongs 6 In the Gateway box type the IP address of the server that acts as an access point to another network NOTE You do not need to use a gateway if the device communicates with other devices on the same subnet 7 Click OK 8 Click Exit to close SConfigurator NOTE Any configuration changes made to the device using Nextiva VMS will override the changes made using SConfigurator or the We...

Reviews: