background image

5

To connect the audio cable:

1. Plug the audio cable from the audio source to the 

audio input connectors on the rear of the device.

Obtaining the IP Address of 
the Nextiva S1800e Series 
Device

By default, all Nextiva S1800e series devices are 

DHCP (Dynamic Host Configuration Protocol) 

enabled. Use SConfigurator to obtain the IP address 

of the device. If you have a DHCP server, the device 

will automatically obtain a valid IP configuration. 

Otherwise, you need to manually enter a IP address.

To obtain the IP address of the device:

1. Download the latest version of SConfigurator from: 

www.verint.com/manuals

.

2. Extract the executable file 

(

SConfigurator.exe

) to the desktop of the 

computer.

3. Start SConfigurator by double-clicking 

SConfigurator.exe

 on the desktop.

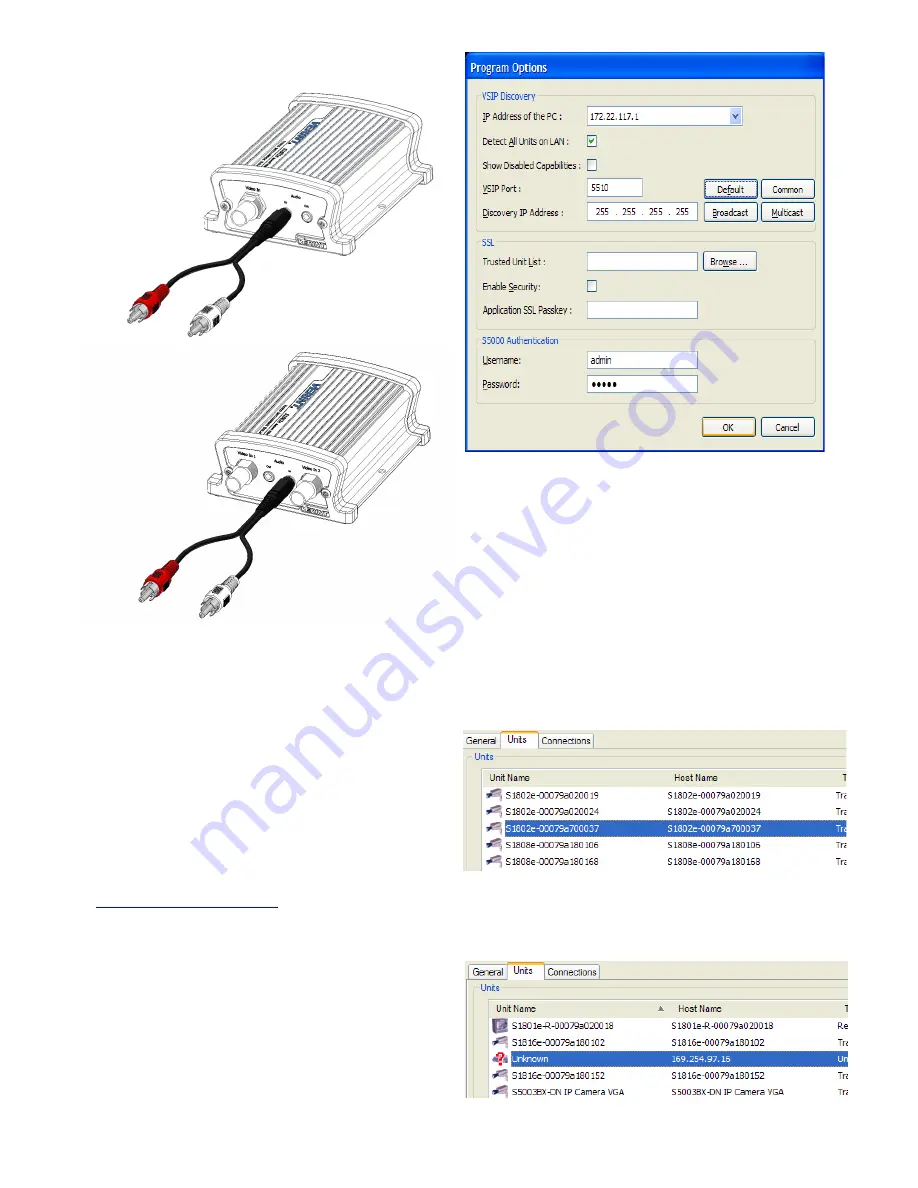
4. In the General tab, click Program Options.

5. Check Detect All Units on LAN.
6. Ensure that the VSIP Port is 5510; otherwise, click 

Default.

7. Ensure that the Discovery IP Address is 

255.255.255.255; otherwise, click Reset to 

Broadcast.

8. Click OK.
9. Select the Units tab, then click Discover. The 

information displayed for the Nextiva S1800e 

series device will vary depending on whether your 

network is using a DHCP server or not.

In a DHCP environment, the Unit Name column 

in the Units box displays the model name and a 

unique alpha-numeric value that corresponds 

to the MAC address of the device.

In APIPA mode, the Unit Name column in the 

Units box displays Unknown and the first two 

octets of the IP address in the Address column 

is 169.254. Use the following procedure to set 

the IP address for the device.

S1801e or S1801e-POE or 
S1801e-R or S1801e-R-HD 

S1802e

Summary of Contents for S1801e

Page 1: ...ENERGY STAR qualified power supply for Nextiva S1800e series single and dual port devices except the S1801e POE Optional Accessories VRM8 19 inch rack mount panel for eight Nextiva S1800e series single and dual port devices PSPOE 802 3af compliant Power over Ethernet injector Hardware Overview The Nextiva S1800e series single dual port devices are available in five models S1801e S1801e POE S1801e ...

Page 2: ...ace as well as the surrounding area 2 Place the device on the flat surface 3 Ensure that you have access to both the front and rear of the device To install the Nextiva S1800e series device on a rack 1 Remove the two screws from the Nextiva S1800e series device 12V GND RLY In1 GND In2 RLY RX R RTS T TX T CTS R GND GND 12V In Out LAN 10 100 12V 12V GND GND GND GND RLY RLY In1 In2 RX R CTS R RTS T T...

Page 3: ...This section explains how to connect the video network and power cables to the Nextiva S1800e series device CAUTION Do not connect the Nextiva S1800e series devices to any cabling BNC PoE or otherwise that runs outdoor To connect the wiring for power 1 Remove the terminal block plug from the rear of the device 2 Verify the polarity of each wire from the power supply according to the attached label...

Page 4: ...a PWR port of a POE injector If you use a PoE injector make sure the Data port of the injector is properly connected to the ethernet switch To connect the cables for video and network on the encoders 1 Connect the video cables from the analog cameras to the BNC connectors on the rear of the device 2 Plug an ethernet cable into the LAN 10 100 RJ 45 network connector on the back of the device NOTE F...

Page 5: ...y double clicking SConfigurator exe on the desktop 4 In the General tab click Program Options 5 Check Detect All Units on LAN 6 Ensure that the VSIP Port is 5510 otherwise click Default 7 Ensure that the Discovery IP Address is 255 255 255 255 otherwise click Reset to Broadcast 8 Click OK 9 Select the Units tab then click Discover The information displayed for the Nextiva S1800e series device will...

Page 6: ...the device belongs 6 In the Gateway box type the IP address of the server that acts as an access point to another network NOTE You do not need to use a gateway if the device communicates with other devices on the same subnet 7 Click OK 8 Click Exit to close SConfigurator NOTE Any configuration changes made to the device using Nextiva VMS will override the changes made using SConfigurator or the We...

Reviews: