Verint S1801e Quick Installation Manual Download Page 3

3

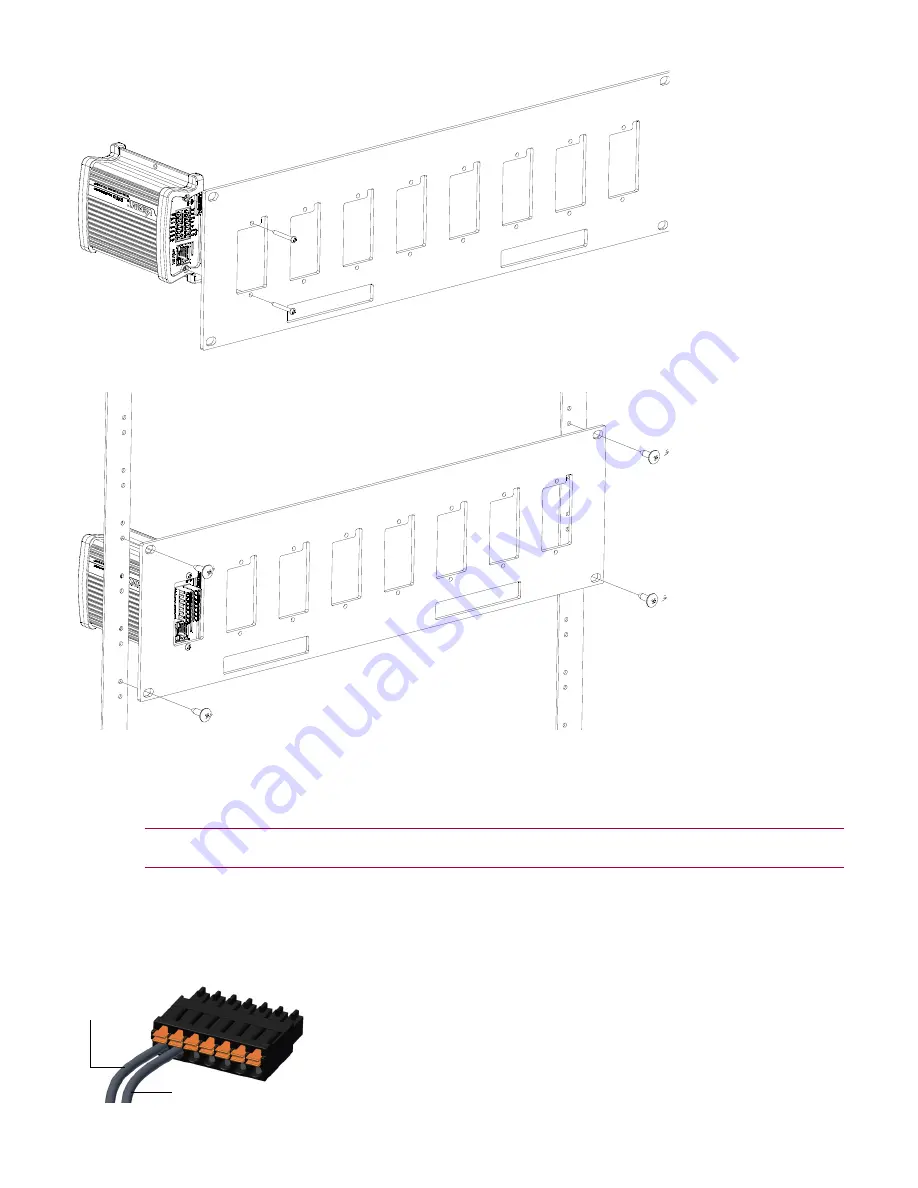
2. Screw the Nextiva S1800e series device to the VRM8 rack mount panel using 5 in-lb (0.56 N-m) force 

with the provided screws.

3. Slide the VRM8 rack mount panel into the 3U mounting space in the rack cabinet.
4. Secure the VRM8 rack mount panel to the rack cabinet using four screws that are supplied with the rack.

Connecting the Nextiva S1800e Series Device

This section explains how to connect the video, network and power cables to the Nextiva S1800e series 

device.

CAUTION: 

Do not connect the Nextiva S1800e series devices to any cabling (BNC, PoE or otherwise) 
that runs outdoor.

To connect the wiring for power:

1. Remove the terminal block plug from the rear of the device.
2. Verify the polarity of each wire from the power supply according to the attached label.
3. Connect the positive power wire in the corresp12V pole and the negative power wire in the 

corresponding GND pole on the terminal block plug. 

+12V

GND

Summary of Contents for S1801e

Page 1: ...ENERGY STAR qualified power supply for Nextiva S1800e series single and dual port devices except the S1801e POE Optional Accessories VRM8 19 inch rack mount panel for eight Nextiva S1800e series single and dual port devices PSPOE 802 3af compliant Power over Ethernet injector Hardware Overview The Nextiva S1800e series single dual port devices are available in five models S1801e S1801e POE S1801e ...

Page 2: ...ace as well as the surrounding area 2 Place the device on the flat surface 3 Ensure that you have access to both the front and rear of the device To install the Nextiva S1800e series device on a rack 1 Remove the two screws from the Nextiva S1800e series device 12V GND RLY In1 GND In2 RLY RX R RTS T TX T CTS R GND GND 12V In Out LAN 10 100 12V 12V GND GND GND GND RLY RLY In1 In2 RX R CTS R RTS T T...

Page 3: ...This section explains how to connect the video network and power cables to the Nextiva S1800e series device CAUTION Do not connect the Nextiva S1800e series devices to any cabling BNC PoE or otherwise that runs outdoor To connect the wiring for power 1 Remove the terminal block plug from the rear of the device 2 Verify the polarity of each wire from the power supply according to the attached label...

Page 4: ...a PWR port of a POE injector If you use a PoE injector make sure the Data port of the injector is properly connected to the ethernet switch To connect the cables for video and network on the encoders 1 Connect the video cables from the analog cameras to the BNC connectors on the rear of the device 2 Plug an ethernet cable into the LAN 10 100 RJ 45 network connector on the back of the device NOTE F...

Page 5: ...y double clicking SConfigurator exe on the desktop 4 In the General tab click Program Options 5 Check Detect All Units on LAN 6 Ensure that the VSIP Port is 5510 otherwise click Default 7 Ensure that the Discovery IP Address is 255 255 255 255 otherwise click Reset to Broadcast 8 Click OK 9 Select the Units tab then click Discover The information displayed for the Nextiva S1800e series device will...

Page 6: ...the device belongs 6 In the Gateway box type the IP address of the server that acts as an access point to another network NOTE You do not need to use a gateway if the device communicates with other devices on the same subnet 7 Click OK 8 Click Exit to close SConfigurator NOTE Any configuration changes made to the device using Nextiva VMS will override the changes made using SConfigurator or the We...

Reviews: