2
1
U S E R I N S T R U C T I O N S
Description
The VeriChip H2 Reader is hand-held Radio Frequency
Identification (RFID) reader which activates an implanted
VeriMed™ RFID Microtransponder with a low power, low
frequency (LF) electromagnetic field. The Reader
receives a unique 16-digit ID number from the VeriMed
Microtransponder. The ID number is used to provide, with
patient consent, physicians and other health
professionals access to a secure database that will
provide the implanted person’s identity and health
information provided by the patient.
Indications
The VeriChip H2 Reader is indicated for use as a portable
instrument that non-invasively reads the ID number of an
implantable VeriMed Microtransponder that is inserted
into the arm of the patient. When activated, the VeriMed
Microtransponder transmits a unique identification
number that will be displayed by the VeriChip H2 Reader
and may be used to access the patient’s identity and
authorized health information from a secure database.
Contraindications
None.
Contents:
VeriChip
H2 Reader Assembly Part Number
600-000515-000 (includes all of the following):
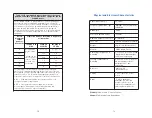
VeriChip H2™ Reader Activation with Manufacturer Settings
1. Press Button F1 and release to power on the Reader.
2. The Reader will enter a self diagnostic mode displaying
the following on the LCD screen:
a. “Initializing”
b. “VeriChip H2 Reader”
“BT Master Rev x.xx”
c. All Pixels active on the two line screen display
d. The number “8” will display in all positions
Check for missing segments. If segments are missing, do not
use and return Reader immediately for repair or replacement.
e. “Battery OK”
f. “BT Connecting - Inquiry Done - Please Wait”
3. Screen will display “PRESS F1 TO SCAN”
4. Press the F1 button and “SCANNING” will be displayed.
5. Perform the scanning process as described on page 3.
6. When a VeriMed ID number is found, an audible chirp will
be heard and the VeriMed ID number will be displayed on
the top line of the LCD and on the second line the
instruction “PRESS F1 TO SCAN” is displayed.
To initiate a new scan session press F1 again.
To scan for a different VeriMed Microtransponder press the F1 button
to clear the previous ID number and to restart the scanning mode.
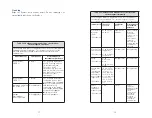
Description
Part Number
VeriChip H2 Reader (1)
600-100313-000
with lanyard and instruction
card attached
Instructions for Use (1)
981-000302-000
Batteries AA (1 set of 4)
303-000014-000
Test Microtransponder (1)
670-000001-000
Bluetooth Receiver (1)
672-000001-000
with related Driver CD (1)
Folder Poster (1)
420-000025-000
Instructional CD (1)
672-000002-000
USB Cable (1)
301-000025-000


