HFp Antenna User’s Guide
Page 7
Element Stack Assembly
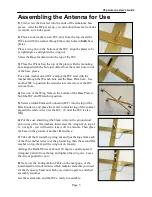
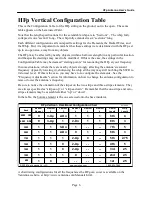
Using the Configuration Table, extend the whip to the correct length for the band. (Remember –
fully collapsed is one “section”.) Screw the whip into the top element.
Screw the bottom element for the band you want onto the base insulator IEC (finger tight, not
wrench tight). Note that the "Bottom" element will always be a One- or Zero-Stripe element, to
keep the high-current node as high in the element stack as possible.
Hint
- For 40 and 80 meters,
you might want to put 2 or 3 elements on the bottom first - the stack can get pretty tall.
Using the threaded inter-element connectors, assemble the remaining elements (all finger-tight) -
then screw the assembled element stack onto the bottom element(s).
IMPORTANT NOTE -
If it is windy, you should use the guy lines to secure the antenna. To do
so, use the Special IEC between two of the upper elements - about head high, or just above, in
the stack. Put the Guy Line lugs on the sleeve of the Special IEC. See the Guy Line details on
Page 9. (We recommend you always do this for 40m and longer configurations, or if you are
going to leave the HFp up for a while… the wind can come up quickly.)
Unwind the radial wires to the proper mark (from the Laminated Card) and stake the spools
down with the provided stakes (or use rocks to weigh them down). You should try to evenly
space the radial wires — place them approximately a 120 degree angles from each other.
Fine Tuning
The best method to fine-tune the HFp is to use one of the portable antenna analyzers. There are a
number of these available from MFJ, AEA, Autek and others. A list comparing the different
models and prices can be found at http://www.eham.net/reviews/products/31.
Set up the HFp, with the extension cable you intend to use to connect it to your radio, and set the
analyzer for a frequency range which includes your target frequency. There should be a null in
the response at or near the target frequency. Adjust the whip to put it right on target.
If the null is out of the whip adjustment range, you will have to re-configure the elements to
bring it closer. Use the techniques in Frequency Adjustments (on Page 8) to change the antenna
configuration to raise or lower the antenna’s frequency. When you get close, use the whip
adjustment to refine the SWR to the best reading.
You can also use your radio to set up the antenna. This is less desirable because it has the
potential to generate some interference to other stations, so you should only use it if you have no
other choice. The procedure is as follows:
1.
Set up the HFp according to the chart for the band of interest.
2.
Set the radio to AM mode, and for SWR indication. If the radio has adjustable power,
use a low power setting.
3.
Transmit a very short carrier at the low end of the band. Note the SWR reading.
4.
Transmit a very short carrier in the middle of the band. Note the SWR reading.
5.
Transmit a very short carrier at the top end of the band. Note the SWR reading.
Ideally, the SWR should be lowest at the middle of the band, and higher toward the top and
toward the bottom of the band. If the SWR is not acceptable in the band, then do the next steps.


