Vent-Axia 496575 Installation And Wiring Instructions Download Page 7


7

FIG. 5: PIR TIMER  

Timer Adjustment 


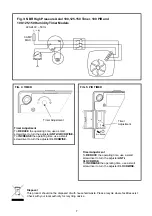
Fig.3: NBR High Pressure Axial 100,125,150 Timer, 100 PIR and  
100,125,150 Humidity Timer Models 


Disposal 

This product should not be disposed of with household waste. Please recycle where facilities exist. 
Check with your local authority for recycling advice 


Timer 
Adjustment 

Timer Adjustment 

To 

REDUCE

 the operating time, use a small 

screwdriver to turn the adjuster 

ANTI-CLOCKWISE. 

To 

INCREASE

 the operating time, use a small 

screwdriver to turn the adjuster 

CLOCKWISE. 


FIG. 4: TIMER  

220-240V ~ 50Hz 

LS 

3 AMP 

MAX 

Timer Adjustment 

To 

REDUCE

 the operating time, use a small 

screwdriver to turn the adjuster 

ANTI-

CLOCKWISE.  

To 

INCREASE

 the operating time, use a small 

screwdriver to turn the adjuster 

CLOCKWISE. 

Summary of Contents for 496575

Page 1: ...R Model 496575 100mm Basic 496576 100mm Timer 496577 100mm Humidity Timer 496578 100mm PIR 496579 125mm Basic 496580 125mm Timer 496581 125mm Humidity Timer 496582 150mm Basic 496583 150mm Timer 49658...

Page 2: ...C Ensure that the mains supply Voltage Frequency and Phase complies with the rating label D The Fan should only be used in conjunction with the appropriate Vent Axia products E The Fan should only be...

Page 3: ...that must comply with the standard requirements of your country to prevent access to the fan s impeller 2 Cut a 107mm diameter hole for 100mm fans a 130mm hole for 125mm fans or a 155mm diameter hole...

Page 4: ...ler rotates and is free from obstructions SETUP WARNING THE FAN AND ANCILLARY CONTROL EQUIPMENT MUST BE ISOLATED FROM THE POWER SUPPLY DURING THE INSTALLATION OR MAINTENANCE NBR High Pressure Axial 10...

Page 5: ...OLLER SWITCH OFF THE MAINS SUPPLY HUMIDISTAT SHOULD ONLY BE ADJUSTED BEFORE OR DURING INSTALLATION 1 Remove the fan grille 2 To INCREASE SET POINT turn the adjuster clockwise This will reduce the inte...

Page 6: ...ned to ensure there is no build up of dirt or other deposits 2 Wipe the inlets and front face with a damp cloth until clean The fan has sealed for life bearings which do not require lubrication Fig 1...

Page 7: ...y for recycling advice Timer Adjustment Timer Adjustment To REDUCE the operating time use a small screwdriver to turn the adjuster ANTI CLOCKWISE To INCREASE the operating time use a small screwdriver...

Page 8: ...nnected to an unsuitable electricity supply The correct electricity supply voltage is shown on the product rating label attached to the unit Has not been subjected to misuse neglect or damage Has not...

Reviews: