


5
NBR High Pressure Axial 100mm PIR
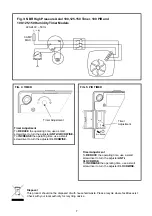
Single speed with PIR (passive infra-red) detector and overrun timer. The fan starts automatically when
a movement is detected and will continue to operate for the set overrun time period. Fig. 1.
The fan can also be wired to a lighting circuit switch. Fig.3. so it can be started by the light switch or the
PIR detector.
TIMER ADJUSTMENT
BEFORE ADJUSTING THE TIMER, SWITCH OFF THE MAINS SUPPLY. TIMER SHOULD
ONLY BE ADJUSTED BEFORE OR DURING INSTALLATION.
1.
Remove the fan grille. The controller is factory set at 15 minutes approx. The overrun
time period can be adjusted from 5-30 minutes by altering the adjuster on the control
PCB.
2.
To REDUCE the operating time, use a small screwdriver to turn the adjuster Fig.5.
ANTI-CLOCKWISE.
3.
To INCREASE the operating time, use a small screwdriver to turn the adjuster Fig.5.
CLOCKWISE.
4.
Replace the fan grille.
NBR High Pressure Axial 100,125 & 150 Humidity Timer
The fan contains an integral humidity controller. In automatic mode the controller switches the fan on at
full speed when the room Relative Humidity (RH) increases. The fan will continue to run until the room
RH falls.
These fans also include a built in timer function. This gives the fan a fixed over run time of approx. 15
mins. The timer can be deactivated by removing the Jumper JP1, (Fig. 6)
HUMIDITY SET-POINT ADJUSTMENT
BEFORE ADJUSTING THE CONTROLLER, SWITCH OFF THE MAINS SUPPLY.
HUMIDISTAT SHOULD ONLY BE ADJUSTED BEFORE OR DURING INSTALLATION.
1.
Remove the fan grille.
2. To
INCREASE SET POINT
, turn the adjuster
clockwise
. This will reduce the internal
Relative Humidity set point at which the fan switches on. (Fig. 6)
3. To
REDUCE SET POINT
, turn the adjuster
anti-clockwise
. This will increase the
internal Relative Humidity set point at which the fan switches on. (Fig. 6)
The integral pullcord activates the internal 15 minute timer. The timer can be cancelled by pulling the
pullcord again. The pullcord can be removed by cutting the cord.
COMFORT MODE (Humidity Timer models only)
The Humidity Timer models include Comfort Mode that can be activated via holding the pullcord for 5
seconds.
This feature delays the LS input boost operation for a maximum of 20 minutes to reduce noise and cold
drafts while bathing. After the LS is disconnected, the fan will switch on for the same period the LS had
been active (up to 20 minutes), plus the overrun time period if selected (0 or 15 minutes).
The LED will slowly blink repetitively (every 4 seconds) during comfort mode lead-in time period. The
LED transitions from blinking to solid LED on when LS boost is activated.
The fans internal Relative Humidity sensor is disabled during Comfort Mode.
This feature resets if there is a power cut.
SPEED SELECTION (Humidity Timer models only)
The fan can be set to run on high or low speed depending on the installation requirements.
The fan is factory set to low speed with jumper JP2 fitted. To activate the high speed setting remove
jumper JP2. (Fig. 6)