


4
country to prevent access to the fan’s impeller. The wall kit used in this installation should
provide a minimum ducting length of 100mm from the fans back plate to the inside of the
external grille).
4.
After installation, ensure impeller rotates freely and the shutters can open.
5.
Replace the grille and ensure the clips engaged.
WIRING
WARNING: THE FAN AND ANCILLARY CONTROL
EQUIPMENT MUST BE ISOLATED FROM THE
POWER SUPPLY DURING THE INSTALLATION / OR
MAINTENANCE.
IMPORTANT
The fan should only be used in conjunction with fixed wiring.
The cross - sectional area of supply cord used should be ranged from 1 -1.5mm
2
.
Cable entry can be made from the rear or side of the fan using the grommet provided.
The extraction fan is suitable for connection to 220-240V 50Hz supply.
The fan is a class ll double insulated product and
MUST NOT
be earthed.
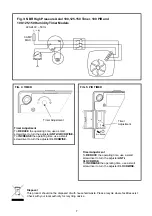
1. Select and follow the appropriate wiring diagram. (Fig. 1,2 or 3)
2. Check all connections have been made correctly and securely fastened.
3. Ensure the impeller rotates and is free from obstructions.
SETUP
WARNING: THE FAN AND ANCILLARY CONTROL
EQUIPMENT MUST BE ISOLATED FROM THE
POWER SUPPLY DURING THE INSTALLATION / OR
MAINTENANCE.
NBR High Pressure Axial 100,125 & 150 Basic
Single speed fan. Controlled by remote switch (e.g. light switch or auto sensor) Fig.1.
NBR High Pressure Axial 100,125 & 150 Timer
Single speed with overrun timer. The fan can be wired to a lighting circuit switch. Fig.3. or wired for a
basic on/off operation wire as Fig 2.
When switched ‘ON’, the fan will operate at full speed and will continue to run for a pre-set time after
the switch is turned ‘OFF’.
TIMER ADJUSTMENT
BEFORE ADJUSTING THE TIMER, SWITCH OFF THE MAINS SUPPLY. TIMER SHOULD
ONLY BE ADJUSTED BEFORE OR DURING INSTALLATION.
1.
Remove the fan grille. The controller is factory set at 15 minutes approx. The overrun
time period can be adjusted from 5-30 minutes by altering the adjuster on the control
PCB. Note the exact min/max time may vary between products.
2.
To REDUCE the operating time, use a small screwdriver to turn the adjuster Fig.4.
ANTI-CLOCKWISE.
3.
To INCREASE the operating time, use a small screwdriver to turn the adjuster Fig.4.
CLOCKWISE.
4.
Replace the fan grille.